This is the first post in a series that will eventually comprise an activity-based, unit pioneering program curriculum.
I. There are numerous terms pertaining to knots and working with rope, but the four presented here, along with some simple “moves” requiring a minimum amount of dexterity, will be useful when learning and applying some of the basics that follow.
OBJECTIVES
- Through hands on experience, Scouts will become familiar with and demonstrate the following knot-tying terminology: running end, standing part, overhand loop, underhand loop.
- Using the materials provided, Scouts will also demonstrate they can tie Half Hitches over an open-ended pole.
MATERIALS
- Suspended horizontal hitching post or similar setup, to accommodate the entire class
- Enough vertical hitching posts (or uprights with a 15-foot attached length of 3/16 or 1/4-inch nylon cord) so there is at least one for every two Scouts
- 6-foot x 1-1/2-inch diameter spar set up as a crossbar with a 6-foot length of 1/2 inch nylon or polyester cord, attached in the middle, to serve as a large visual aid

PROCEDURE A
- With each Scout standing in front of a dangling cord, using the 1/2-inch cord as an illustration, the instructor explains where the running end, and standing part are. Scouts are given an opportunity to point to the corresponding part on their respective cords.
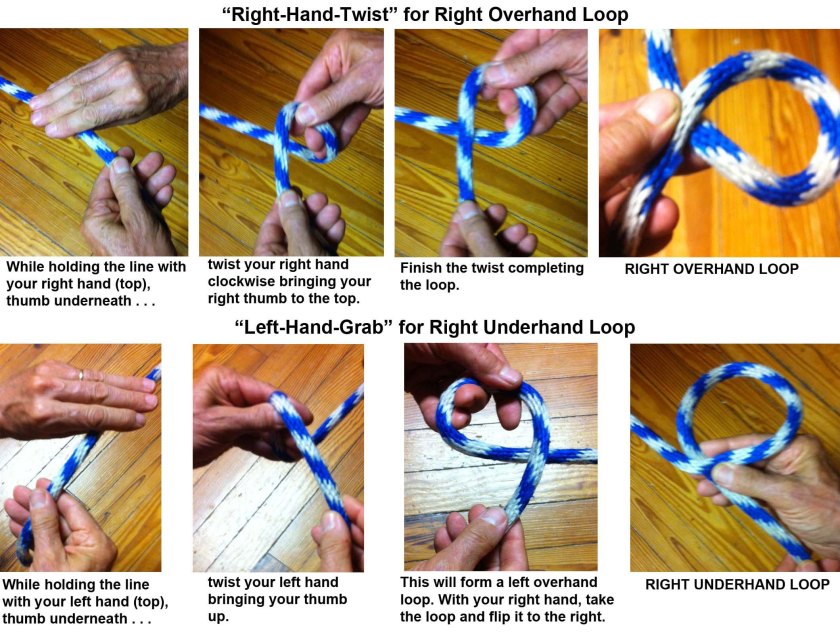
- The instructor explains what an overhand loop is, illustrating the “right-hand-twist.” Scouts review the maneuver and form the loop with their respective cords.
- The instructor explains what an underhand loop is and illustrates the “left-hand-grab.” Scouts review the maneuver and form the loop with their respective cords.
- The instructor calls out each of the above terms in mixed orders and Scouts, race to point to the correct part of the cord, or form the loops in response.


PROCEDURE B
- With Scouts gathering around a vertical hitching post, the instructor demonstrates how, by making an underhand loop, a half hitch can be placed around an open-ended pole. He then demonstrates that many half hitches can be placed around the pole, one on top of the other.
- Pairs of Scouts, each at a vertical hitching post, try to lay half hitches over the top of the pole. Scouts coach one another and further instruction is provided as needed.
- Races are conducted to see how many half hitches can be laid over a pole in 20 seconds.
