

CLICK HERE FOR COLOR PHOTOS AND COMMENTARY.
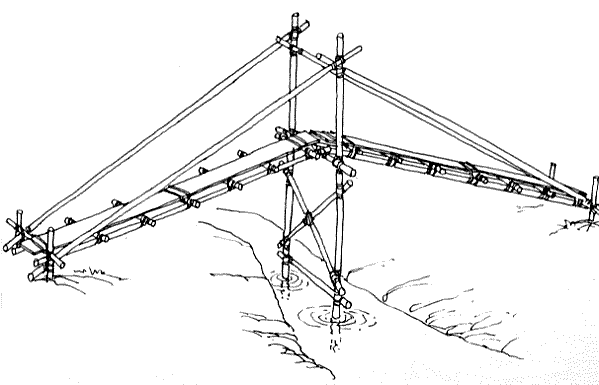
This simple crossing bridge uses only a single trestle and two walkways. The legs of the trestle are extended up above the walkway to provide a way to attach a handrail. The length of the spars listed for the walkways and trestle will be enough to build a bridge that will span a creek or ravine that’s up to 4 feet deep and 18 inches wide.
This project can be broken into three subassemblies: the trestle, the two walkways, and the four light spars for handrails.
Trestle. Begin by building the trestle. The legs for the trestle should be spars that are about 3 inches in diameter and 8 to 10 feet long. When choosing these spars, take into account the depth of the creek you’re crossing.
The distance from the base of the legs to the top ledger (transom) on the trestle should be about 1 foot higher than the level of the banks of the creek. This will allow the walkways to slant up. Then allow an additional 4 feet in height on the legs from the top ledger up to the top of the legs for attaching the handrail.
The top ledger of the trestle should be about 3″ in diameter since it also acts as the transom and carries all the weight of the walkways and the person using it. The bottom ledger can be smaller: a 2 inch diameter spar will work here.

The trestle is assembled with Square Lashings to hold the ledgers and the ends of the cross braces to the legs. The center of the cross braces is lashed together with a Diagonal Lashing.
Walkways. The two walkways are assembled as separate sub assemblies. (Refer to Bridge Walkways.) Be sure to make the cross spar at the end of the walkway long enough to attach to both the stakes and the handrails without getting in the passageway.
Assembly. To assemble the bridge, set the trestle in the center of the creek. Heel in the bottoms of the trestle legs by setting them in holes approximately 4 to 6 inches deep (see Drawing 1). This will prevent the trestle from shifting, and is also a way to level the transom spar as the trestle is set in place so that the walkways are level.
Next, put the walkways in position from both sides and lash the walkways’ underspars to the transom (top ledger) of the trestle. Then drive stakes at the other end of the walkways. Lash the ends of the cross spars on the walkways to the stakes.
Handrails. Finally, handrails are provided to help those crossing the bridge and also add strength to the structure of the bridge. When the handrails are added, they form triangles with the walkway and the trestle leg. These triangles produce a strong structure that prevents the bridge from racking. Lash the handrails to the top of the trestle legs and to the stakes with simple Strop Lashings (see Drawing 2).
List of Materials for a Single Trestle Bridge
- 2 3-inch x 8 or 10-foot trestle legs
- 1 3-inch x 4 -foot trestle top ledger (transom)
- 1 2-inch x 4-foot trestle bottom ledger
- 2 2-inch x 6-foot cross braces
- 4 3-inch x 10-foot walkway lateral spars
- 12 2-inch x 3-foot walkway cross spars
- 4 2-inch x 3-1/2-foot walkway cross spars
- 2 2-inch x 10″ x 10-foot walkway planks
- 4 2-1/2-inch x 12-foot handrails
- 4 stakes
Related articles

I thank you so much for the good work you’re doing for the community. I love scouting so much and I work with the volnarable children and we have a scout club in our organization, please I request you people to be our friends if you receive this massage.