
CLICK HERE FOR SINGLE TRESTLE BRIDGE PROCEDURE, MATERIALS, AND INFORMATION.


CLICK HERE FOR SINGLE TRESTLE BRIDGE PROCEDURE, MATERIALS, AND INFORMATION.

CLICK HERE FOR SINGLE TRESTLE BRIDGE PROCEDURE, MATERIALS, AND INFORMATION.
CLICK HERE FOR SINGLE TRESTLE BRIDGE PROCEDURE, MATERIALS, AND INFORMATION.

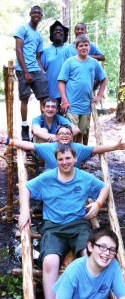
Before we relate this interesting, real-life account, here’s a little about building bridges and Pioneering: To open up the frontier, pioneers built BRIDGES. To this day, the most familiar and most functional of all “larger” pioneering projects are bridges. In the older edition of the Pioneering Merit Badge Pamphlet, pioneering legend Adolph Peschke provides details for five “boy-sized” projects. Four of them are bridges: (Double A-Frame Monkey Bridge, Single Lock Bridge, Single Trestle Bridge, Single A-frame Bridge).
Here are some scanned photos and text from the 1976 printing of the Boy Scout Fieldbook where, again, there is a major emphasis on building bridges:

“With your knots and lashings down pat, you’re ready for one of the most exciting outdoor crafts going: pioneering—building structures of timbers for practical purposes. It tests many skills, including teamwork. Probably your first try ought to be a simple project—but you may get your gang really steamed up by the notion of a bridge to avoid a long walk around a gully, stream, or pond on your campsite. So bridge it!
“LOCK BRIDGES are used for spanning streams with steeply sloping sides. If the stream is narrow, use a single-lock bridge (top right), consisting of two trestles and two roadways. For a wider stream, build a double lock bridge (center) in which the two trestles that are placed in the water are locked into a horizontal trestle that carries the center section of the roadway.
“TRESTLE BRIDGES are used to span fairly wide streams with shallow beds and gently sloping sides. The trestles are of different heights, depending on the depth of the water at various points. The bridge is constructed by placing the first trestle in the water, then lashing two “road bearers” (lateral spars) to the top of it, and anchoring the other end of the bearers to the bank. Other trestles are then placed in the water and connected with more road bearers.”
THE BRIDGE OF FIFTEEN NATIONS
In the preface of his book, Progressive Pioneering, John Thurman tells a story illustrating a modern-day scenario of pioneering in action and how it “saved the day.” Additionally, the account provides a shining example of people from fifteen different countries working very well together to satisfy a common objective:
“SOMETIMES cynical people say, “Why pioneering, anyway?”, “What is the practical application in the modern world?” Well if ever pioneering was justified, the true story that follows surely proves the point. From the very start of Scouting, one overall idea was ‘being prepared’ and I still find that this makes sense, in any country, in any situation, in any age.”
John Thurman goes on to describe exceedingly rainy conditions that prevailed for nine days throughout the training session. With the training at an end, the last day, a September Sunday, was set aside for a special celebration:
“We, that is myself and the members of the Training Teams of fifteen countries of the Americas—North, South, Central, and the Caribbean—had the previous night, at midnight exactly, come to the end of a strenuous, exacting, but very satisfying “Training the Team” Course. The course had been held in the National Training Centre of Mexico, a place called Meztitla. The site was literally hacked out of the jungle, on the lower slope of a considerable mountain range. I had done what I went to Mexico to do and on this Sunday I was relieved of all responsibility and content to be a part of whatever final celebrations the Mexican Scout people planned. The morning was glorious with brilliant sunshine and a fresh and pleasant breeze. The camp looked lovely, although it was a little wet under foot. The flags of fifteen nations flew proudly and unitedly in the centre of the camp. Visitors, many of considerable importance, began to gather; the Mexican Minister of Education, the First Secretary of the British Embassy, the Governor of the State, the Mayor and his supporters, and wives and families, relatives and grandparents of many of those who had taken part in the course.”
In his book, what follows are descriptions of the festivities. It was quite a party with lots of speeches, special presentations, Mexican music, and lots of Mexican food. Then, like it had during the previous nine days, the rain began to fall…and fall, and then really fall. It was one serious downpour, a veritable deluge. John describes that rivers appeared where the paths had been. The only way into camp was a ford across a mountain stream, and this, it was discovered, was already impassable. He writes:
“It steadily worsened; the mountain stream was now a raging torrent, bringing down boulders, tree trunks, and great lumps of what had been the bank. The ford had vanished completely and in front of us was a chasm or ravine about twelve feet deep with a raging torrent tumbling along its new course.
“There was no other way out of camp. We could have stayed and we could have managed, but it would have been hard on the woman and children who were our guests. We could have thrown a foot bridge across the ravine but then they would have been faced with abandoning vehicles and a very long and tiring walk to the nearest habitation.
“Unanimously it was decided that we should build a bridge; not a foot bridge, not a monkey bridge, not an aerial runway, but a road bridge which would carry the vehicles, the equipment, and the people.
“And so began the Saga of the Bridge of Fifteen Nations, for the men of fifteen nations contributed to its building. Mercifully equipment was available and there was a large supply of timber. The hands were willing, experienced, and capable. The men knew their knots and lashings and their basic pioneering.
“Three hours later, as darkness began to cover the area, the first car—a little Renault—gingerly felt its way across the bridge. As it accelerated up the bank on the far side of the ravine, the cheers from the men of fifteen nations were united, vociferous, and heartwarming. We were wet and tired; some of us were bruised and battered, and some had minor cuts, but spirits were never higher. Within the next half hour, every vehicle and every person made their way across the bridge and so onward to Mexico City; perhaps a little later than expected, but Mexico is one of the countries of ‘manana’, so why be concerned about slight errors in punctuality?
“It was truly a memorable day. It was Scouting in action and Scouting in practice. It was good to know that we could build a bridge when a bridge was the only answer. It was even better to know that the men of fifteen nations could work unitedly and effectively to build the bridge.”
![]() The following text is by Adolph E. Peschke as presented in the 1998 printing of the 1993 edition of the Pioneering Merit Badge Pamphlet:
The following text is by Adolph E. Peschke as presented in the 1998 printing of the 1993 edition of the Pioneering Merit Badge Pamphlet:
Pioneering is the knowledge and skill of using simple materials to build structures that are used in a wide range of Scouting activities. These skills are sometimes referred to as “backwoods engineering.”
Down through the ages, people have used ropes, spars, and simple hardware to build bridges, towers, and even their own shelters. In the early development of our country, pioneering methods were used in mining and transportation, to clear the wilderness, and to build roads and bridges. So it is understandable that the term “backwoods engineering” was applied.
The same skills can be used by Scouts to build pioneering projects ranging in complexity from a simple camp gadget to a signal tower.
Whatever the project, the same applied principles of physics, geometry, and math are used to build pioneering projects and structures. But, keep in mind that all the information (in this pamphlet*) is eventually used for a practical, hands-on application—that is, to build something.
Pioneering is a good foundation for many Scouting activities. You must learn, and then use, such disciplines as planning ahead and teamwork. You can also put to use the basic skills learned in rank advancement, such as knot tying.
But most of all, pioneering provides a practical way to experience the joy of accomplishment when you’ve built something that is needed for yourself or others; it can be something that makes living in camp easier and more comfortable. Pioneering can be both fun and challenging when you use your skill and knowledge to choose the right materials (ropes and spars) and build a usable structure.
The basics of pioneering, such as tying knots, making lashings, using rope tackle, constructing anchors, and basic rope knowledge can be done at home. The projects and structures (shown in this pamphlet**) can usually be constructed with materials available at summer camp or at council camping events.
* ROPE-TOSS-LOG-LIFT CHALLENGE
* ROPE FOR PIONEERING AND CAMP USE
* ROUNDTURN WITH TWO HALF HITCHES
* PRUSIK
* WHIPPING
* ANCHORING PIONEERING PROJECTS
* LASHING
* JAPANESE MARK II SQUARE LASHING
** 14′ DOUBLE LADDER SIGNAL TOWER
** DOUBLE A-FRAME MONKEY BRIDGE
CLICK HERE FOR COLOR PHOTOS AND COMMENTARY.
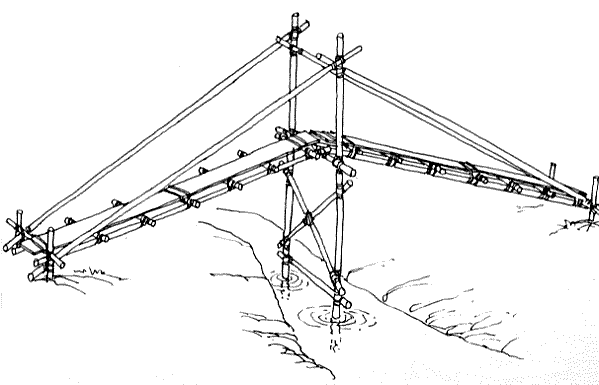
This simple crossing bridge uses only a single trestle and two walkways. The legs of the trestle are extended up above the walkway to provide a way to attach a handrail. The length of the spars listed for the walkways and trestle will be enough to build a bridge that will span a creek or ravine that’s up to 4 feet deep and 18 inches wide.
This project can be broken into three subassemblies: the trestle, the two walkways, and the four light spars for handrails.
Trestle. Begin by building the trestle. The legs for the trestle should be spars that are about 3 inches in diameter and 8 to 10 feet long. When choosing these spars, take into account the depth of the creek you’re crossing.
The distance from the base of the legs to the top ledger (transom) on the trestle should be about 1 foot higher than the level of the banks of the creek. This will allow the walkways to slant up. Then allow an additional 4 feet in height on the legs from the top ledger up to the top of the legs for attaching the handrail.
The top ledger of the trestle should be about 3″ in diameter since it also acts as the transom and carries all the weight of the walkways and the person using it. The bottom ledger can be smaller: a 2 inch diameter spar will work here.

The trestle is assembled with Square Lashings to hold the ledgers and the ends of the cross braces to the legs. The center of the cross braces is lashed together with a Diagonal Lashing.
Walkways. The two walkways are assembled as separate sub assemblies. (Refer to Bridge Walkways.) Be sure to make the cross spar at the end of the walkway long enough to attach to both the stakes and the handrails without getting in the passageway.
Assembly. To assemble the bridge, set the trestle in the center of the creek. Heel in the bottoms of the trestle legs by setting them in holes approximately 4 to 6 inches deep (see Drawing 1). This will prevent the trestle from shifting, and is also a way to level the transom spar as the trestle is set in place so that the walkways are level.
Next, put the walkways in position from both sides and lash the walkways’ underspars to the transom (top ledger) of the trestle. Then drive stakes at the other end of the walkways. Lash the ends of the cross spars on the walkways to the stakes.
Handrails. Finally, handrails are provided to help those crossing the bridge and also add strength to the structure of the bridge. When the handrails are added, they form triangles with the walkway and the trestle leg. These triangles produce a strong structure that prevents the bridge from racking. Lash the handrails to the top of the trestle legs and to the stakes with simple Strop Lashings (see Drawing 2).
List of Materials for a Single Trestle Bridge
