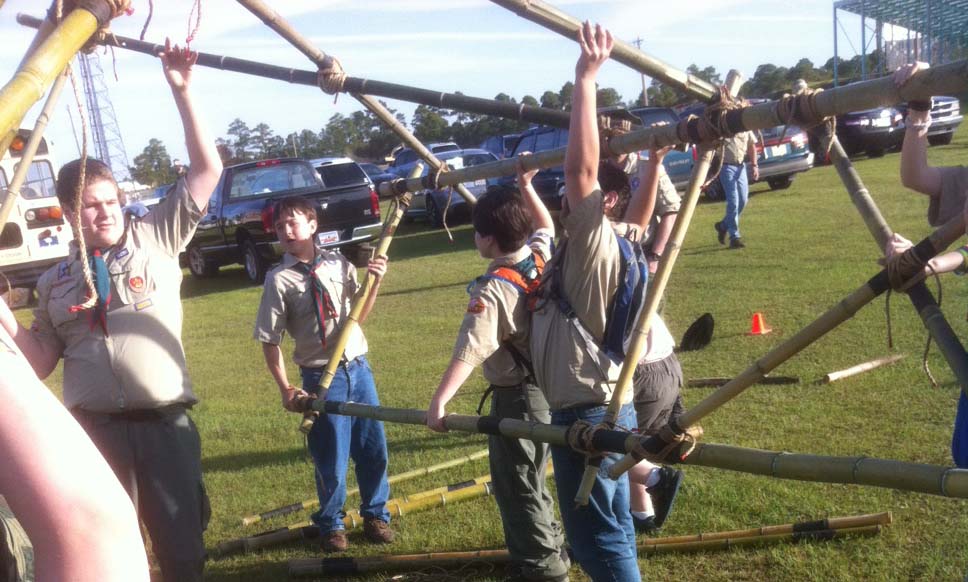
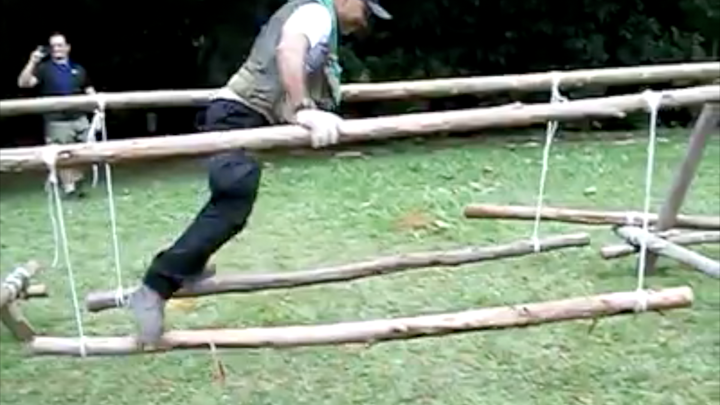
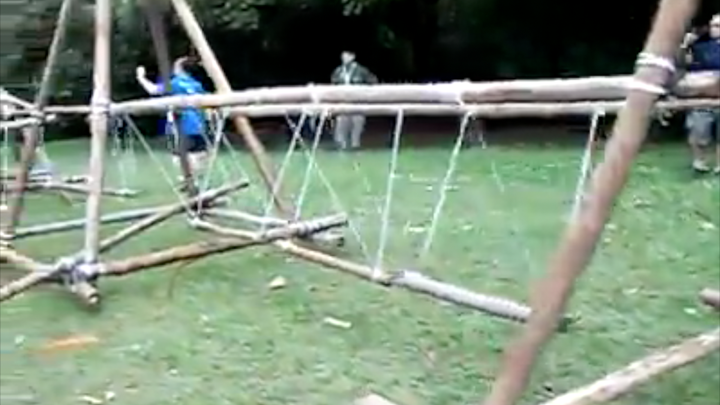
Pioneering projects can be built to serve a practical purpose, as in a bridge connecting two banks of a stream providing a shortcut to the dining hall, or simply for recreation as in a swing boat at a Scout Expo. The most desirable project constructed just for fun is the one that can get a lot of use. The more action it sees, the the more it can be considered a success. The Brazilian Balance Track, so dubbed because it came to our attention in a FaceBook post from the 88º GE / RJ Scout Group Atol das Rocas of Brazil as part of a training given by Chief Jorge Kuma Stotuka, is simply irresistible! Most everyone passing by is going to want to give it a go! For that matter, as revealed in the video, a group of Scouts will literally line up with individual Scouts waiting their turn to get on and see how easy or hard it is to make it from one end to the other.
Racking Turns
Basically, the track consists of four quadpods connected by three ingenious, little challenges. Three of the quadpods also provide their own less daunting challenge. Variations in construction will be determined by the length of the spars connecting the quadpods, in other words, the degree each challenge is more or less demanding hinges on the distance between the quadpods and subsequently the amount of stepping, swinging, and negotiating required to traverse each section.
Here is the basic layout:
• Four 12-foot quadpods with four 8-foot crossbars about 6-inches from the butts, spaced about 10 feet apart • Inside 2nd quadpod: one 8-foot spar lashed to the center of the front and rear crossbars
• Inside 3rd quadpod: one 10-foot diagonal pole connecting the side crossbars
• Inside 4th quadpod: three evenly-spaced 8-foot spars lashed to the outside crossbars
• Between 1st and 2nd quadpod: seven 3-foot ladder rungs, suspended about 1 foot above the ground from two parallel, 12-foot handrails
• Between 2nd and 3rd quadpod: two 8-foot, lengthwise, swinging poles, one for each foot, suspended in two places about 1 foot above the ground from two 12-foot handrails
• Between 3rd and 4th quadpod: three, swinging, 3-foot rungs, each suspended in four places from two 12-foot handrails and lined up so they’re parallel to the handrails about 1 foot off the ground
This small camp table can be comprised almost completely of Scout staves. It is 100% functional and provides a convenient raised surface for personal, patrol, or general use. It’s simple design makes it quick and easy to set up, and it is remarkably stable.
Make the table legs. Start by lashing together four Scout staves into two sets of shear legs with 6-foot manila lashing ropes. If you prefer, square lashings can be used instead of shear lashings. (In lieu of Scout staves, straight poles an inch or so in diameter are just fine.)
Lash on the table top supports. Next, with two square lashings, lash a 2-1/2-foot stick to connect each set of shear legs about 30 inches off the ground. (A Scout stave cut in two is ideal.) This will form two A-frames, one for each side of the table. Make sure each of these support sticks are lashed on straight and at the same distance from the bottom end of both sets of legs.
Securely hold up the A-frames. This is surely the best part. Find the midpoint of a 20-foot line. At about two feet away, tie a clove hitch at the top of one of the Scout staves of one of the A-frames. Repeat this process on the other side attaching the line with a clove hitch to one of the Scout staves of the other A-frame.
Secure each end of the 20-foot line to stakes driven into the ground on either side, about 5 feet away, so the line extends out evenly from each end of this table framework. You can use round turns with two half hitches, taut-line hitches, or rope tackles. Here’s the beauty of this configuration: you can manipulate the distance between the A-frames by adjusting the clove hitches, and provide optimum stability to the table by placing a good, reasonable strain on the line at each stake. It will stand up in an impressively rigid fashion.
Lash on the table top. Finally, lay 12 Scout staves, (or similar poles) side by side, on top of the 2-1/2-foot support sticks, and using binder twine, lash them on with floor lashings.
Before the advent of BSA height restrictions on pioneering projects, the Scout-sized, 14′ Double Ladder Signal Tower was built by Scout units, Scout pioneering crews, and Pioneering Merit Badge classes on a regular basis.
Because it’s such a fine example of Scout Engineering, it has continued to be a feature in the Pioneering Areas of the national jamborees.
At this time, with the proper consideration and review from the Council Risk Enterprise Management Committee, in conjunction with the assurance the construction process will be carried out correctly and in accordance with pioneering safety guidelines, a structure like this that is taller than 6 feet can once again be built and climbed upon during Scouts BSA resident camp.
12′ Scout Swing Seeing Action at a Public Scout Expo
The design for this swing is not complicated, though it does present some logistical challenges. The main thing is, a working swing is going to get lots of play. Therefore, lashings need to be super tight, and the eight sturdy pioneering stakes that serve as anchors need to be driven solidly into the ground, perpendicular to and touching the six spars connecting the legs.
List of Materials
six 3-1/2-inch x 12-foot spars for the legs
one 4-inch x 12-foot spar for the crossbar
six 3-inch x 6-foot connecting spars
eight 3-foot pioneering stakes
two 2-inch x 8-inch x 2-foot prepared swing seats
four 20-foot x 1/2-inch swing ropes
four steel rings
four 6-foot x 5/8-inch ropes for Prusiks
twenty 15-foot x 1/4-inch manila lashing ropes
six 20-foot x 1/4-inch manila lashing ropes
two single pulleys reeved with 20 feet of rope, with a small loop of rope tied to the top
one eight-foot ladder
Though one might think this structure is built by making two simple tripods to support the crossbar, it’s MUCH better to make two A-frames, standing up vertically, supported by a third spar lashed to one leg of each A-frame, slanting down to the ground. The obvious reason is to give the crossbar maximum stability where it rests at the juncture of the two legs of each vertical A-frame.
Prepared Swing Seats
Rig the swing seats. Attach two 20 foot swing ropes to the two swing seats, using a scaffold hitch rigged with a bowline. In order to accommodate the swing rope with the scaffold hitch, the swing seats should be prepared with impressions cut on each side, 2 inches long and 1/2 inch deep, beginning 1-1/2 inches from each end.
Attach the rings to the crossbar. Using the 6-foot ropes, tie the steel rings to the crossbar with prusiks at intervals as per the measurements reflected in the diagram.
Prepare the A-Frames. Using two 12-foot spars and one 6-foot spar, with tight square lashings, lash together two identical A-frames making sure the tips of the legs cross the same distance from the top for each. Use a 20-foot rope where the tips of the legs intersect, and 15-foot ropes at the bottom. NOTE: Make sure the 6-foot connecting spars are lashed low enough to the bottom so later on there will be plenty of room to lash them to the pioneering stakes.
Add the oblique supporting legs. About a foot or so below the top lashing on the A-frames, lash on a third 12-foot spar to one leg of each A-frame, using 20-foot ropes. These spars will be angled down, extending out to support the A-frames in their vertical positions.
Connect the legs. Stand up the A-frames so they’re in a vertical position. Connect the 12-foot oblique supporting leg to the legs of each A-frame, using the remaining 6-foot spars and eight 15-foot ropes. Again, make sure they’re lashed low enough to the ground so later on there will be plenty of room to lash them to the pioneering stakes. (If you’ll be using the pulleys to lift up the 12-foot crossbar, loop one over the top of a leg, before standing up the A-frames.)
Position the two 3-legged subassemblies. Line up both support assemblies so they are facing one another on even ground and with the A-frames 10 feet apart.
Position the crossbar. Tie one end of each pulley rope to the ends of the crossbar, and have two Scouts carefully hoist the crossbar up to near the tops of the A-frames. They must carefully hold it in place. Position the ladder so that it’s even with one A-frame, and have a strong Scout climb about four to five feet up and lift the end into the crux of one A-frame. Repeat the process on the other side of the swing.
Lash on the crossbar. Making sure the rings are properly hanging down, and the crossbar is extending out approximately one foot from each side, one Scout will climb up and tightly lash the crossbar to one of the legs of each A-frame with a 20-foot rope.
Tie on the swings. One Scout will climb up and connect the swing ropes to the rings using a roundturn with two half hitches, making sure the swings hang evenly at the desired height.
Drive in and lash on the anchors. Four pioneering stakes are driven into the ground on each side—two spaced evenly and touching the bottom of each A-frame, and one against each connecting spar, hammered in near the oblique supporting leg. After these stakes are solidly in the ground, so they cannot jiggle, lash them to the connecting spars using 15-foot ropes.
Test the swing and make any adjustments as necessary.
Using the 14′ Double Ladder Signal Tower as a point of reference, here are the plans for a very tall campsite gateway that stands out (and up) and serves as an impressive feat of Scout engineering. One of the perks included in this project is it provides an opportunity for new Scouts to experience hoisting a “boy-sized” structure replete with their own special colors e.g. their patrol flags.
Since this 14-foot structure isn’t climbed on, the spars can be considerably thinner in diameter. Bamboo is ideal. Lashing on those flags attached to each corner creates a spectacular effect and hence the name “4 Flag Tower!”
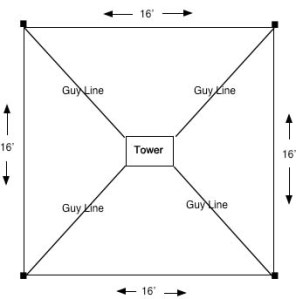
14′ Tower Gateway Schematic / Gateway to a Scout Expo Photo
Note: This design is not self-standing. Therefore, using it as a gateway at a camporee or Scout Expo with the necessary guylines requires an area wide and deep enough to accommodate a 16 x 16-foot space.
Scouts lash together a 4′ Side.
Materials Needed:
four 2-1/2 to 3-inch x 14-foot leg spars
six 2-inch x 8-foot X-brace spars
four 2-inch x 6-foot X-brace spars
four 2-inch x 6-foot support spars
six 2-inch x 4-foot leg spreader
forty-five 15-foot x 1/4-inch lashing ropes
four 25-foot guylines
eight 24-inch pioneering stakes
Assemble the 4-foot sides. Begin by laying out two pairs of 14-foot spars for the tower legs, side by side, 3 and 1/2 feet apart. Be sure the butt ends are even at the bottom so the tower will stand up straight.
NOTE:All lashings need to be very tight.
Diagram 1
Lash the legs together starting with a 4-foot bottom leg spreader about 6 inches up from the butt ends. Lash on a 4-foot middle leg spreader in the middle of the 14-foot legs (7 feet up), and a 4-foot top spreader about 3 inches from the top of the 14-foot legs.
When the legs are joined with the three 4-foot spreaders, lash on two 6-foot X-brace spars using square lashings to lash the ends to the legs, and a diagonal lashing where they cross, forming a trestle in the bottom half of the legs (see diagram 1). Three of the ends are lashed to the outside of the legs, and one on the inside, so that a slight gap is created where they cross. As the diagonal lashing begins, this gap will be cinched together with the timber hitch. Repeat the whole process with the other two 14-foot legs.
Diagram 2
Join the 4-foot sides. Turn both sides up horizontally, parallel to one another about 5 and 1/2 feet apart. Make sure the bottoms are even.
Lash on one of the 6-foot support spars directly above the 4-foot middle spreader (see diagram 2).
Lash another one of the 6-foot support spars directly under the 4-foot side spreader at the very top.
Lashing the X Braces with a Diagonal Lashing.
Now, lash on two of the 8-foot X brace spars diagonally between the two 6-foot supports using square lashings to lash the ends to the legs, and a diagonal lashing where they cross forming a trestle in the top part of the wide (6-foot) side (see diagram 2). Three of the ends are lashed to the outside of the legs, and one on the inside, so that a slight gap is created where they cross. As the diagonal lashing begins, this gap will be sprung together with the timber hitch.
Lash the other side. To make the lashings on the other side, you have to get the whole crew together to carefully lift and roll the tower over 180° so that it’s laying on the X-brace, and the other sides of the 4-foot sides are easier to get to.
Repeat the same procedure as before.
Scouts carefully lift the structure and rotatie it 180° to lash the other side.
Lash on the middle X-brace. This X-brace is what will keep the four sides from racking. Lash the two remaining 8-foot X brace spars diagonally across the legs just under the 4-foot middle leg spreader (see Tower Gateway Schematic on the top of this page). Use square lashings to lash them to the legs and a diagonal lashing where they cross. To accomplish this, some crew members will have to hold up the top of the tower so that there is better access to all four ends of the 8′ X brace spars.
Lash on the flags. If you want a flag or flags to fly from the top of the tower, lash the flagpole(s) to the top of each tower legs using a couple of tight round lashings.
Tower Gateway Layout
Anchors and guylines. When all the lashings are done, move the tower to where it will be hoisted. Before actually hoisting the tower, lay out the position of the four legs on the ground. Then determine where the four anchors for the guylines will be placed to steady the legs of the tower.
Using the pioneering stakes, build four 1-1 anchors. Each should extend 16 feet, 45° out from the leg.
NOTE: Make sure the flags are unfurled before hoisting the tower.
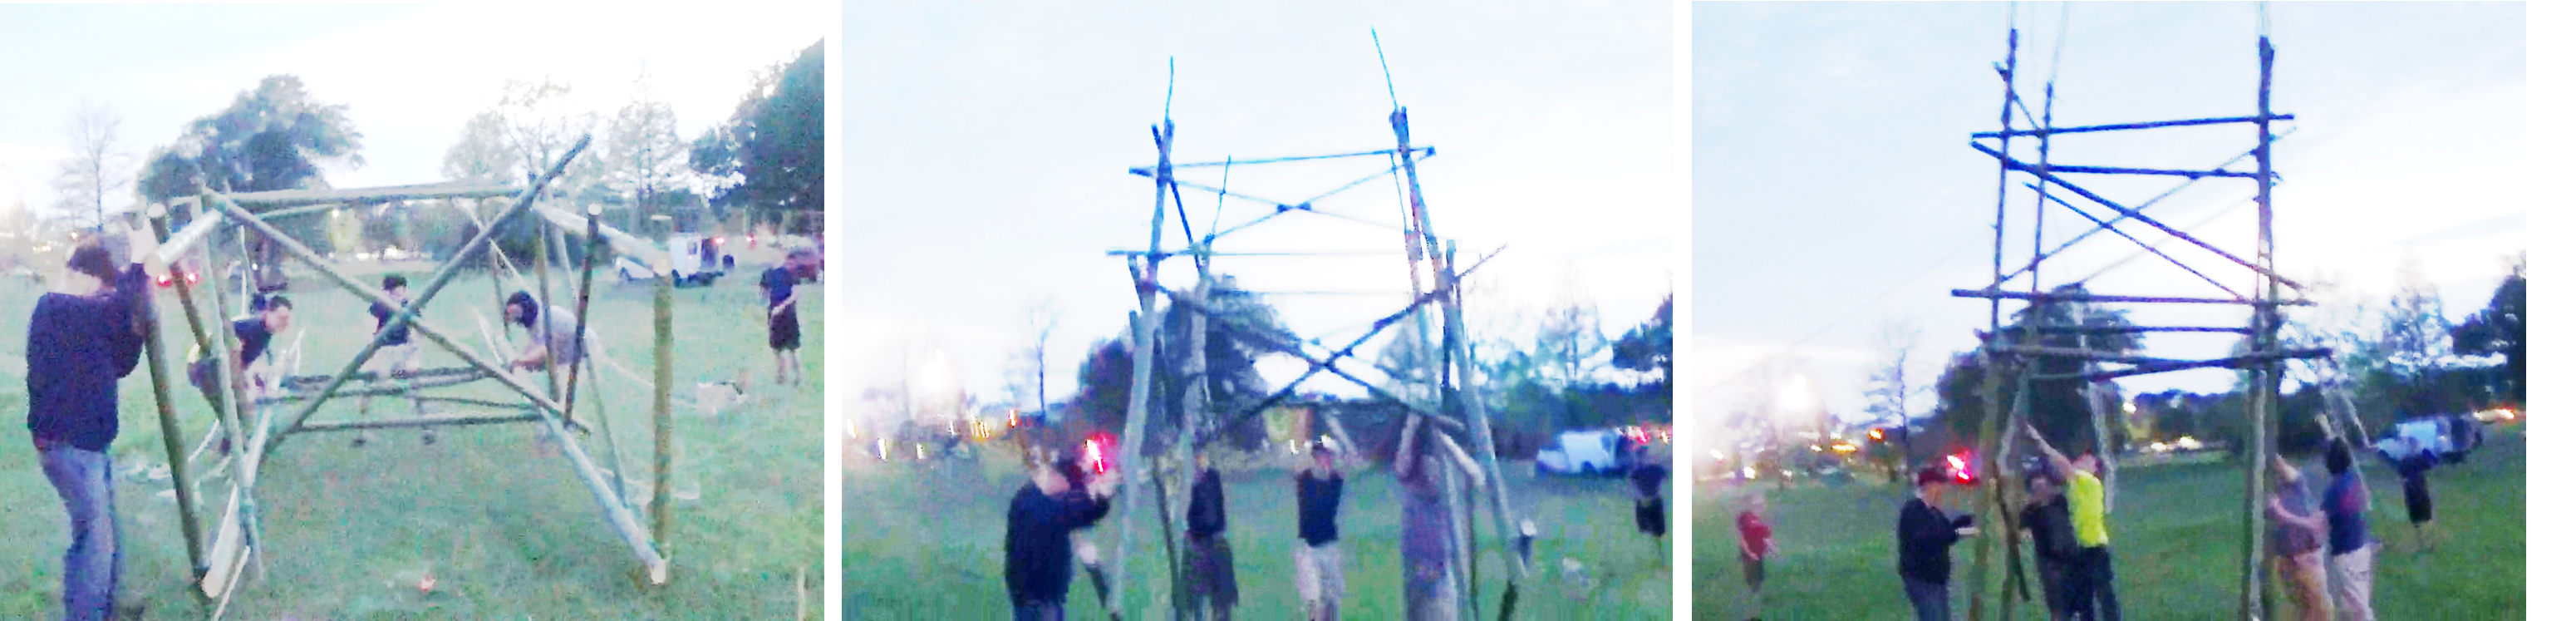
Hoisting the tower. You’ll need a whole crew to do the hoisting. Get ready to hoist the tower by delegating the following:
One signal caller who tells the crew members when and how fast to pull on the ropes.
One safety officer who observes for all safety considerations and signs of trouble during the hoisting.
Four Scouts to serve as “Lifters” to lift the top 6′ support spar that’s on the ground. Their job is to first left and then push the tower up.
Two Scouts, one on each of the 2 guylines attached to the legs, to make sure the tower isn’t over pulled and topples over
Four “Pullers” who will use the two guylines as hoisting ropes to pull the tower until it is standing
We did it!
When everyone is in position, the signal caller should direct the Scouts on the hoisting ropes (the pullers) to hoist the tower into position, while the lifters start lifting. Care should be exercised not to over pull the tower.
As soon as the tower is standing, four Scouts should temporarily tie the guylines to the anchors using a roundturn with two half hitches.
Heeling the tower. If the tower is uneven, you can heel the the butt ends of the legs 4 to 6 inches deep as needed to make it more level.
Tighten the guylines. As soon as the tower is in position, go to each of the anchors and untie the Roundturn with Two Half Hitches and replace it with a rope tackle. Use the rope tackles to hold the tower steady, by gradually applying strain to each of the four guylines at the same time. Do this by tying a butterfly knot in each guyline about 6 to 8 feet from the anchor. Then wrap the running end of the guyline around the forward stake of the anchor and back through the loop in the butterfly knot. When rope tackles are tied to all four anchors, gradually tighten the lines. Apply enough strain to each of the guylines to hold the tower firm and in a vertical position. Then tie off the rope tackles and secure the running ends with half hitches.
Hoisting a Larger Version: 17′ high x 8′ wide x 6′ deep
You’ve got to love this design. It’s compact, it’s sturdy, and it’s ingenious!
This drying rack is based on suspending two concentric, equilateral triangles to make six cross sections for hanging wet clothing or towels during a long term encampment, and there’s no reason you can’t put it up on an overnighter if there’s a practical need. All that’s been said before regarding the advantages of this kind of campsite improvement apply to this simple camp gadget:
It takes up less space while drying more wet things.
It eliminates the clutter of clothing and towels haphazardly strewn around on tables, tree branches, tent platforms, or overcrowded on a disorganized array of drooping clothes lines.
It can be set up in a location where there is the most sunshine.
It’s especially useful when camping in an open area with few trees.
Materials (adapt these as you like)
three 4-foot x 1-inch sticks
three 5-foot x 1-inch sticks (Scout staves are ideal)
one 6-foot x 1-1/2 to 2-1/2-inch straight pole for the upright (or an additional 5-foot Scout stave)
one 30-inch pioneering stake
eight camp gadget lashing ropes (6 to 10-foot)
three 15-foot lashing ropes
three small stakes
Two Equilateral Triangles
Procedure
Lash the triangles. Start by lashing together two equilateral triangles, one smaller for the top (three 4-foot sticks), and the larger one for the bottom (three 5-foot staves). Use square lashings. One easy way is to lash two at 90° and then bend them in and tie the third square lashing to make the triangle. This yields a nice, tightly-lashed triangle, (but be careful you’re not putting too much stress on the ropes and poles when preparing to apply the third lashing).
Pioneering Stake
Erect the upright. Pound in a pioneering stake and lash the 6-foot pole to it securely with two tight strop lashings or round lashings. Making this upright stand up vertically without moving or wobbling at all is a key to a good and sturdy clothing dryer. So, solidly pound in the stake and make sure it’s as straight as possible. Also, make sure the lashings are well-tied and tight.
—> ALTERNATIVE APPROACH: A clothes drying rack can be erected without having to either pound in a stake or sink the center pole, by using the same principle as when erecting a flagpole. The key is using the support ropes as guylines. SEE PHOTO.
Rolling Hitches
Attach the triangles. Lay the triangles on the ground over the upright, first the larger triangle, and then the smaller one on top.
Tie each corner of the smaller triangle to a support rope so it will be suspended about 5 feet above the ground. Use clove hitches which can be adjusted as necessary to assure the triangle hangs evenly and the 4-foot sticks are horizontal. Continuing with each of the three support ropes, repeat this process for the larger triangle so that it will hang about 4 feet above the ground.
Clove Hitch
Taut Line Hitch at Stake
Anchor the support ropes. Hammer in a small stake a foot or so out, in line with each corner of the bottom triangle. Using the remaining length of the support ropes, attach them to the stakes with a simple taut-line hitch. This will further stabilize the clothing dryer and enable you to make fine-tune adjustments to the way the triangles lay. (You can also just make them fast to the stakes with a roundturn with two half hitches, or another clove hitch.)
An assembled clothes drying rack at the 2013 Jamboree gets the once over.
Before we relate this interesting, real-life account, here’s a little about building bridges and Pioneering: To open up the frontier, pioneers built BRIDGES. To this day, the most familiar and most functional of all “larger” pioneering projects are bridges. In the older edition of the Pioneering Merit Badge Pamphlet, pioneering legend Adolph Peschke provides details for five “boy-sized” projects. Four of themare bridges: (Double A-Frame Monkey Bridge, Single Lock Bridge, Single Trestle Bridge, Single A-frame Bridge).
Here are some scanned photos and text from the 1976 printing of the Boy Scout Fieldbook where, again, there is a major emphasis on building bridges:
Three Walkway Bridges
“With your knots and lashings down pat, you’re ready for one of the most exciting outdoor crafts going: pioneering—building structures of timbers for practical purposes. It tests many skills, including teamwork. Probably your first try ought to be a simple project—but you may get your gang really steamed up by the notion of a bridge to avoid a long walk around a gully, stream, or pond on your campsite. So bridge it!
“LOCK BRIDGES are used for spanning streams with steeply sloping sides. If the stream is narrow, use a single-lock bridge (top right), consisting of two trestles and two roadways. For a wider stream, build a double lock bridge (center) in which the two trestles that are placed in the water are locked into a horizontal trestle that carries the center section of the roadway.
“TRESTLE BRIDGES are used to span fairly wide streams with shallow beds and gently sloping sides. The trestles are of different heights, depending on the depth of the water at various points. The bridge is constructed by placing the first trestle in the water, then lashing two “road bearers” (lateral spars) to the top of it, and anchoring the other end of the bearers to the bank. Other trestles are then placed in the water and connected with more road bearers.”
THE BRIDGE OF FIFTEEN NATIONS
In the preface of his book, Progressive Pioneering,John Thurman tells a story illustrating a modern-day scenario of pioneering in action and how it “saved the day.” Additionally, the account provides a shining example of people from fifteen different countries working very well together to satisfy a common objective:
“SOMETIMES cynical people say, “Why pioneering, anyway?”, “What is the practical application in the modern world?” Well if ever pioneering was justified, the true story that follows surely proves the point. From the very start of Scouting, one overall idea was ‘being prepared’ and I still find that this makes sense, in any country, in any situation, in any age.”
John Thurman goes on to describe exceedingly rainy conditions that prevailed for nine days throughout the training session. With the training at an end, the last day, a September Sunday, was set aside for a special celebration:
“We, that is myself and the members of the Training Teams of fifteen countries of the Americas—North, South, Central, and the Caribbean—had the previous night, at midnight exactly, come to the end of a strenuous, exacting, but very satisfying “Training the Team” Course. The course had been held in the National Training Centre of Mexico, a place called Meztitla. The site was literally hacked out of the jungle, on the lower slope of a considerable mountain range. I had done what I went to Mexico to do and on this Sunday I was relieved of all responsibility and content to be a part of whatever final celebrations the Mexican Scout people planned. The morning was glorious with brilliant sunshine and a fresh and pleasant breeze. The camp looked lovely, although it was a little wet under foot. The flags of fifteen nations flew proudly and unitedly in the centre of the camp. Visitors, many of considerable importance, began to gather; the Mexican Minister of Education, the First Secretary of the British Embassy, the Governor of the State, the Mayor and his supporters, and wives and families, relatives and grandparents of many of those who had taken part in the course.”
In his book, what follows are descriptions of the festivities. It was quite a party with lots of speeches, special presentations, Mexican music, and lots of Mexican food. Then, like it had during the previous nine days, the rain began to fall…and fall, and then really fall. It was one serious downpour, a veritable deluge. John describes that rivers appeared where the paths had been. The only way into camp was a ford across a mountain stream, and this, it was discovered, was already impassable. He writes:
“It steadily worsened; the mountain stream was now a raging torrent, bringing down boulders, tree trunks, and great lumps of what had been the bank. The ford had vanished completely and in front of us was a chasm or ravine about twelve feet deep with a raging torrent tumbling along its new course.
“There was no other way out of camp. We could have stayed and we could have managed, but it would have been hard on the woman and children who were our guests. We could have thrown a foot bridge across the ravine but then they would have been faced with abandoning vehicles and a very long and tiring walk to the nearest habitation.
“Unanimously it was decided that we should build a bridge; not a foot bridge, not a monkey bridge, not an aerial runway, but a road bridge which would carry the vehicles, the equipment, and the people.
“And so began the Saga of the Bridge of Fifteen Nations, for the men of fifteen nations contributed to its building. Mercifully equipment was available and there was a large supply of timber. The hands were willing, experienced, and capable. The men knew their knots and lashings and their basic pioneering.
“Three hours later, as darkness began to cover the area, the first car—a little Renault—gingerly felt its way across the bridge. As it accelerated up the bank on the far side of the ravine, the cheers from the men of fifteen nations were united, vociferous, and heartwarming. We were wet and tired; some of us were bruised and battered, and some had minor cuts, but spirits were never higher. Within the next half hour, every vehicle and every person made their way across the bridge and so onward to Mexico City; perhaps a little later than expected, but Mexico is one of the countries of ‘manana’, so why be concerned about slight errors in punctuality?
“It was truly a memorable day. It was Scouting in action and Scouting in practice. It was good to know that we could build a bridge when a bridge was the only answer. It was even better to know that the men of fifteen nations could work unitedly and effectively to build the bridge.”
As stated by John Sweet in Scout Pioneering, “The chariot race originated at Gilwell in the early days of Leader Training and for many years was used on every Scout Wood Badge Course as a classic demonstration of B.P.’s method in action:
the Patrol as the unit of activity
the immediate application of newly acquired skills (Square Lashing, Diagonal Lashing)
the construction of a basic unit in mainline pioneering (the trestle)
light-hearted competition between Patrols”
The classic chariot race has been run in a variety of ways. This one uses an H-Frame Trestle, which is the basic component of many pioneering projects. For that matter, in pioneering circles when we refer to a trestle, we mean the H-Frame, so there should be no confusion. As stated, there are a variety of ways to run a chariot race. One thing to note: depending on how the chariot is transported, it can be hard on turf, so think twice before dragging it on a nice lawn! That’s the very reason why one way to run it is to have the rider hold on as the trestle is literally picked up and carried by at least four patrol members. Many times, when the chariot is dragged, the “charioteer” simply stands on the ledger and holds onto the transom, as patrol members grab onto any part of the trestle they can reach. But, to imitate an actual chariot to the fullest extent, the rider should grab a hold of a rope serving as the “reins” while two other Scouts act as “wheels” keeping the chariot upright, as patrol members pull the chariot like horses using two hauling lines tied to the transom at each leg.
From: Scout Pioneering – Patrols in Action, by John Sweet
This interpatrol activity can be presented indoors or outdoors. If indoors, and the trestle is dragged, care should be taken to avoid scuffing the floor of the church fellowship hall or damaging the carpet. The following is furnished for each patrol:
Materials (Heavier Version)
two 8-foot x 2 to 3-inch diameter spars for the legs
four 6-foot x 2 to 3-inch diameter spars for the ledger, transom, and cross braces (The ledgers can be 4 to 6 feet in length.
nine 15-foot lashing ropes
one 10-foot lashing rope for the reins
two 15-foot lashing ropes for the hauling lines
Materials (Light Version)
six Scout Staves
nine lashing ropes (6 feet will do for the 8 square lashings and a 10-footer for the diagonal lashing)
one 10-foot lashing rope for the reins
two 15-foot lashing ropes for the hauling lines
See Note 1 and 2. Adjust the angles between the ledger and the legs so they are less than 90º and make sure the width between the legs at the ledger is narrow enough so the charioteer can plant his feet right next to the legs.
Note 1: When using Scout Staves (Light Version), it will be necessary to angle the legs inward from the ledger to the transom. When the angle between the legs and the ledger is less than 90º, the lashings are much less likely to slip down over the smooth surface of the Scout Stave. That will mean, the distance between the legs where the transom is to be lashed will need to be less than the distance between the legs where the ledger is to be lashed.
Note 2: Since the Scout Stave comprising the ledger will bow and possibly break if the feet of the charioteer are not planted as near as possible to the legs, it is necessary to lash the ledger to the legs at a width that will correspond comfortably with the size of the charioteer.
On signal, each patrol will build a trestle as per the above drawing. As soon as their “chariot” is built and they have selected a “charioteer” (usually their lightest member), two members to hold the trestle upright, and their “horses,” they run a specified course or race to a turn-around-line and back to where they started.
Note: A Mark II Square Lashing can be used to spring the spars together at the X-brace, in lieu of a diagonal lashing.
Single Lock Bridge Photo Scanned from 1967 Field Book
The following text is by Adolph E. Peschke as presented in the 1998 printing of the 1993 edition of the Pioneering Merit Badge Pamphlet:
The single lock bridge shown here is a well-established and basic design. The list of spars shown for this project should build a bridge to span a creek or ravine approximately 4 feet deep and 18 feet from bank to bank.
Trestles. The bridge consists of two trestles and two walkways. Begin by building the two trestles as subassemblies. Adjust the length of the spars for the trestle so that when they are placed in the creek, as shown in Drawing 2, the tops of the ledgers will be about 1 foot above the level of the banks of the creek. This will give a comfortable slant to the walkways.
Drawing 1: Trestle Schematic
When constructing the two trestles, build only one trestle first. Then as the second trestle is being built, make sure that the legs are narrower at the top and fit between the legs of the first trestle (see Drawing 1).
Walkways. Next, the two walkways are constructed as subassemblies. Each walkway consists of two lateral spars. six cross spars, and two longer cross spars. One of these two longer cross spars is used as an underspar at the end of the walkway that is attached to the transom. The other longer cross spar is used to attach to the stakes. (Refer to Bridge Walkways.)
Drawing 2: Interlocking Trestles
Assembly. After building the trestles and walkways, take them to the assembly site (the creek or ravine). Place the trestles in the center of the creek so that the tops of the trestles are interlocked (see Drawing 2). Then lift a 3-inch diameter transom spar to fit on top of the interlocked trestle legs. Now, heel in the bases of the legs in holes 4 to 6 inches deep. As you’re heeling in the legs, level the transom spar so that the walkways don’t slant when they’re added.
Next, the two walkways are put into position (see Drawing 3). Lash the underspars on the walkways to the transom spar with Strop Lashings at three points. Finally, the cross spars at the ends of the walkways are lashed to the stakes.
By lashing the walkways to the transom spar and lashing the ends of the walkways to the stakes, you make a complete walkway unit that will prevent movement and provide a sturdy bridge deck.


 • Inside 2nd quadpod: one 8-foot spar lashed to the center of the front and rear crossbars


 Attach the rings to the crossbar. Using the 6-foot ropes, tie the steel rings to the crossbar with