Chariot races are fun and here’s about the easiest version around. Once Scouts are familiar with the shear lashing and square lashing, they can make an A-Frame to serve as a simple carrying structure (chariot). The race can be run in a variety of ways:
The Simple Pick Up and Carry Approach
Pick up the chariot and carry it (advisable if the playing field is a well-cared for lawn)
Drag the chariot (works well in wide open fields)
Run relay-style heats on a short course (where space is limited)
Lay out a longer course
Materials for each Patrol
two 8-foot x 4-inch spars for the A-frame legs
one 6-foot x 3-inch spar for the ledger
three 15-20-foot x 1/4-inch manila lashing ropes
Shear Lashings are Applied to the Tips of the Legs
Procedure Patrols discuss their plan of attack. It’s decided who is to tie what lashings, who is to assist, who will ride and who will carry (or drag as conditions dictate).
A-Frames are Formed
On signal, patrols lash together an A-frame using a shear lashing at the tips of the 8-foot spars and square lashings at the butt ends for the 6-foot ledger. (If desired, three square lashings can be tied.) When the chariot is built, it is raced around a preset course or to a turn around line and back.
Positioning the Trestle and Lashing both Walkway Underpars to the Trestle TransomDriving in the Pioneering Stakes / Lashing the Walkways to the StakesLashing the Handrails to the Trestle LegsSingle Trestle Bridge Built Over a Shallow Creek at Camp Coker, Society Hill, SC
Though there have been some changes and modifications through the years, in most respects, pioneering in the Boy Scouts remains constant. Why Pioneering!
The following text has been extracted from the Introduction to the 1981 Printing of the 1974 Revision of the BSA Pioneering Merit Badge Pamphlet. Most of the action photos have been scanned from the Pioneering Projects section. (Many are also featured in the GREAT 1976 printing of the 1967 revision of the Boy Scout Field Book.)
Crossing a Stream on an X-frame Monkey Bridge!
Remember Robinson Crusoe? He was the guy who was shipwrecked on a desert isle and managed to survive. Of course he was lucky—he salvaged a lot of useful equipment. But his story makes you wonder what you’d do if the same thing happened to you.
Have you ever thought what you’d like to have if you found yourself all alone in a wilderness with no chance of escape? So let’s make the problem easier—you can choose just one item, one “tool,” to take with you.
Interlocking the Trestles on a Single Lock Bridge!
Only one tool? Impossible, you may think. The guys who have this merit badge would be very likely to choose rope. For with it anyone skilled in the outdoor arts of pioneering can build many useful things.
It’s one of the oldest tools we know. Thousands of years ago, primitive men twisted vines or plant fibers to make rope that they used to attach handles to their simple tools. Ropes were used in building the pyramids.
Lashing on Walkway Cross Spars!
In Central and South America, Indian tribes were crossing deep valleys on rope suspension bridges long before the first explorers arrived from Europe. And with the help of rope our own pioneers could, when they had to, build a temporary bridge that would enable woman and children to cross a stream safely. They could build a raft to carry a winter’s catch of fur to market.
Take a look at this pamphlet, and you’ll discover why rope would be a good “tool” to have in the wilderness. Everyone of the requirements depends on rope. Pioneering, in the Scout sense, means being able to construct a great variety of things with poles and rope. In order to build a bridge without nails or a tower without bolts, the builder needs ropes—plus the knowledge of how to use them. Most pioneering is concerned with lashing poles together to make something—usually temporary—that makes living in the outdoors a little easier.
In pioneering, the use of knots and lashings is of supreme importance. A wrong knot, an insecure lashing, or a weak rope could lead to disaster. Did you know, for example, that tying a Bowline in a rope cuts its efficiency by 40%? And that a Square Knot reduces the rope’s efficiency by 50%? Which means that it’s only half as strong as an unknotted rope. Knots, turns, and hitches weaken a rope by forming a bend that distributes the load on the fibers unequally.
Lashing on Walkway Floor Spars.
All this knowledge comes in handy in pioneering—but our wilderness has shrunk so much that the average troop no longer can go into the woods and cut the trees needed for building a rope-lashed tower. However, there are isolated areas where Scouts might get permission to clear out some trees, and the thinning might make the ones left standing grow better. A troop that can acquire poles this way should keep them perhaps on a campsite—and use them over and over.
–
–
Lashing Together a 24′ Signal Tower Side!
Most often the best bet for anyone who wants to learn pioneering is summer camp. Here there will be the poles, the ropes, and—just as important—someone with the skills to teach you how to make Square Lashings, Diagonal Lashings, and Shear Lashings. Ever hear of a parbuckle? Can you tie the required 10 knots and explain their use? The best way to learn is by observing someone who already knows.
Our pioneers were good at improvising. They had to be. Without being able to improvise they never could have settled the wilderness., built bridges and houses, and turned it into the comfortable communities we live in today. Scouts who want to try their hands at pioneering will learn to improvise—and will be using some basic engineering principles that still have plenty of applications.
Hoisting a 24′ Signal Tower!
For example, engineers working in mountainous areas often use rope conveyers in preference to rigid railways. The aerial cableway used in the construction of the Hoover Dam in Colorado consisted of six steel-wire ropes crossing a 1,256-foot span. The “bucket” or carriage they supported could carry 150 tones of excavated material away from the site at one time or bring in the same amount of concrete from the mixing plant.
Tightening the Lashings on a 24′ Signal Tower!
You need not wait until you get to summer camp to begin your own pioneering. Even in a big city, you can learn to tie the knots and find out the best applications for each. Learn how to make Eye, End, and Short splices. And learn how to make lashings by building scale models. A scale of 1 inch to 1 foot is convenient and easy to use: This means that a tower 24 feet tall will scale down to 24 inches in your model.
Pioneering merit badge is not one of those required for Eagle. But in a time when most people have no understanding of what our ancestors had to know to live in the wilderness, pioneering is a cultural tie with the past, an emergency skill worth learning, and a real test of your cooperative spirit. The patrol or troop has to work together as a team, and learning the give-and-take in carrying out a construction project is as important as learning the technical skills of pioneering.
Using the 14′ Double Ladder Signal Tower as a point of reference, here are the plans for a very tall campsite gateway that stands out (and up) and serves as an impressive feat of Scout engineering. One of the perks included in this project is it provides an opportunity for new Scouts to experience hoisting a “boy-sized” structure replete with their own special colors e.g. their patrol flags.
Since this 14-foot structure isn’t climbed on, the spars can be considerably thinner in diameter. Bamboo is ideal. Lashing on those flags attached to each corner creates a spectacular effect and hence the name “4 Flag Tower!”
14′ Tower Gateway Schematic / Gateway to a Scout Expo Photo
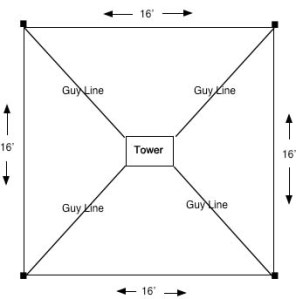
Note: This design is not self-standing. Therefore, using it as a gateway at a camporee or Scout Expo with the necessary guylines requires an area wide and deep enough to accommodate a 16 x 16-foot space.
Scouts lash together a 4′ Side.
Materials Needed:
four 2-1/2 to 3-inch x 14-foot leg spars
six 2-inch x 8-foot X-brace spars
four 2-inch x 6-foot X-brace spars
four 2-inch x 6-foot support spars
six 2-inch x 4-foot leg spreader
forty-five 15-foot x 1/4-inch lashing ropes
four 25-foot guylines
eight 24-inch pioneering stakes
Assemble the 4-foot sides. Begin by laying out two pairs of 14-foot spars for the tower legs, side by side, 3 and 1/2 feet apart. Be sure the butt ends are even at the bottom so the tower will stand up straight.
NOTE:All lashings need to be very tight.
Diagram 1
Lash the legs together starting with a 4-foot bottom leg spreader about 6 inches up from the butt ends. Lash on a 4-foot middle leg spreader in the middle of the 14-foot legs (7 feet up), and a 4-foot top spreader about 3 inches from the top of the 14-foot legs.
When the legs are joined with the three 4-foot spreaders, lash on two 6-foot X-brace spars using square lashings to lash the ends to the legs, and a diagonal lashing where they cross, forming a trestle in the bottom half of the legs (see diagram 1). Three of the ends are lashed to the outside of the legs, and one on the inside, so that a slight gap is created where they cross. As the diagonal lashing begins, this gap will be cinched together with the timber hitch. Repeat the whole process with the other two 14-foot legs.
Diagram 2
Join the 4-foot sides. Turn both sides up horizontally, parallel to one another about 5 and 1/2 feet apart. Make sure the bottoms are even.
Lash on one of the 6-foot support spars directly above the 4-foot middle spreader (see diagram 2).
Lash another one of the 6-foot support spars directly under the 4-foot side spreader at the very top.
Lashing the X Braces with a Diagonal Lashing.
Now, lash on two of the 8-foot X brace spars diagonally between the two 6-foot supports using square lashings to lash the ends to the legs, and a diagonal lashing where they cross forming a trestle in the top part of the wide (6-foot) side (see diagram 2). Three of the ends are lashed to the outside of the legs, and one on the inside, so that a slight gap is created where they cross. As the diagonal lashing begins, this gap will be sprung together with the timber hitch.
Lash the other side. To make the lashings on the other side, you have to get the whole crew together to carefully lift and roll the tower over 180° so that it’s laying on the X-brace, and the other sides of the 4-foot sides are easier to get to.
Repeat the same procedure as before.
Scouts carefully lift the structure and rotatie it 180° to lash the other side.
Lash on the middle X-brace. This X-brace is what will keep the four sides from racking. Lash the two remaining 8-foot X brace spars diagonally across the legs just under the 4-foot middle leg spreader (see Tower Gateway Schematic on the top of this page). Use square lashings to lash them to the legs and a diagonal lashing where they cross. To accomplish this, some crew members will have to hold up the top of the tower so that there is better access to all four ends of the 8′ X brace spars.
Lash on the flags. If you want a flag or flags to fly from the top of the tower, lash the flagpole(s) to the top of each tower legs using a couple of tight round lashings.
Tower Gateway Layout
Anchors and guylines. When all the lashings are done, move the tower to where it will be hoisted. Before actually hoisting the tower, lay out the position of the four legs on the ground. Then determine where the four anchors for the guylines will be placed to steady the legs of the tower.
Using the pioneering stakes, build four 1-1 anchors. Each should extend 16 feet, 45° out from the leg.
NOTE: Make sure the flags are unfurled before hoisting the tower.
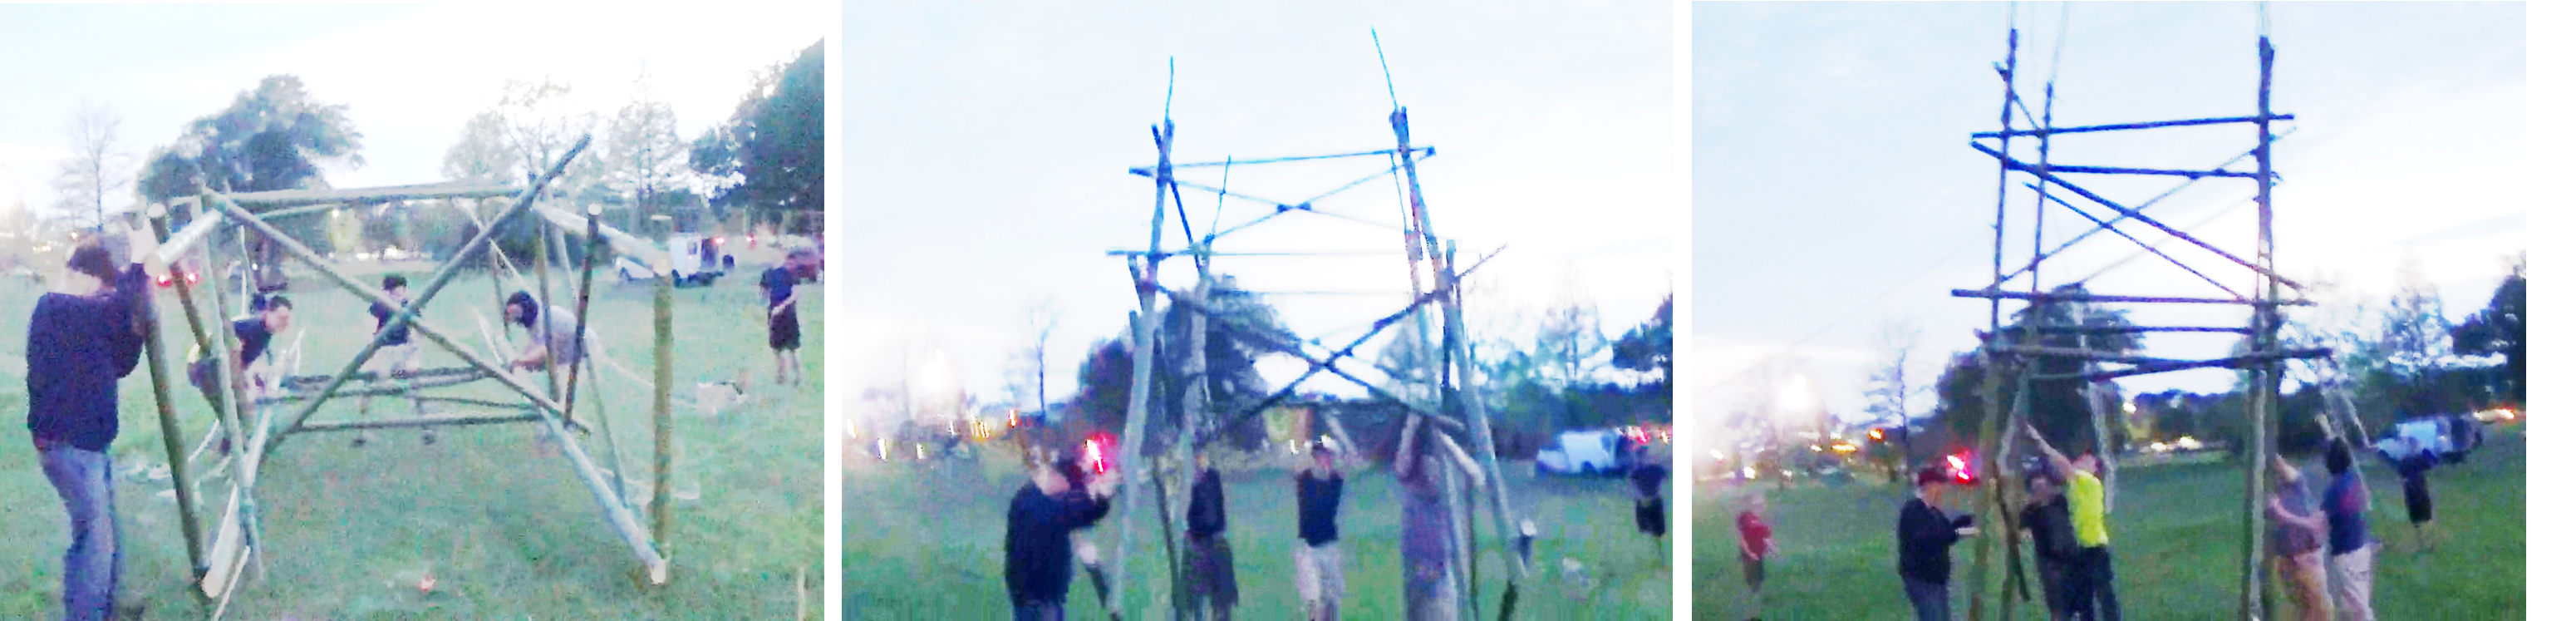
Hoisting the tower. You’ll need a whole crew to do the hoisting. Get ready to hoist the tower by delegating the following:
One signal caller who tells the crew members when and how fast to pull on the ropes.
One safety officer who observes for all safety considerations and signs of trouble during the hoisting.
Four Scouts to serve as “Lifters” to lift the top 6′ support spar that’s on the ground. Their job is to first left and then push the tower up.
Two Scouts, one on each of the 2 guylines attached to the legs, to make sure the tower isn’t over pulled and topples over
Four “Pullers” who will use the two guylines as hoisting ropes to pull the tower until it is standing
We did it!
When everyone is in position, the signal caller should direct the Scouts on the hoisting ropes (the pullers) to hoist the tower into position, while the lifters start lifting. Care should be exercised not to over pull the tower.
As soon as the tower is standing, four Scouts should temporarily tie the guylines to the anchors using a roundturn with two half hitches.
Heeling the tower. If the tower is uneven, you can heel the the butt ends of the legs 4 to 6 inches deep as needed to make it more level.
Tighten the guylines. As soon as the tower is in position, go to each of the anchors and untie the Roundturn with Two Half Hitches and replace it with a rope tackle. Use the rope tackles to hold the tower steady, by gradually applying strain to each of the four guylines at the same time. Do this by tying a butterfly knot in each guyline about 6 to 8 feet from the anchor. Then wrap the running end of the guyline around the forward stake of the anchor and back through the loop in the butterfly knot. When rope tackles are tied to all four anchors, gradually tighten the lines. Apply enough strain to each of the guylines to hold the tower firm and in a vertical position. Then tie off the rope tackles and secure the running ends with half hitches.
Hoisting a Larger Version: 17′ high x 8′ wide x 6′ deep