Easy Tall Flagpole

At most Scouting events, there isn’t a permanently-installed, tall, metal pole for raising and lowering the colors. During opening ceremonies at these Scout gatherings, a tall flagpole made by joining long spars together can impress and inspire.

Opening Ceremony at a District Camporee

What is meant by tall? Naturally, the height of the flagpole depends on the size of the flag and the size of the area where it will be raised. For the most part, the flags used in Scouting are 3 x 5 feet, and the average size outdoor flagpole for a 3 x 5-foot flag is 20 feet. Of course, the main criteria for flagpole height is how far away you want the flag to be seen. But also, flying a flag high is synonymous with pride, and the taller the pole the greater the impact. However, this post is about a simple flagpole and not a pioneering display of goliath proportions. The specific flagpole featured on this page topped out at 32 feet, which was impressive, but not uncanny.

Building and putting up a taller flagpole requires more attention than one for an easy campsite setup, but all in all it’s still a relatively simple operation. Basically, four things are needed:

  1. Long spars
  2. An effective way to join the spars together so the flagpole will be rigid
  3. A series of planned steps to take before standing the flagpole up *
  4. A crew to lift the flagpole to its vertical position

Long spars. Depending on your point of reference, the definition of long spars is relative, and will hinge on what’s available in your geographic area and how practical it is to procure and transport them. Naturally, the longer the spars the fewer you’ll need to make the pole tall, which of course has obvious advantages. Again, depending on your point of reference, a long spar can be seen as having a length anywhere from 10 to 20 feet.

Tall View
Simple, Tall, Pioneering Flagpole

In the flagpole featured on this page, there are three long spars: 16-foot bottom, 14-foot middle, and 10-foot top. The lower the spar, the larger the diameter. The butt end of the next spar up should be as near to the same diameter as possible to the top of the one it’s joining.

West Country Round Lashing Joining Two Bamboo Spars

An effective way to join the spars together so the flagpole will be rigid. Obviously, the rigidity of the flagpole is a primary concern. You don’t want it to bend and  you don’t want it to come apart. It has to ever-withstand the stress of its own weight in a vertical position, as well as the weakening forces of wind, rain, and varying temperatures. When it comes to joining spars together to extend their length, there are basically four lashings that can be employed. For the tightest and most secure lashing, the West Country Round Lashing works really very well.

When the utmost rigidity is required, a quarter of the spars’ lengths should overlap each other. Using long lengths of 1/4-inch manila rope, start each of the two lashings approximately 1-1/2 to 2 inches from the ends of the overlapping spars and tie at least ten tight half knots (overhand knots) towards the middle of the overlap. Depending on the length of the lashing rope and the size of the spars, for added security, additional lashings can be tied e.g. in the photo to the left, where the bottom spar and the middle spar overlap, four West Country Round Lashings were applied.

* A series of planned steps to take before standing the flagpole up. Before transforming the finished flagpole from horizontal to vertical, these steps need to be taken:

  1. Determine the spot on the ground where the flagpole will stand and dig a hole about 4 inches deep with a diameter just a little larger than that of the flagpole’s butt end.
  2. Position the flagpole so the bottom is right over the hole.
  3. To attach the rope halyard, tie a small rope grommet and pulley to the top of the flagpole with a prusik.
  4. Reave the prepared rope halyard through the tackle.
  5. Attach four guylines of the  proper length (see: Guylines.) Tie the guylines to the flagpole about 3/4 up the pole with four rolling hitches. Tie them on so they will each line out to their respective anchors.
  6. Measure out the proper distance from the bottom of the flagpole in four perpendicular directions and mark the spots where the front pioneering stake will be driven into the ground for each 1-1 anchor. The rule of thumb is drive in the stakes at a distance equal to twice the height from where the knots were tied, measured out from the base of the flagpole.

  7. Build four 1-1 anchors in readiness for attaching the four guylines.

A crew to lift the flagpole to its vertical position. When ready, four crew members each take hold of a guyline and position themselves in line with their respective anchors. Additional crew members line up along the length of the flagpole ready to walk the pole up to its vertical position. One member is stationed at the bottom to guide the pole into the hole as the others lift. When everyone is in position, a signal caller gives the go ahead to lift. Those with the guylines pass the ends of their lines behind the front stake of their anchor. Once the flagpole is standing upright, each guyline is secured to its anchor with a rope tackle. Final adjustments can then be made to each guyline until the pole is standing straight.

SaveSave

14′ Gateway Tower (4 Flag Tower)

Coker Four Flags
Gateway to the Boy Scout Camp Pioneering Area

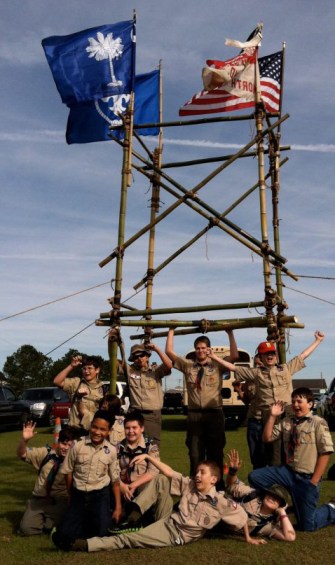
Using the 14′ Double Ladder Signal Tower as a point of reference, here are the plans for a very tall campsite gateway that stands out (and up) and serves as an impressive feat of Scout engineering. One of the perks included in this project is it provides an opportunity for new Scouts to experience hoisting a “boy-sized” structure replete with their own special colors e.g. their patrol flags.

Since this 14-foot structure isn’t climbed on, the spars can be considerably thinner in diameter. Bamboo is ideal. Lashing on those flags attached to each corner creates a spectacular effect and hence the name “4 Flag Tower!”

14′ Tower Gateway Schematic / Gateway to a Scout Expo Photo

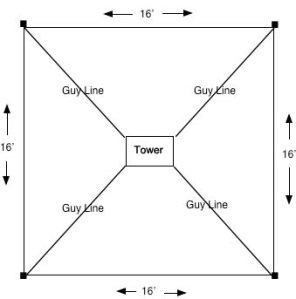
Note: This design is not self-standing. Therefore, using it as a gateway at a camporee or Scout Expo with the necessary guylines requires an area wide and deep enough to accommodate a 16 x 16-foot space.

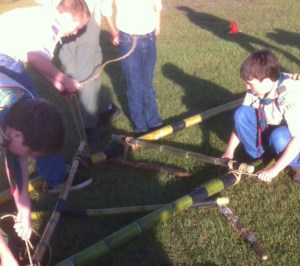
Scouts lash together a 4' Side.
Scouts lash together a 4′ Side.

Materials Needed:

  • four 2-1/2 to 3-inch x 14-foot leg spars
  • six 2-inch x 8-foot X-brace spars
  • four 2-inch x 6-foot X-brace spars
  • four 2-inch x 6-foot support spars
  • six 2-inch x 4-foot leg spreader
  • forty-five 15-foot x 1/4-inch lashing ropes
  • four 25-foot guylines
  • eight 24-inch pioneering stakes

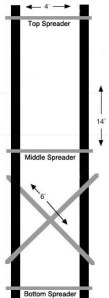
Assemble the 4-foot sides. Begin by laying out two pairs of 14-foot spars for the tower legs, side by side, 3 and 1/2 feet apart. Be sure the butt ends are even at the bottom so the tower will stand up straight.

NOTE: All lashings need to be very tight.

Diagram 1
Diagram 1

Lash the legs together starting with a 4-foot bottom leg spreader about 6 inches up from the butt ends. Lash on a 4-foot middle leg spreader in the middle of the 14-foot legs (7 feet up), and a 4-foot top spreader about 3 inches from the top of the 14-foot legs.

When the legs are joined with the three 4-foot spreaders, lash on two 6-foot X-brace spars using square lashings to lash the ends to the legs, and a diagonal lashing where they cross, forming a trestle in the bottom half of the legs (see diagram 1). Three of the ends are lashed to the outside of the legs, and one on the inside, so that a slight gap is created where they cross. As the diagonal lashing begins, this gap will be cinched together with the timber hitch. Repeat the whole process with the other two 14-foot legs.

Diagram 2
Diagram 2

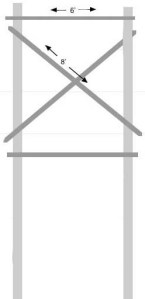
Join the 4-foot sides. Turn both sides up horizontally, parallel to one another about 5 and 1/2 feet apart. Make sure the bottoms are even.

Lash on one of the 6-foot support spars directly above the 4-foot middle spreader (see diagram 2).

Lash another one of the 6-foot support spars directly under the 4-foot side spreader at the very top.

Lashing the X Braces with a Diagonal Lashing.

Now, lash on two of the 8-foot X brace spars diagonally between the two 6-foot supports using square lashings to lash the ends to the legs, and a diagonal lashing where they cross forming a trestle in the top part of the wide (6-foot) side (see diagram 2). Three of the ends are lashed to the outside of the legs, and one on the inside, so that a slight gap is created where they cross. As the diagonal lashing begins, this gap will be sprung together with the timber hitch.

Lash the other side. To make the lashings on the other side, you have to get the whole crew together to carefully lift and roll the tower over 180° so that it’s laying on the X-brace, and the other sides of the 4-foot sides are easier to get to.

Repeat the same procedure as before.

Scouts carefully lift the structure and rotatie it 180° to lash the other side.

Lash on the middle X-brace.  This X-brace is what will keep the four sides from racking. Lash the two remaining 8-foot X brace spars diagonally across the legs just under the 4-foot middle leg spreader (see Tower Gateway Schematic on the top of this page). Use square lashings to lash them to the legs and a diagonal lashing where they cross. To accomplish this, some crew members will have to hold up the top of the tower so that  there is better access to all four ends of the 8′ X brace spars.

Lash on the flags. If you want a flag or flags to fly from the top of the tower, lash the flagpole(s) to the top of each tower legs using a couple of tight round lashings.

Tower Gateway Layout

Anchors and guylines. When all the lashings are done, move the tower to where it will be hoisted. Before actually hoisting the tower, lay out the position of the four legs on the ground.  Then determine where the four anchors for the guylines will be placed to steady the legs of the tower.

Using the pioneering stakes, build four 1-1 anchors. Each should extend 16 feet, 45° out from the leg.

Attach the four guylines to the legs about 12″ above the middle 4′ spreaders with a roundturn with two half hitches.

NOTE: Make sure the flags are unfurled before hoisting the tower.

Hoisting the tower. You’ll need a whole crew to do the hoisting. Get ready to hoist the tower by delegating the following:

  1. One signal caller who tells the crew members when and how fast to pull on the ropes.
  2. One safety officer who observes for all safety considerations and signs of trouble during the hoisting.
  3. Four Scouts to serve as “Lifters” to lift the top 6′ support spar that’s on the ground. Their job is to first left and then push the tower up.
  4. Two Scouts, one on each of the 2 guylines attached to the legs, to make sure the tower isn’t over pulled and topples over
  5. Four “Pullers” who will use the two guylines as hoisting ropes to pull the tower until it is standing
We did it!
We did it!

When everyone is in position, the signal caller should direct the Scouts on the hoisting ropes (the pullers) to hoist the tower into position, while the lifters start lifting. Care should be exercised not to over pull the tower.

As soon as the tower is standing, four Scouts should temporarily tie the guylines to the anchors using a roundturn with two half hitches.

Heeling the tower. If the tower is uneven, you can heel the the butt ends of the legs 4 to 6 inches deep as needed to make it more level.

Tighten the guylines. As soon as the tower is in position, go to each of the anchors and untie the Roundturn with Two Half Hitches and replace it with a rope tackle. Use the rope tackles to hold the tower steady, by gradually applying strain to each of the four guylines at the same time. Do this by tying a butterfly knot in each guyline about 6 to 8 feet from the anchor. Then wrap the running end of the guyline around the forward stake of the anchor and back through the loop in the butterfly knot. When rope tackles are tied to all four anchors, gradually tighten the lines. Apply enough strain to each of the guylines to hold the tower firm and in a vertical position. Then tie off the rope tackles and secure the running ends with half hitches.

Hoisting a Larger Version: 17' high x 8' wide x 6' deep
Hoisting a Larger Version: 17′ high x 8′ wide x 6′ deep

Anchoring Pioneering Projects

The following text is by Adolph E. Peschke as presented in the 1998 printing of the 1993 edition of the Pioneering Merit Badge Pamphlet:

Building pioneering projects often requires some type of strong point for attaching a guyline for a tower or derrick. An anchor point might also be needed to anchor one or both ends of a monkey bridge.

Sometimes nature will provide a tree or rock in just the right location or you might be able to shift the location of the project to take advantage of a natural anchor.

STAKES

Pioneering Stakes

When nature does not provide a solution, anchors can be constructed using stout pioneering stakes.

Note: Under no conditions should tent pegs be used for pioneering stakes. They’re not long enough or strong enough to make a safe anchor.

Pioneering stakes should be made of hardwood, such as oak or hickory. The most common size of stake (for the projects shown in this pamphlet) is 2-1/2 inches in diameter and about 24 to 30 inches long (see figure 84). After cutting the stake to this size, cut a point on one end. Then bevel the top edge to prevent it from mushrooming or splitting when the stake is driven into the ground.

MALLET

Wooden Mallots
Wooden Mallets

When driving stakes into the ground, it’s best to use a wooden mallet. Using a metal sledge hammer or an ax head will damage the stake.

To make a wooden mallet, cut a 4-inch diameter piece of hardwood, such as hickory, elm, or sycamore, about 11 inches long (see figure 85). It should weigh about four pounds. Drill a 1-1/8-inch diameter hole to mount the handle. The handle can be made from a 24-inch length of hardwood (similar to making a stake). Use a knife or ax to round the end of the handle to fit the hole in the mallet head. Secure the handle in place with a wedge placed crosswise to the length of the head.

Buried Spar & Guyline Placement

SOIL CONDITIONS

When driving the stake into the ground, drive it at about a 20° angle. Soil conditions can vary and will dictate how large and long a stake you need. If there will be a heavy strain on the anchor, you might need additional stakes as in the 3-2-1 configuration (shown in figure 89). After the stake is driven into the ground, keep your eye on it as strain is applied to see how it’s holding.

If ground conditions are unsuitable for even the largest stake you have, use a 4-inch diameter spar that’s buried 35 inches in the ground at a 30° angle and anchored in place with a stake (see figure 86).

GUYLINE

Always attach the guyline around the stake as close to the ground as you can get it. If the guyline is placed or slips higher on the stake, there will probably be enough leverage to pull the stake loose (See figure 87).

ANGLES FOR GUYLINES

Both the 3-2-1 anchor and the log-and-stake anchor should be positioned so that the guyline is at a 15° angle, or a maximum of 25°. To determine this, measure the height at the point where the guyline is attached. Double this distance to determine the minimum distance required between the base and the anchor. For example, if the guyline is attached 10′ up the pole, the anchor should be a minimum of 20′ from the base (see figure 88). If your line is long enough, it won’t hurt to place the anchor a few feet further out.

Angles for Guylines
Angles for Guylines and Guyline Length

3-2-1 ANCHOR

Strong Anchor for Pioneering Projects

As the name implies, the 3-2-1 anchor is made by driving stakes in a series: three stakes, then two stakes, and then one stake to form the anchor (see figure 89). All six stakes are 30 inches long and are driven 18 inches into the ground at a 20° angle.

First drive in the set of three stakes. Next drive in the set of two stakes about 24 inches away from the first set. Then tie a rope from the top of the three-stake set to the bottom of the two stake set using at least two loops of 1/4-inch manila rope, or six to eight loops of binder twine. Then use a small stick to twist the rope tight in a tourniquet. After the rope is twisted tight, push the end of the stick in the ground to keep it from unwinding.

Finally, drive a single stake in the ground about 12 inches from the two-stake set. Once again, use a twisted rope or binder twine as a tourniquet to hold the two-stake set tightly in place.

Depending on the strain, you can use other configurations, such as 2-1-1, or even 1-1-1 for a light strain. When using any stake anchor, be sure that it is in direct alignment with the strain being applied.

LOG-AND-STAKE ANCHOR

Log-and-Stake Anchor

The log-and-stake anchor is easy to make and can hold a considerable amount of pull. You can tie the line directly to the log, or you can use a ring-and-rope grommet as shown in figure 90.

To make the log-and-stake anchor, place a log 4 to 6 inches in diameter perpendicular to the pull of the line. Then drive in four large stakes in front of the log. Next, slip the rope grommet through the ring and then slip the ends of the grommet around the log (see figure 90).

Drive a second row of stakes 24 inches behind the front stakes. Then anchor the front stakes to the rear stakes with a tourniquet made of binder twine or rope.

STROPS

It is good practice to use a device called a strop to avoid damage to your long lines. It also makes it easier to tie off your long lines and to make adjustments.

A strop can be made by using a 10-foot length of 1/2-inch diameter manila or polypropylene rope. To make a strop, splice a thimble and ring into one end of the rope (see figure 91), or use a screw pin shackle with a thimble.

The strop can then be wrapped around a rock or tree to attach the line (see figure 92). It can also be used around a spar that is anchored between two trees (see figure 93).

Strops
Strops

Note: Be sure to use a piece of canvas or burlap to protect your rope from sharp edges of a rock or to protect the bark of the tree from rope burns.

GROMMETS

A grommet is often used in conjunction with an anchor. A large grommet can be made by splicing together the ends of a 10-foot length of 1/2-inch manila or polypropylene rope. If you don’t have a spliced grommet in your pioneering kit, tie the ends of the rope with a square knot or a carrick bend. Be sure to secure the ends of the rope.

The completed grommet is useful when attaching a long line to an anchor of stakes. It provides a strong and more convenient way to attach a guyline or other long line.

The grommet you use must be made of a larger-diameter rope than the guyline to avoid creating a weak link in the chain between the structure and the anchor.

Rope Grommet
Rope Grommet

Single Pull Rope Tackle Monkey Bridge Configuration

PDF FILE for: Anchoring Pioneering Projects