Here are three definitions for “pioneer” and how they can be applied to modern day Scouts:
pi·o·neer (p-nîr) noun
1. One who ventures into unknown or unclaimed territory to settle.
Equipped with their pioneering skills, Scouts camping in a rustic, wilderness setting who use these skills to “settle” into their campsites for long or short terms are like modern day versions of the old-time pioneer. In this case, “settle” can mean improving their site with forked sticks and crossbar for hanging an 8 quart pot over a cooking fire, a large or small Chippewa Kitchen, and everything in between. Those old-time pioneers who ventured into unclaimed territory were not only adventurous, they were also resourceful. In today’s Scout Pioneering, these two qualities come to life as Scouts are faced with making practical decisions while camping and backpacking. Usefulness and fun can go hand in hand.
2. One who opens up new areas of thought, research, or development: (a pioneer in aviation).
Once pioneering skills are learned and practiced, Scouts can devise their own gadgets, and structures and ways to build them. Commensurate with outdoor activities and camping, Scouts using their pioneering skills coupled with a good dose of ingenuity, come up with “new” and useful ideas, e.g. cutting a short piece of bamboo of the proper diameter and lashing it to an upright on the dining fly to serve as a convenient flagpole holder. From our standpoint, even if on a small scale, the Scout who recently came up with this ingenious little device is a “pioneer in camp gadgets.”
3. A soldier who performs construction in the field to facilitate troop movements.
Scouts can facilitate troop movement by building a bridge over a gully or stream that can conveniently and efficiently be used to get from one location to another. Scouting publications are replete with photos of Scouts putting up various types of walkway bridges across small streams and gullies. That’s real pioneering (and real fun)
Is all that a little far-fetched? Well, it’s a fact, you can apply most anything to Scout Pioneering. It’s that universal in its appeal and that broad in its scope.
“Why Pioneering? To me the overriding reason for presenting Pioneering is that Scouts like it.”
We know with certainty that the majority of Scouts do like pioneering, and the better they get at it, the more they like it. So, if the Scouts have the desire, why aren’t more Scout units providing the remarkable fun that goes hand in hand with building and enjoying a wide range of pioneering structures?
The reason or reasons are obvious. Somewhere there’s an obstacle or obstacles, and a problem or problems. If there wasn’t, more and more Scouts would be happily involved in unit pioneering programs, building ever-more wonderful things at camp, on outings, and during camporees. The fun, adventure, involvement and challenges are built right in—and also the success. And, nothing succeeds like success! So lets start right there:
STUMBLING BLOCK 1: Nothing Succeeds Like Success!
Generally speaking, experiencing failure is not great for sparking enthusiasm and rarely results in an exclamation like, “Hey! That was fun!” In his book Pioneering Projects, Gilwell Camp Chief, John Thurman wrote, “if any Patrol, Troop, or Scouter tries to start pioneering before establishing a sound background of basic Scout training in regard to knotting and lashing, then pioneering will become unpopular and will go down in the history of the Patrol or Troop as a failure.” Why? Because without the prerequisite skills, the structure won’t work or stay standing. That’s no way to equate pioneering with something the Scouts can successfully accomplish, and that’s no fun.
An Introduction to Round Lashing for New Scouts During a Troop Meeting
But, just teaching Scouts the ropes is not enough! Unless the training sessions on knotting and lashing are “tied” to some fun or practical application, then repeated knot-tying and lashing sessions will be a source of exasperation and boredom—an inevitable turn off. Not good! After introducing some basics, give the Scouts a real opportunity to put them into action! Not with an elaborate project, but with a challenge or game where they actually get to use what they learned.
Scouts use they’re round lashings to play “Catch the Snapper.”
(Refer to Favorite Scout Meeting Challenges.) Make sure the activity matches their skill level. That way, success is assured, and each new success is a building block to a bigger one. When these initial forays into pioneering are successfully carried out, then it’s a sure bet that actually building the useful camp gadget and larger campsite improvement will result in its own success story with a tangible outcome in the form of a concrete accomplishment. “We built that!”
Now, if the youth and adults are really interested, what else will hold a troop back from implementing an effective Pioneering program?
STUMBLING BLOCK 2: Lack of Scouter Training.
Pioneering Team Building Challenge at a Camporee
(a) It’s possible the Scouters themselves don’t possess the necessary knowledge and skills required to introduce their Scouts to the knotting and lashing techniques required to construct even a simple camp gadget, not to mention a bridge.
No excuse. The basic knowledge and skills required are super easy to gain. Knot and lashing diagrams, online animations and demonstrations, and learning sessions from fellow Scouters are available to one and all. What it takes is devoting some time to mastering each technique so it can be passed along directly to the Scouts or to those who will be doing the instructing. VIEW: HOW-TO PIONEERING SKILL VIDEOS
(b) Perhaps the Scouters never actually built the pioneering projects themselves, resulting in a natural hesitation to embark on ventures into unfamiliar territory. When there’s a desire to get into pioneering, but there is very little or no pioneering experience, the best training by far is from qualified individuals who have presented a well-rounded pioneering program to their units and have themselves helped provide the opportunities to successfully build the projects. In lieu of that, a great place to start is to get information that is both understandable and dependable. Successful pioneering programs have been developed from scratch by utilizing the 1993, 1998 edition of the Pioneering Merit Badge Pamphlet by Adolph Peschke. The pamphlet is like an A to Z primer on the modus operandi of basic pioneering. Additionally, as a source of comprehensive information, the book Scout Pioneering spoon feeds the reader with practical approaches and ideas.
STUMBLING BLOCK 3: Lack of equipment.
Lack of equipment is easily the most understandable of all deterrents. Naturally, when there are limited or even zero materials, implementing a unit pioneering program can be daunting proposition. For smaller camp gadgets you can use sticks, Scout staves and binder twine. But, for larger projects, you need the right kind of lashing ropes and the right kinds of spars.
A collection of pine spars ready for transport to the unit’s storage facility.
A favorite John Thurman quote is, “Determination remains the enduring answer to most problems.” So, coupled with the determination that Scouts will be rewarded with rich pioneering experiences, here are some avenues to pursue:
A collection of bamboo, in the quantity and size to build the chosen project.
Make an ongoing and concerted effort to get everyone on deck to help locate and gather the materials needed to build the targeted project(s). This is a whole lot easier and more practical than when one individual takes on the responsibility all by themself.
Check with the owners of land where there are stands of trees that are good for making spars, sharing with them what you want to do with the spars, and offering to do a little unnoticeable thinning out of some trees, which will be beneficial to the overall tree population. Forest Stewardship
Start with what you need. Expand as you go. Necessity is the mother of invention.
Team up with other Scouters in neighboring units, in the District, or in the Council, and put together a pioneering kit for communal use. (For a unit interested in putting together their own pioneering kit, a good place to start is to gather the materials necessary to undertake the specific project or projects the unit wishes to build. More supplies can be added to the unit’s kit to meet additional demands for materials, as required by the desire and wherewithal to tackle new and different projects.)
Gather the materials you need based on where you are in the cumulative pioneering process. Start with what’s necessary for training and interpatrol activities, and then add the components required for a chosen project, starting from the more simple, e.g. a Double A-frame Monkey Bridge. That way, you can start building your pioneering program around the specific project you’ve got in your sights.
If you’re in an area that just ain’t got no trees, check into building a pioneering kit made up of laminated spars.
Nothing really worth doing is ever really easy. The keys are a willingness to learn, a desire strong enough to motivate you to persevere, and the sound conviction that: this is going to be great!
As John Sweet says in Scout Pioneering, in regards to giving Scouts the opportunity to experience the joys of Pioneering, “…greater efforts are obviously needed to open up this adventurous, creative, challenging Scouting activity to the Scouts who would undoubtedly revel in it if given the chance to do so. Everything, finally, will depend on the attitude of the Troop Scout Leader, and they are the one who must be won over. Scouters who are themselves well-versed in the simple techniques of pioneering will need no encouragement and might even have to be restrained! To the others, a vast company, we would merely say that in all fairness they should at least allow their Scouts to have a go. One thing is pretty certain. If they do they will add another dimension to their training programme.”
Using the 14′ Double Ladder Signal Tower as a point of reference, here are the plans for a very tall campsite gateway that stands out (and up) and serves as an impressive feat of Scout engineering. One of the perks included in this project is it provides an opportunity for new Scouts to experience hoisting a “boy-sized” structure replete with their own special colors e.g. their patrol flags.
Since this 14-foot structure isn’t climbed on, the spars can be considerably thinner in diameter. Bamboo is ideal. Lashing on those flags attached to each corner creates a spectacular effect and hence the name “4 Flag Tower!”
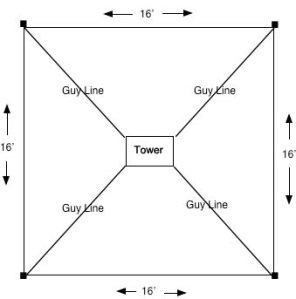
14′ Tower Gateway Schematic / Gateway to a Scout Expo Photo
Note: This design is not self-standing. Therefore, using it as a gateway at a camporee or Scout Expo with the necessary guylines requires an area wide and deep enough to accommodate a 16 x 16-foot space.
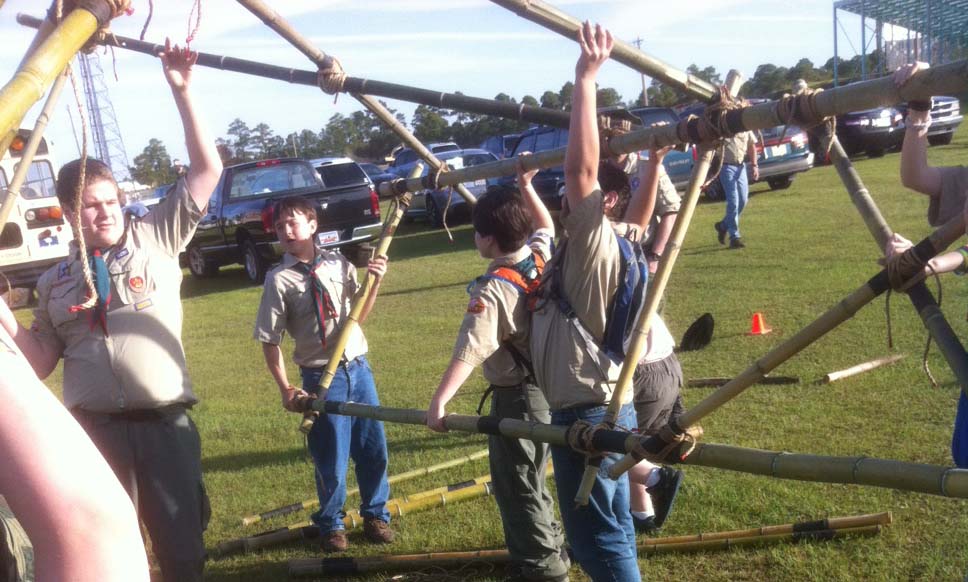
Scouts lash together a 4′ Side.
Materials Needed:
four 2-1/2 to 3-inch x 14-foot leg spars
six 2-inch x 8-foot X-brace spars
four 2-inch x 6-foot X-brace spars
four 2-inch x 6-foot support spars
six 2-inch x 4-foot leg spreader
forty-five 15-foot x 1/4-inch lashing ropes
four 25-foot guylines
eight 24-inch pioneering stakes
Assemble the 4-foot sides. Begin by laying out two pairs of 14-foot spars for the tower legs, side by side, 3 and 1/2 feet apart. Be sure the butt ends are even at the bottom so the tower will stand up straight.
NOTE:All lashings need to be very tight.
Diagram 1
Lash the legs together starting with a 4-foot bottom leg spreader about 6 inches up from the butt ends. Lash on a 4-foot middle leg spreader in the middle of the 14-foot legs (7 feet up), and a 4-foot top spreader about 3 inches from the top of the 14-foot legs.
When the legs are joined with the three 4-foot spreaders, lash on two 6-foot X-brace spars using square lashings to lash the ends to the legs, and a diagonal lashing where they cross, forming a trestle in the bottom half of the legs (see diagram 1). Three of the ends are lashed to the outside of the legs, and one on the inside, so that a slight gap is created where they cross. As the diagonal lashing begins, this gap will be cinched together with the timber hitch. Repeat the whole process with the other two 14-foot legs.
Diagram 2
Join the 4-foot sides. Turn both sides up horizontally, parallel to one another about 5 and 1/2 feet apart. Make sure the bottoms are even.
Lash on one of the 6-foot support spars directly above the 4-foot middle spreader (see diagram 2).
Lash another one of the 6-foot support spars directly under the 4-foot side spreader at the very top.
Lashing the X Braces with a Diagonal Lashing.
Now, lash on two of the 8-foot X brace spars diagonally between the two 6-foot supports using square lashings to lash the ends to the legs, and a diagonal lashing where they cross forming a trestle in the top part of the wide (6-foot) side (see diagram 2). Three of the ends are lashed to the outside of the legs, and one on the inside, so that a slight gap is created where they cross. As the diagonal lashing begins, this gap will be sprung together with the timber hitch.
Lash the other side. To make the lashings on the other side, you have to get the whole crew together to carefully lift and roll the tower over 180° so that it’s laying on the X-brace, and the other sides of the 4-foot sides are easier to get to.
Repeat the same procedure as before.
Scouts carefully lift the structure and rotatie it 180° to lash the other side.
Lash on the middle X-brace. This X-brace is what will keep the four sides from racking. Lash the two remaining 8-foot X brace spars diagonally across the legs just under the 4-foot middle leg spreader (see Tower Gateway Schematic on the top of this page). Use square lashings to lash them to the legs and a diagonal lashing where they cross. To accomplish this, some crew members will have to hold up the top of the tower so that there is better access to all four ends of the 8′ X brace spars.
Lash on the flags. If you want a flag or flags to fly from the top of the tower, lash the flagpole(s) to the top of each tower legs using a couple of tight round lashings.
Tower Gateway Layout
Anchors and guylines. When all the lashings are done, move the tower to where it will be hoisted. Before actually hoisting the tower, lay out the position of the four legs on the ground. Then determine where the four anchors for the guylines will be placed to steady the legs of the tower.
Using the pioneering stakes, build four 1-1 anchors. Each should extend 16 feet, 45° out from the leg.
NOTE: Make sure the flags are unfurled before hoisting the tower.
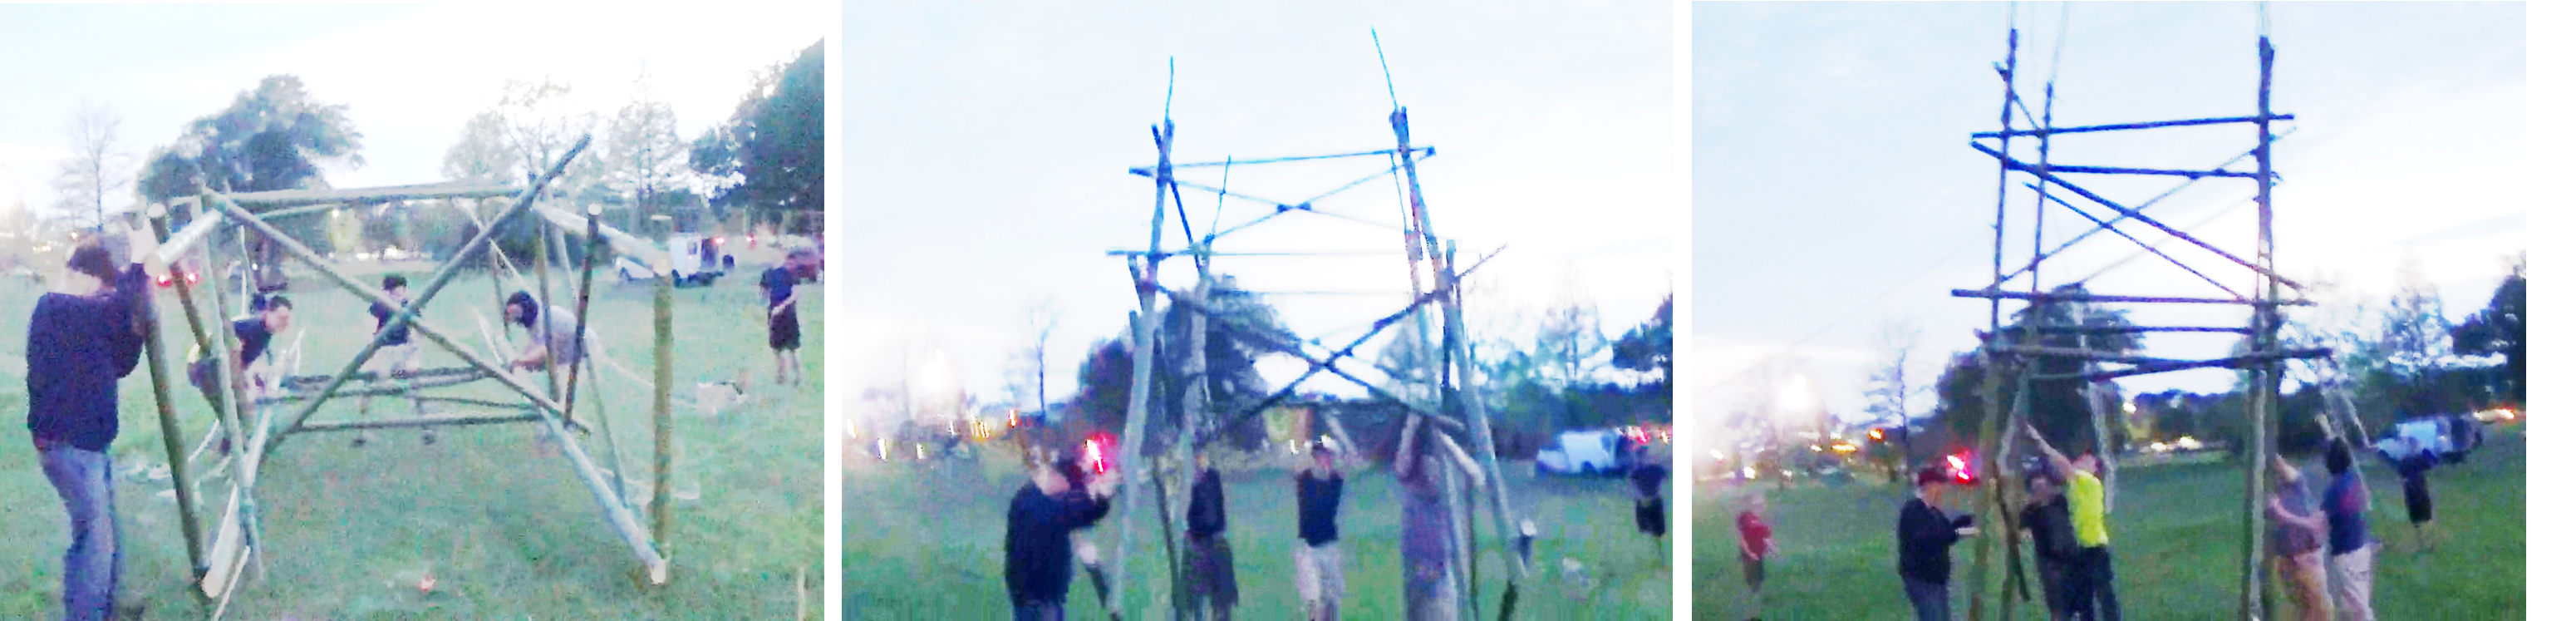
Hoisting the tower. You’ll need a whole crew to do the hoisting. Get ready to hoist the tower by delegating the following:
One signal caller who tells the crew members when and how fast to pull on the ropes.
One safety officer who observes for all safety considerations and signs of trouble during the hoisting.
Four Scouts to serve as “Lifters” to lift the top 6′ support spar that’s on the ground. Their job is to first left and then push the tower up.
Two Scouts, one on each of the 2 guylines attached to the legs, to make sure the tower isn’t over pulled and topples over
Four “Pullers” who will use the two guylines as hoisting ropes to pull the tower until it is standing
We did it!
When everyone is in position, the signal caller should direct the Scouts on the hoisting ropes (the pullers) to hoist the tower into position, while the lifters start lifting. Care should be exercised not to over pull the tower.
As soon as the tower is standing, four Scouts should temporarily tie the guylines to the anchors using a roundturn with two half hitches.
Heeling the tower. If the tower is uneven, you can heel the the butt ends of the legs 4 to 6 inches deep as needed to make it more level.
Tighten the guylines. As soon as the tower is in position, go to each of the anchors and untie the Roundturn with Two Half Hitches and replace it with a rope tackle. Use the rope tackles to hold the tower steady, by gradually applying strain to each of the four guylines at the same time. Do this by tying a butterfly knot in each guyline about 6 to 8 feet from the anchor. Then wrap the running end of the guyline around the forward stake of the anchor and back through the loop in the butterfly knot. When rope tackles are tied to all four anchors, gradually tighten the lines. Apply enough strain to each of the guylines to hold the tower firm and in a vertical position. Then tie off the rope tackles and secure the running ends with half hitches.
Hoisting a Larger Version: 17′ high x 8′ wide x 6′ deep


 -nîr
-nîr ) noun