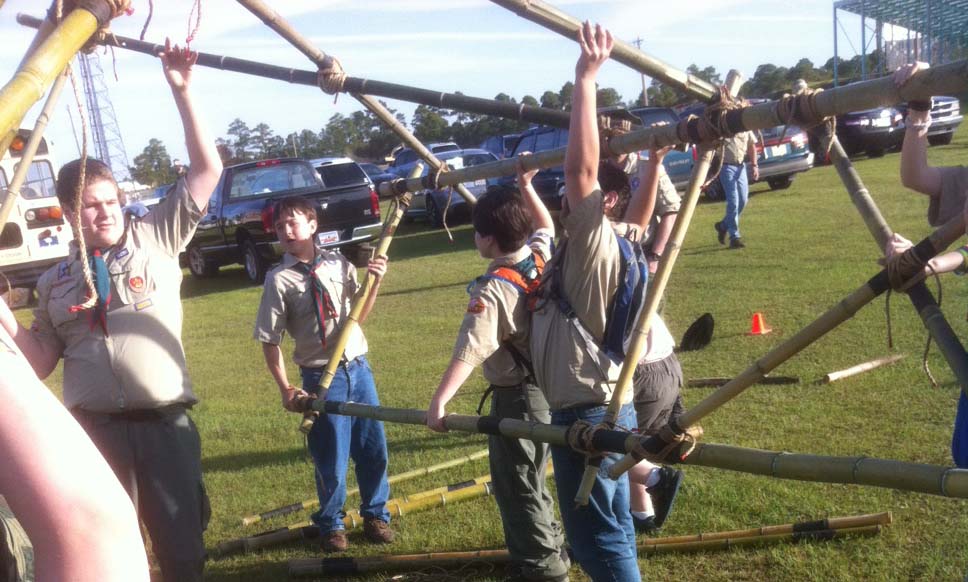
Troop 86 from Sumter, SC wanted to do a pioneering project and they selected the Double A-Frame Monkey Bridge. Great place to start, and a great way to illustrate sequential programming. What skills enter into the picture? A whole bunch! And with each step along the way, there’s an activity wherein each campcraft skill can be put into action, in a fun way, as reinforcement.
B.-P. wrote: “I am inclined to suggest to Scouters that in addition to the technical details of knotting, lashing, and anchorages, there is an educative value in Pioneering since it gives elementary training in stresses, mensuration, etc.” In addition to the “mensuration” skills that come into play when setting out the area for the bridge’s A-frames and anchors, a good deal of measuring takes place to assure the A-frames are as close to identical as possible, the pairs are joined together in similar fashion, an the spanner ropes are spread evenly. (Hand in hand with the building, Scouts do a lot of planning.)
SEQUENTIALLY-PRESENTED SKILLS AND RELATED ACTIVITIES
Open-Ended Clove Hitch – How else would you want to secure the hand ropes to the A-frames? — How-to Video / Activity Video —
Using Half Hitches to tie a Clove Hitch – A simple process always makes it easy to tie a clove hitch and finish many types of lashings. Several are used to attach the spanner ropes. — How-to Video / Activity Video —
Round Lashing – Three or four can be used to join together the bottoms of the A-frames on each side. Round lashings can also be used to attach a flag pole(s) to an A-frame(s). — How-to Video / Activity Video —
Square Lashing – This project can use fourteen of them for both building the A-frames and then joining them together. — How-to Video / Activity Video —
3-2-1 Anchor – The skill is to carefully drive in the stakes at the proper angle and applying the tourniquets to join the groupings. — Explanatory Video —
Roundturn with Two Half Hitches – You can use this pioneering knot to attach the hand ropes to the anchors. — How-to Video / Activity Video —
Down through the decades, Scout Pioneering has always consisted of building bridges, towers, and…RAFTS. Raft building provides some unique challenges, and is fun in many ways. Whenever you don’t have a boat or canoe, and there’s a desire to float on, or across, a body of water, making a raft is what commonly comes to mind.
Here the objective was to make one large enough to float everyone who built it—at the same time. Eleven Scouts were present to build the raft, so the final project was to make one that could carry all eleven. Of course that’s more Scouts than are in a regular patrol, hence the name, “Large” Patrol Raft.
The materials on hand were as follows:
four 14-foot bamboo poles, about 4 inches in diameter
eight 8-foot bamboo poles, 2 inches in diameter
six 55-gallon drums
one 8-foot x 3-foot, lightweight, plywood board,
lashing ropes
The key to lashing together a raft where the frame would be high enough off the water so the Scouts would stay dry (it was a cold winter day), was to make sure the 14-foot poles were close enough together so the drums could be tied fast, below the framework, and remain there! These long, parallel, lateral poles had to be at a distance narrower than the drums, but wide enough so the drums could securely nestle between them.
None of John Thurman‘s books on Pioneering specify exactly how to tie on the drums. It’s just suggested not to use the same rope for a series of them, to assure if one comes loose, they all don’t. The Scouts decided to use, in this case, a 12-1/2-foot, 1/4-inch manila lashing rope, and secure one end to the outside pole with a simple two half hitches, leaving a long tail in which they tied a bowline to form a fixed loop. They then ran the other end under the drum, around the other pole, up over the top of the drum, and through the fixed loop. This way, they were able to put a good deal of strain on the line, without it sliding around the drum, and tie it off with a couple of half hitches, just like with a rope tackle.
The project was a success. They all fit on and the raft floated! For raft building as it pertains to Scout Pioneering, refer to the post: Raft Building.
Single Pull 2-Ring Monkey Bridge Anchor Configuration
We’ve seen how block and tackles and even commercial-grade come-alongs have been employed to tighten hand and foot ropes during the construction of various monkey bridge projects, especially those spanning longer distances and using larger diameter ropes. On the other side of the coin, in the presentation of his Double A-Frame Monkey Bridge, Adolph Peschke says, “Whatever strain three or four Scouts can put on the foot rope by pulling it by hand will be enough.”
The simple rope tackle provides a 3:1 mechanical advantage and is frequently used to apply the desired tension to both hand ropes and foot rope—often on both sides of the bridge. Adjusting the strain on individual ropes during use of the bridge can result in a slight complication—the spanner ropes can lose their symmetry.
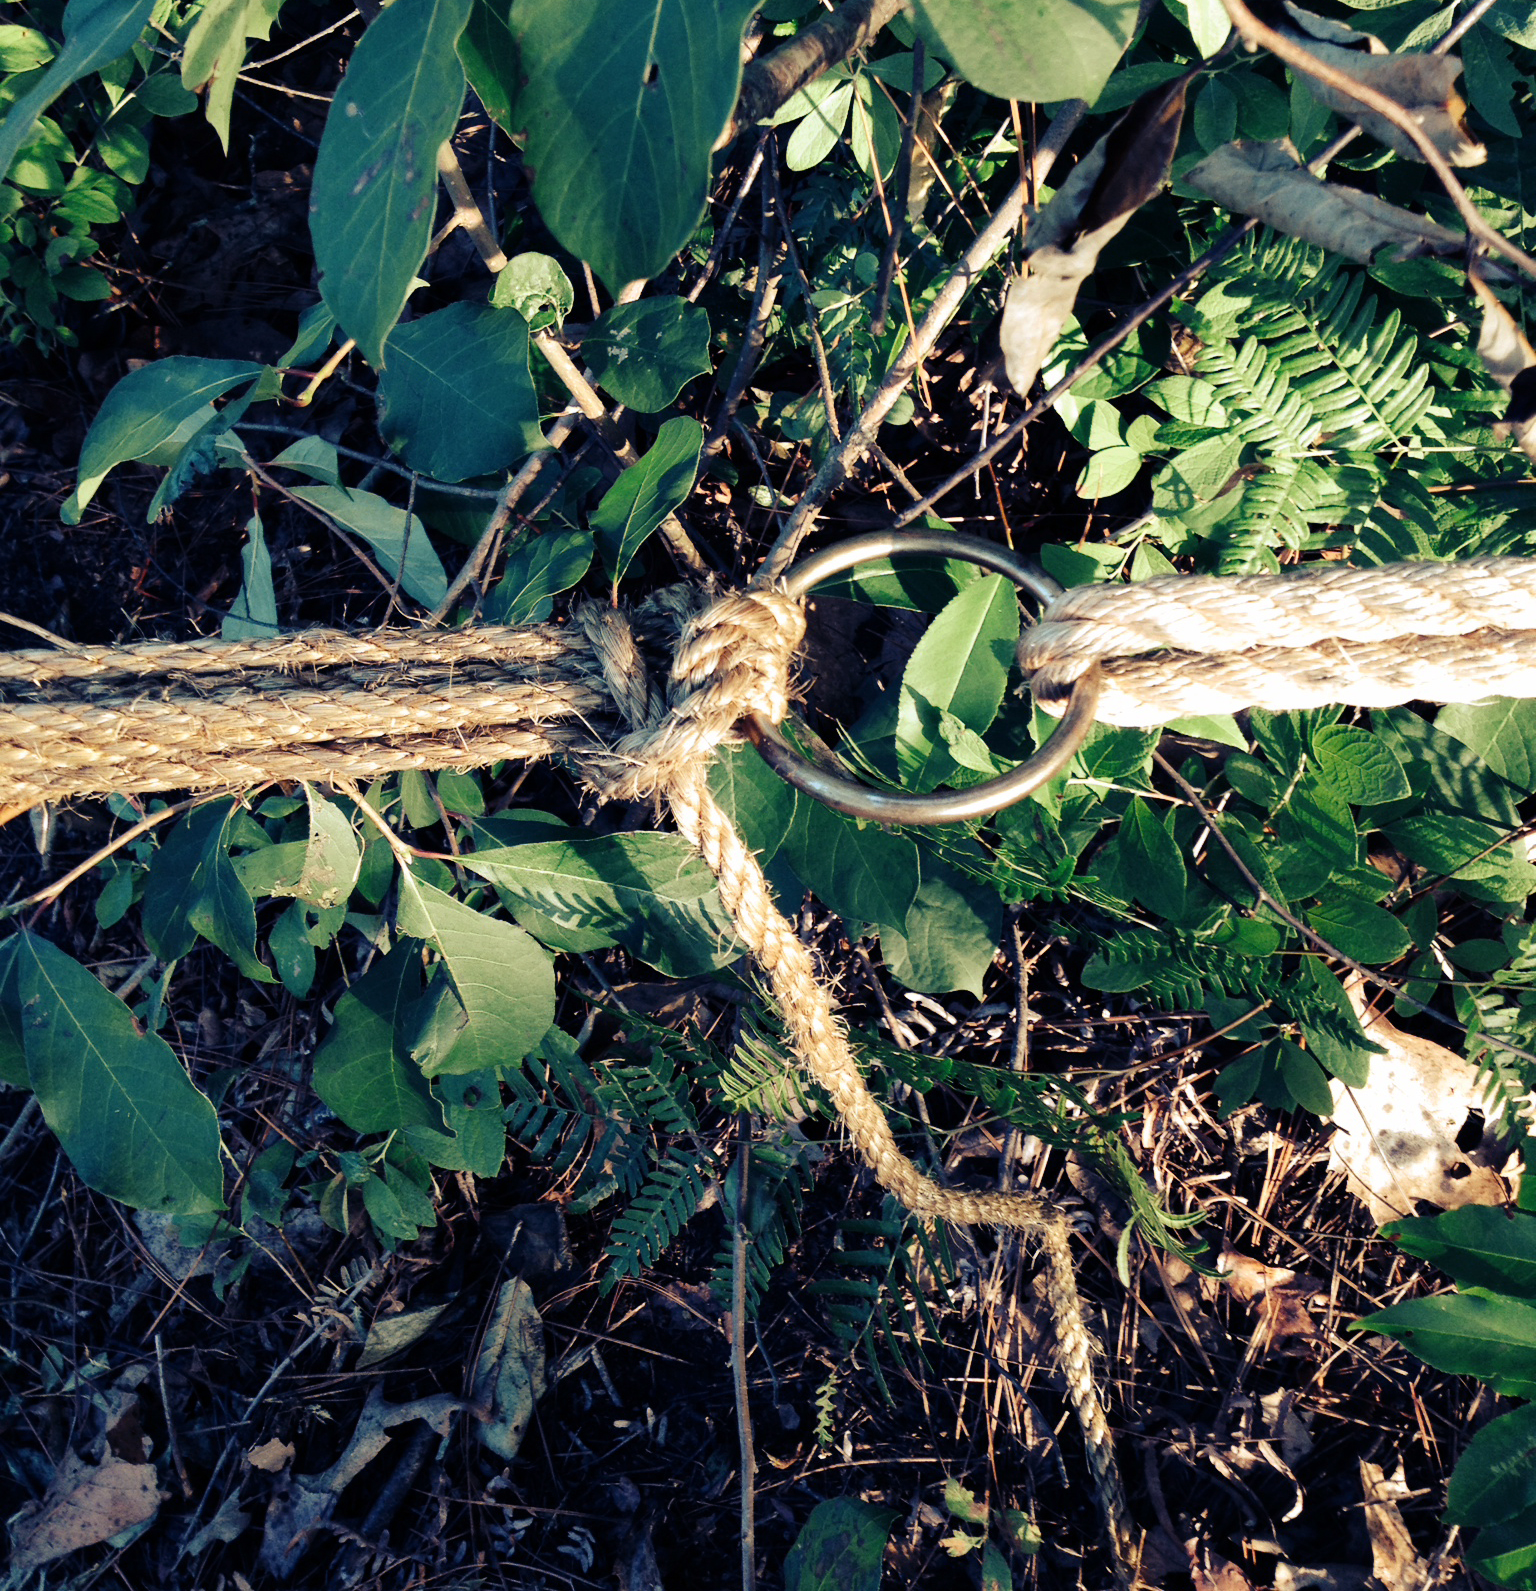
On the side of the bridge where the tension will be adjusted, the hand and foot Ropes are attached to one large ring.
A method that will alleviate this issue, and also provide a greatly increased mechanical advantage, is to utilize a Single Pull 2-Ring Configuration. After attaching the hand ropes to their respective spars with Clove Hitches, (adjusting the strain on the sections of the hand ropes between the double A-frames to match the sag of the foot rope) this approach is executed as follows:
Use a roundturn with two half hitches to attach the hand and foot ropes to a rope grommet at one anchor point. At that side of the bridge, they will remain fixed.
Pulling the three ropes so each receives the same degree of strain, attach each to one large ring at the other side of the bridge, again using Roundturns with Two Half Hitches.
With a length of 1/4 or 3/8-inch manila (preferred), using a roundturn with two half hitches, connect one end to the same large ring.
The other ring is in the rope grommet which is attached to the anchor.
Reeve the running end of this rope through the ring in a rope grommet which is situated about four feet away and already fixed at the anchor point on this side of the bridge.
Carry the running end back and reeve it through the large ring. (If you now pull on the running end, there’s a 2:1 mechanical advantage.)
To increase the strength of this connection enabling it to withstand all the strain exerted on the bridge during heavy operation, reeve the running end back through the ring in the rope grommet and then through the large ring two or more times.
Now when you adjust the tension of the hand and foot ropes with this pull rope, the mechanical advantage is greatly increased. Secure the entire configuration with two Half Hitches cinched up against one of the rings.
Some Notes: This arrangement can be configured any way you like, e.g. when using 3/8-inch manila, attach the pull rope to the large ring, reeve it through both rings twice, and then finally secure the configuration at the large ring. Or, instead of first tying the pull rope to the large ring (the ring that’s functioning as the moving block) initially tie it to the ring in the rope grommet (fixed block). Then proceed to reeve it through the other ring, back again, etc.
With each turn on the rings, make sure the rope doesn’t cross on top of itself as this would interfere with adjusting the strain.
This kind of rope tackle can exert too much force on the bridge components, so carefully monitor how tight everything is getting and don’t just give the rope a willy-nilly pull.
A Triumphant Success—posing on their Single A-Frame Bridge
In the Pioneering Area of the 2013 national jamboree, we put together a couple of Single A-Frame Bridge kits, so Scouts and Venturers could build this simple crossing bridge during their visit to Garden Ground Mountain. Each kit included:
Whenever a crew wanted to build a bridge, we provided an overview of the design and gave them a quick introduction to tying a rope tackle and the Japanese Mark II Square Lashing. What follows are some photo montages of the Single A-Frame bridges built from the kits during the jamboree. For larger and largest views, click on the photos once, and then once again:
Positioning their A-Frame in the ditch while preparing the guylines, and lashing the walkways to the transom.Lashing the transom to the legs and putting tension on a guyline.Positioning their A-Frame and hammering stakes in the corners of the walkways.Lashing on the transom to the legs.Lashing on the ledger and holding the A-Frame up while adjusting the height of the transom.The Shear Lashing at the top of the legs, and lashing the ledger at the bottom.Lashing the A-Frame legs with a Shear Lashing, and lashing on the transom.Carrying their A-Frame to the ditch and placing the walkways on the transom.Lashing on the transom and attaching the walkways.Tightly frapping a Square Lashing for the transom and working together to join the walkways to the A-Frame.Strop lashing the walkways to their A-Frame.
On occasion, a pair of Scouts wanted to build a bridge, and with persistence, and the help of staff or friendly Scouter, they were able to get it done.
At most Scouting events, there isn’t a permanently-installed, tall, metal pole for raising and lowering the colors. During opening ceremonies at these Scout gatherings, a tall flagpole made by joining long spars together can impress and inspire.
Opening Ceremony at a District Camporee
What is meant by tall? Naturally, the height of the flagpole depends on the size of the flag and the size of the area where it will be raised. For the most part, the flags used in Scouting are 3 x 5 feet, and the average size outdoor flagpole for a 3 x 5-foot flag is 20 feet. Of course, the main criteria for flagpole height is how far away you want the flag to be seen. But also, flying a flag high is synonymous with pride, and the taller the pole the greater the impact. However, this post is about a simple flagpole and not a pioneering display of goliath proportions. The specific flagpole featured on this page topped out at 32 feet, which was impressive, but not uncanny.
Building and putting up a taller flagpole requires more attention than one for an easy campsite setup, but all in all it’s still a relatively simple operation. Basically, four things are needed:
Long spars
An effective way to join the spars together so the flagpole will be rigid
A series of planned steps to take before standing the flagpole up *
A crew to lift the flagpole to its vertical position
Long spars. Depending on your point of reference, the definition of long spars is relative, and will hinge on what’s available in your geographic area and how practical it is to procure and transport them. Naturally, the longer the spars the fewer you’ll need to make the pole tall, which of course has obvious advantages. Again, depending on your point of reference, a long spar can be seen as having a length anywhere from 10 to 20 feet.
Simple, Tall, Pioneering Flagpole
In the flagpole featured on this page, there are three long spars: 16-foot bottom, 14-foot middle, and 10-foot top. The lower the spar, the larger the diameter. The butt end of the next spar up should be as near to the same diameter as possible to the top of the one it’s joining.
West Country Round Lashing Joining Two Bamboo Spars
An effective way to join the spars together so the flagpole will be rigid. Obviously, the rigidity of the flagpole is a primary concern. You don’t want it to bend and you don’t want it to come apart. It has to ever-withstand the stress of its own weight in a vertical position, as well as the weakening forces of wind, rain, and varying temperatures. When it comes to joining spars together to extend their length, there are basically four lashings that can be employed. For the tightest and most secure lashing, the West Country Round Lashing works really very well.
When the utmost rigidity is required, a quarter of the spars’ lengths should overlap each other. Using long lengths of 1/4-inch manila rope, start each of the two lashings approximately 1-1/2 to 2 inches from the ends of the overlapping spars and tie at least ten tight half knots (overhand knots) towards the middle of the overlap. Depending on the length of the lashing rope and the size of the spars, for added security, additional lashings can be tied e.g. in the photo to the left, where the bottom spar and the middle spar overlap, four West Country Round Lashings were applied.
* A series of planned steps to take before standing the flagpole up. Before transforming the finished flagpole from horizontal to vertical, these steps need to be taken:
Determine the spot on the ground where the flagpole will stand and dig a hole about 4 inches deep with a diameter just a little larger than that of the flagpole’s butt end.
Position the flagpole so the bottom is right over the hole.
To attach the rope halyard, tie a small rope grommet and pulley to the top of the flagpole with a prusik.
Reave the prepared rope halyard through the tackle.
Attach four guylines of the proper length (see: Guylines.) Tie the guylines to the flagpole about 3/4 up the pole with four rolling hitches. Tie them on so they will each line out to their respective anchors.
Measure out the proper distance from the bottom of the flagpole in four perpendicular directions and mark the spots where the front pioneering stake will be driven into the ground for each 1-1 anchor. The rule of thumb is drive in the stakes at a distance equal to twice the height from where the knots were tied, measured out from the base of the flagpole.
Build four 1-1 anchors in readiness for attaching the four guylines.
A crew to lift the flagpole to its vertical position. When ready, four crew members each take hold of a guyline and position themselves in line with their respective anchors. Additional crew members line up along the length of the flagpole ready to walk the pole up to its vertical position. One member is stationed at the bottom to guide the pole into the hole as the others lift. When everyone is in position, a signal caller gives the go ahead to lift. Those with the guylines pass the ends of their lines behind the front stake of their anchor. Once the flagpole is standing upright, each guyline is secured to its anchor with a rope tackle. Final adjustments can then be made to each guyline until the pole is standing straight.
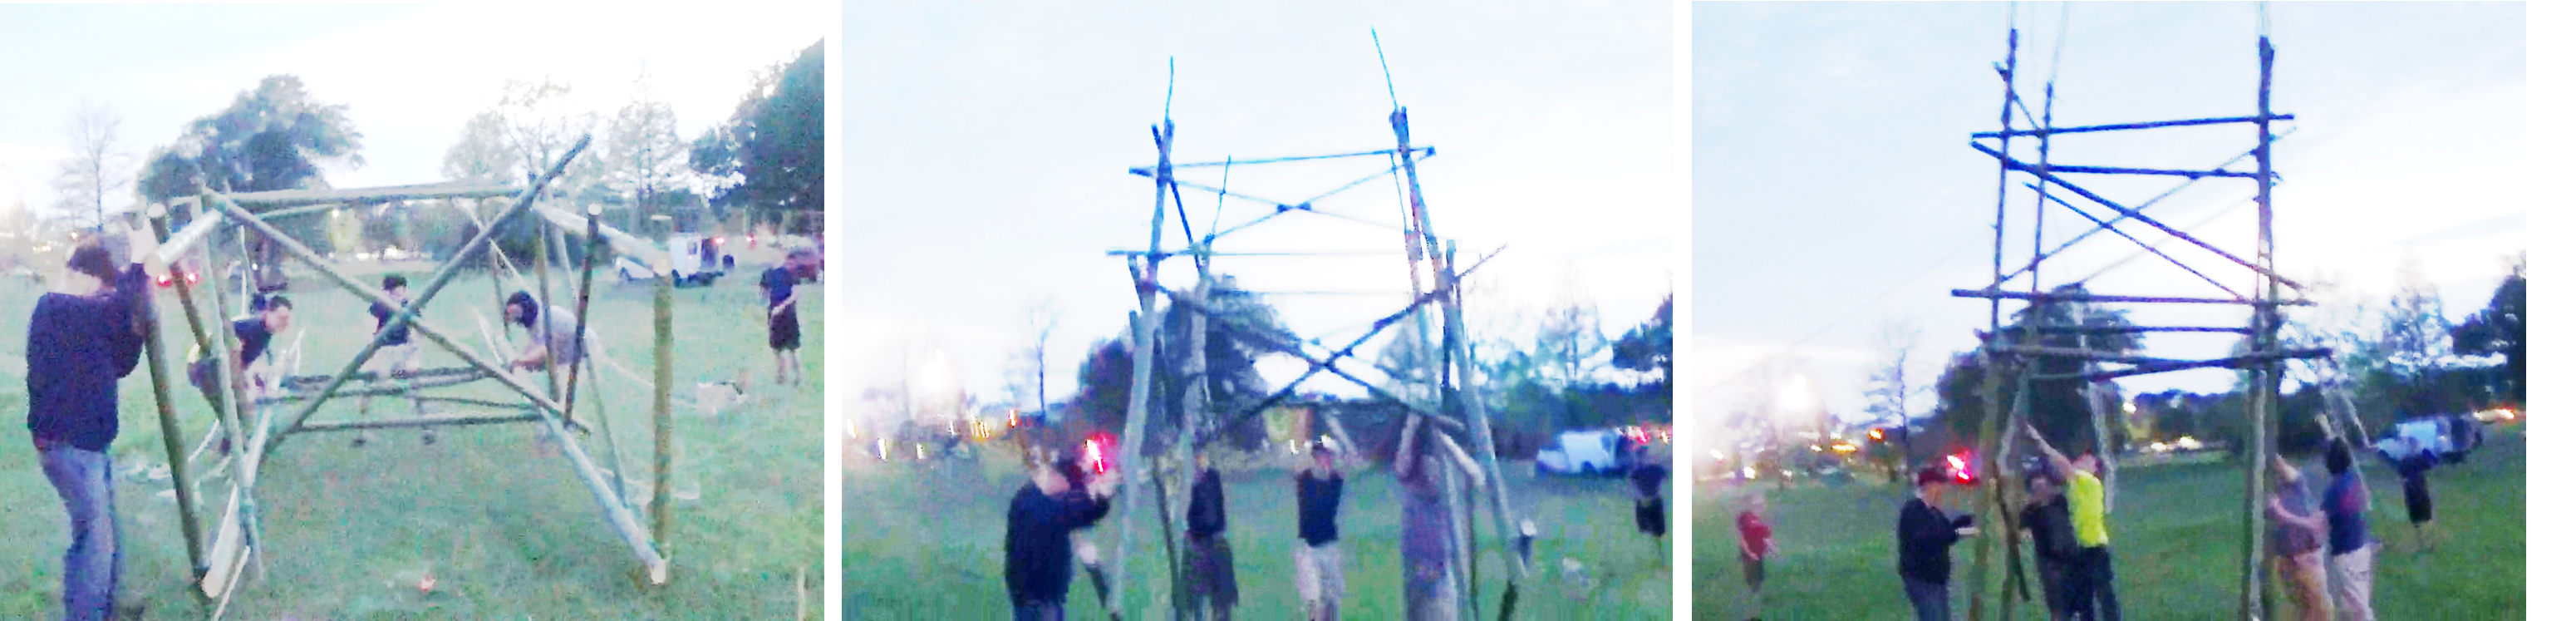
Using the 14′ Double Ladder Signal Tower as a point of reference, here are the plans for a very tall campsite gateway that stands out (and up) and serves as an impressive feat of Scout engineering. One of the perks included in this project is it provides an opportunity for new Scouts to experience hoisting a “boy-sized” structure replete with their own special colors e.g. their patrol flags.
Since this 14-foot structure isn’t climbed on, the spars can be considerably thinner in diameter. Bamboo is ideal. Lashing on those flags attached to each corner creates a spectacular effect and hence the name “4 Flag Tower!”
14′ Tower Gateway Schematic / Gateway to a Scout Expo Photo
Note: This design is not self-standing. Therefore, using it as a gateway at a camporee or Scout Expo with the necessary guylines requires an area wide and deep enough to accommodate a 16 x 16-foot space.
Scouts lash together a 4′ Side.
Materials Needed:
four 2-1/2 to 3-inch x 14-foot leg spars
six 2-inch x 8-foot X-brace spars
four 2-inch x 6-foot X-brace spars
four 2-inch x 6-foot support spars
six 2-inch x 4-foot leg spreader
forty-five 15-foot x 1/4-inch lashing ropes
four 25-foot guylines
eight 24-inch pioneering stakes
Assemble the 4-foot sides. Begin by laying out two pairs of 14-foot spars for the tower legs, side by side, 3 and 1/2 feet apart. Be sure the butt ends are even at the bottom so the tower will stand up straight.
NOTE:All lashings need to be very tight.
Diagram 1
Lash the legs together starting with a 4-foot bottom leg spreader about 6 inches up from the butt ends. Lash on a 4-foot middle leg spreader in the middle of the 14-foot legs (7 feet up), and a 4-foot top spreader about 3 inches from the top of the 14-foot legs.
When the legs are joined with the three 4-foot spreaders, lash on two 6-foot X-brace spars using square lashings to lash the ends to the legs, and a diagonal lashing where they cross, forming a trestle in the bottom half of the legs (see diagram 1). Three of the ends are lashed to the outside of the legs, and one on the inside, so that a slight gap is created where they cross. As the diagonal lashing begins, this gap will be cinched together with the timber hitch. Repeat the whole process with the other two 14-foot legs.
Diagram 2
Join the 4-foot sides. Turn both sides up horizontally, parallel to one another about 5 and 1/2 feet apart. Make sure the bottoms are even.
Lash on one of the 6-foot support spars directly above the 4-foot middle spreader (see diagram 2).
Lash another one of the 6-foot support spars directly under the 4-foot side spreader at the very top.
Lashing the X Braces with a Diagonal Lashing.
Now, lash on two of the 8-foot X brace spars diagonally between the two 6-foot supports using square lashings to lash the ends to the legs, and a diagonal lashing where they cross forming a trestle in the top part of the wide (6-foot) side (see diagram 2). Three of the ends are lashed to the outside of the legs, and one on the inside, so that a slight gap is created where they cross. As the diagonal lashing begins, this gap will be sprung together with the timber hitch.
Lash the other side. To make the lashings on the other side, you have to get the whole crew together to carefully lift and roll the tower over 180° so that it’s laying on the X-brace, and the other sides of the 4-foot sides are easier to get to.
Repeat the same procedure as before.
Scouts carefully lift the structure and rotatie it 180° to lash the other side.
Lash on the middle X-brace. This X-brace is what will keep the four sides from racking. Lash the two remaining 8-foot X brace spars diagonally across the legs just under the 4-foot middle leg spreader (see Tower Gateway Schematic on the top of this page). Use square lashings to lash them to the legs and a diagonal lashing where they cross. To accomplish this, some crew members will have to hold up the top of the tower so that there is better access to all four ends of the 8′ X brace spars.
Lash on the flags. If you want a flag or flags to fly from the top of the tower, lash the flagpole(s) to the top of each tower legs using a couple of tight round lashings.
Tower Gateway Layout
Anchors and guylines. When all the lashings are done, move the tower to where it will be hoisted. Before actually hoisting the tower, lay out the position of the four legs on the ground. Then determine where the four anchors for the guylines will be placed to steady the legs of the tower.
Using the pioneering stakes, build four 1-1 anchors. Each should extend 16 feet, 45° out from the leg.
NOTE: Make sure the flags are unfurled before hoisting the tower.
Hoisting the tower. You’ll need a whole crew to do the hoisting. Get ready to hoist the tower by delegating the following:
One signal caller who tells the crew members when and how fast to pull on the ropes.
One safety officer who observes for all safety considerations and signs of trouble during the hoisting.
Four Scouts to serve as “Lifters” to lift the top 6′ support spar that’s on the ground. Their job is to first left and then push the tower up.
Two Scouts, one on each of the 2 guylines attached to the legs, to make sure the tower isn’t over pulled and topples over
Four “Pullers” who will use the two guylines as hoisting ropes to pull the tower until it is standing
We did it!
When everyone is in position, the signal caller should direct the Scouts on the hoisting ropes (the pullers) to hoist the tower into position, while the lifters start lifting. Care should be exercised not to over pull the tower.
As soon as the tower is standing, four Scouts should temporarily tie the guylines to the anchors using a roundturn with two half hitches.
Heeling the tower. If the tower is uneven, you can heel the the butt ends of the legs 4 to 6 inches deep as needed to make it more level.
Tighten the guylines. As soon as the tower is in position, go to each of the anchors and untie the Roundturn with Two Half Hitches and replace it with a rope tackle. Use the rope tackles to hold the tower steady, by gradually applying strain to each of the four guylines at the same time. Do this by tying a butterfly knot in each guyline about 6 to 8 feet from the anchor. Then wrap the running end of the guyline around the forward stake of the anchor and back through the loop in the butterfly knot. When rope tackles are tied to all four anchors, gradually tighten the lines. Apply enough strain to each of the guylines to hold the tower firm and in a vertical position. Then tie off the rope tackles and secure the running ends with half hitches.
Hoisting a Larger Version: 17′ high x 8′ wide x 6′ deep
Using a Rope Tackle, two Scouts tighten a hand rope on their monkey bridge.Click on the image for a larger view.
We apply a rope tackle, (also known as the Trucker’s Hitch, Lineman’s Hitch, Load Binder, and Harvester Hitch) where the guylines meet the anchors for pretty much all our pioneering projects. For safety reasons, Taut-Line Hitches should never be used in any pioneering work, because if the tension is eased the knot can slip.
The rope tackle is one of the many skills learned for pioneering that can be used in a variety of situations for many years to come.
Securing a load of spars to a flatbed for transport.
Frequently, we use a rope tackle when creating a ridge line between two trees for dining flies and tarps, and love using them whenever there’s an appropriate need to hold the strain on a line being tightened.
Simple Rope Tackle for a Low Stress Application using Braided Nylon Cord.
Rope Tackle for Pioneering Use
The following drawings and text have been extracted directly from the 1993 publication of the Pioneering Merit Badge Pamphlet written by Adolph Peschke:
When you want to lift or pull more than your own strength will permit, or when you want to make a heavy lifting job a little easier, the rope tackle is a device that can be used.
The idea behind a rope tackle is similar to that of a tackle using blocks and pulleys. In a rope tackle, one lead (end) of the rope has to be fixed. That is, it has to be anchored around a spar or tied through a ring or other piece of hardware that doesn’t move.
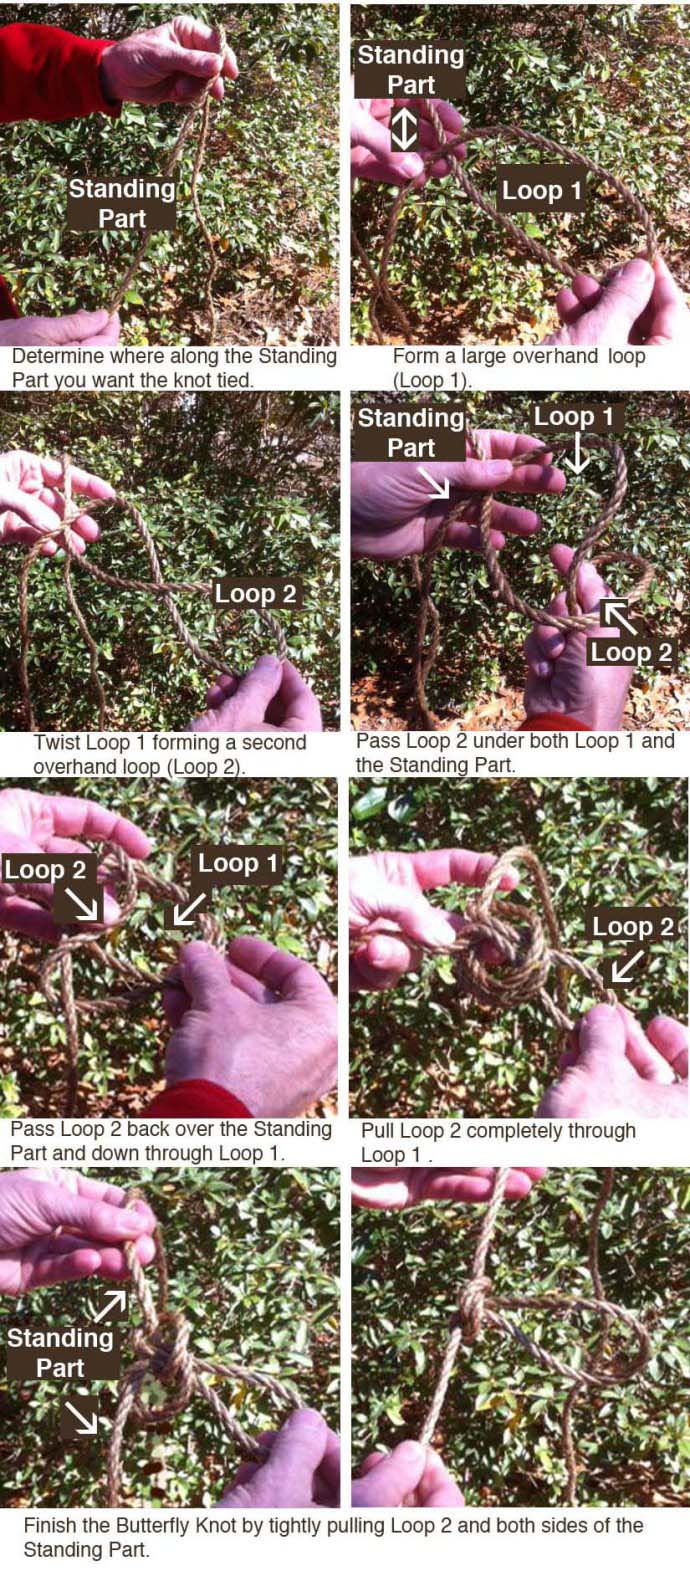
Loop knot. Then a loop knot is tied along the standing part of the rope. The Butterfly Knot and the Bowline on a bight are suitable for making a loop knot because they can be tied in the standing part of the rope and they are both easy to tie and fairly easy to untie even after being put under a strain. If you have no other reason to become proficient in tying these two knots, the rope tackle should convince you.
Vertical display, as for lifting or pulling an object.
Connect with the load. After you’ve tied the loop knot, it forms a fixed loop that acts as the wheel in a block. If you’re using the rope tackle to lift or pull an object, pass the running end through a ring or other hardware that’s attached to the object (load). The ring (or other hardware) is used so that the rope is free to slide as you pull on the hauling end of the rope as the tackle takes effect. If you want to use the rope tackle to tighten a line, pass the running end around a fixed object such as a spar, a stake, or a tree.
Finally, the running end of the rope is passed through the fixed loop in the loop knot. The running end becomes the hauling line which is pulled to make the tackle work.
Principles. The rope tackle works on the same principles as any other tackle using mechanical blocks or pulleys. The rigging method shown on the left develops twice the lifting or pulling power that’s applied to the hauling end. In other words, you can lift a fifty-pound weight using only twenty-five pounds of force on the hauling end.
To determine how much force is needed to lift a weight, the general rule is that you count the number of ropes passing through the ring where the object (load) is. In this case there are two ropes passing through the ring that’s attached to the load. Then divide the number into the weight being lifted. Let’s assume that the weight being lifted is fifty pounds. The answer is twenty-five pounds, which is the amount of pull required to lift the fifty pounds with the rope tackle.
When you take into consideration the friction of the ropes rubbing together, you will have to apply a bit more than the twenty-five pounds to make the lift. But even with the loss caused by friction, the rope tackle is quite effective.
Sometimes it is better to actually experience the effect of how the rope tackle works than it is to understand the technical explanation of the process. Setting up a rope tackle will convince you.
Tying off the Rope Tackle & Maintaining the Tension on the Line
Tying off. When using a rope tackle, if you want to hold the position of a load being lifted or pulled, or if you want to hold the strain of a line being tightened, form a bight in the hauling end of the rope and tie it off with a tight Half Hitch below the fixed loop in the Butterfly Knot.
Types of rope. The type of rope you choose for a rope tackle should have a low stretch factor, such as pure manila rope. Ropes that stretch like polypropylene and nylon, even though they are strong, require that you pull the stretch out of the rope before your tackle takes effect.
Note: When in use, the rope tackle can put considerable strain on the fibers of the rope. Therefore, repeated use of the same section of the rope for this purpose should be avoided. The ropes used to make the tackle should be inspected for damaged fibers on a regular basis.
Uses of the rope tackle. The wide range of uses for a rope tackle by a number of different craftsmen speaks for its effectiveness. Each craft seems to use a slightly different knot or hitch to form the loop that makes a rope tackle. The Lorryman’s Hitch, the Lineman’s Hitch, the Stagehand’s Hitch, are all samples of different knots or hitches used to form the loop. The only difference between these hitches is that in some of them the type of knot used to make the loop is more easily untied than others after a hard pull. But they all do essentially the same thing. That is, they form a fixed loop for the rope to be used as a tackle.
The extent to which the rope tackle has been used by craftsmen and tradesmen in their daily work can be better understood from the following list of uses and by the various names by which it is called:
The Linesman’s Hitch is used to put strain on a line in the process of stringing electric or telephone lines. It was used as far back as the building of the telegraph lines that opened up the western states during the 1800s.
The Stagehand’s Hitch is used to adjust the height of the curtains on a theater stage.
The Wagoneer’s Hitch is an English reference to the hitch used to secure the load on a wagon or lorry.
The Load Binder is is what the farmer called the hitch he used to tie down a load of hay on his wagon.
Pulling a log. One of the uses of a rope tackle is to pull a heavy load such as a log. To do this, you need two ropes. Tie a short (6′ to 8′) length of rope to the end of the log with a Timber Hitch. Then tie a bowline at the other end of this rope.
Pulling a Log or Other Heavy Object
To pull the log, tie a long line to a tree or other anchor point with a Roundturn with Two Half Hitches. Then tie a Butterfly Knot in the long line to form the loop for a rope tackle. Run the end of the long line through the Bowline and back through the fixed loop in the Butterfly Knot. Then pull on the end of the long line to pull the log.
Pioneering Uses
To adjust the strain on the guylines of a pioneering project or a flagpole (see figures 98 and 99)
To put the strain on a picket line used for tying up horses or canoes
To tie down and secure your equipment on a trailer or truck (see figure 100)
To hoist or lower equipment in rock climbing
To tie a line to air your sleeping bag or to make a clothesline for wet clothes
To tighten hold-down ropes on large tents and flies
The following text is by Adolph E. Peschke as presented in the 1998 printing of the 1993 edition of the Pioneering Merit Badge Pamphlet:
A butterfly knot is a fixed loop tied in the middle of a rope. There are a number of other knots that do the same thing, but the butterfly knot tends to work better because it doesn’t jam when strained and it’s easy to untie.
Since it’s tied in a symmetrical fashion, strain can be put on it from any direction. Even though this knot is usually tied in the middle of the rope, you can also tie it at the end of the line if you need a fixed loop that is easily untied.
The butterfly knot is a favored knot for mountain/rock climbers, used for hand or foot loops or used to hook their carabiners into. It has many uses in pioneering work.
Butterfly Knot Instruction at a Camporee
Pioneering Uses
When using a rope to pull a heavy object (such as a log), tie a series of butterfly knots to form loops for each person’s hand or shoulder.
When climbing a rope, you can tie a series of butterfly knots to form loops for your hands and feet.
To provide a fixed loop to use with a toggle.
When making a rope tackle, the loop in the butterfly knot serves as the pulley. (See Rope Tackle.)
To tie up horses or anchor canoes on shore, tie a series of in a picket line for each horse or canoe.
YOU’LL USE IT AGAIN AND AGAIN!
The butterfly knot, also named the Alpine Butterfly and the Lineman’s Loop, has been referred to as the “Queen of Knots” by Pioneering legend, John Sweet.
The following text is by Adolph E. Peschke as presented in the 1998 printing of the 1993 edition of the Pioneering Merit Badge Pamphlet:
Pioneering is the knowledge and skill of using simple materials to build structures that are used in a wide range of Scouting activities. These skills are sometimes referred to as “backwoods engineering.”
Down through the ages, people have used ropes, spars, and simple hardware to build bridges, towers, and even their own shelters. In the early development of our country, pioneering methods were used in mining and transportation, to clear the wilderness, and to build roads and bridges. So it is understandable that the term “backwoods engineering” was applied.
The same skills can be used by Scouts to build pioneering projects ranging in complexity from a simple camp gadget to a signal tower.
Whatever the project, the same applied principles of physics, geometry, and math are used to build pioneering projects and structures. But, keep in mind that all the information (in this pamphlet*) is eventually used for a practical, hands-on application—that is, to build something.
Pioneering is a good foundation for many Scouting activities. You must learn, and then use, such disciplines as planning ahead and teamwork. You can also put to use the basic skills learned in rank advancement, such as knot tying.
But most of all, pioneering provides a practical way to experience the joy of accomplishment when you’ve built something that is needed for yourself or others; it can be something that makes living in camp easier and more comfortable. Pioneering can be both fun and challenging when you use your skill and knowledge to choose the right materials (ropes and spars) and build a usable structure.
The basics of pioneering, such as tying knots, making lashings, using rope tackle, constructing anchors, and basic rope knowledge can be done at home. The projects and structures (shown in this pamphlet**) can usually be constructed with materials available at summer camp or at council camping events.
If the site where you hold your meetings can feature a “permanent” crossbar about 10 feet high, then your Scouts can frequently practice and enjoy this activity whenever the opportunity is presented. Otherwise, erecting the crossbar is itself a mini-pioneering challenge, and if you have the grounds, can be regularly put up by a patrol prior to or during as many meetings as desired.
Also referred to as the Rope-Throw-Log-Lift Game and the Heaving Bar, this is an activity requiring a series of rope-handling and knot-tying skills. Because the skills that are called into play aren’t normally combined in such a sequence, and because there’s an element of fast-paced, fun competition, those Scouts knowing how to tie the featured knots most often get a kick out of giving it a go. The activity can be a competition to complete the task in the fastest time between individual Scouts or played with a team of three Scouts, each assigned a specific task.
Here’s how Adolph Peschke describes this activity in the 1993 edition of the Pioneering Merit Badge Pamphlet:
Long log! (Good Half Hitch, but is that a Timber Hitch?)
This game is intended to develop the knot tying skills of an individual Scout or of a team of three Scouts. It is important to know that the knots used (clove hitch, timber hitch, sheep shank) are each tied in a typical application for each knot. Additionally, you will develop the skills of coiling and throwing a rope.
To prepare for this challenge, you should practice tying the individual knots and coiling and throwing a rope. The challenge starts for a single Scout with the rope coiled ready to throw. The rope is thrown over the cross spar. If the throw misses the mark, the Scout recoils the rope and throws again. If the throw is good, he uses the end of the rope he is holding to tie a clove hitch on the stake next to where he’s standing.
Next he moves to the end of the rope that was thrown over the cross spar and uses it to tie a timber hitch around a short length of log (about 4 inches in diameter and 4 feet long). Then he ties a half hitch around one end of the log (forming a Killick Hitch).
To complete the challenge, he moves to the part of the rope between the stake and the upright structure, and ties a sheep shank to shorten the rope enough to suspend the log above the ground.
This is how it should look!
When the challenge is played with a team of three Scouts, the first Scout throws the rope over the cross spar and ties the clove hitch on the stake. the second Scout moves to the log and ties the timber hitch with the additional half hitch. The third Scout ties a sheep shank to shorten the rope and hold the log off the ground. The challenge comes when the game is played while being timed with a stopwatch. As a patrol, the times of the individual Scouts can be added up for a total patrol score.
Three Scouts at once!
The following materials will be needed so that three Scouts or three teams of Scouts can play simultaneously:
three 50-foot x 1/4 or 3/8-inch throwing ropes
two 8 to 10-foot x 2 to 3-inch legs
one 10-foot x 2 to 3-inch crossbar
two 15-foot x 1/4-inch lashing ropes
seven stakes
three 4-foot x 4-inch logs
four 20-foot guylines
To set up the upright structure, lash the cross bar to the legs with tight square lashings. About 3/4 of the way up each crossbar, attach two guylines with a roundturn with two half hitches. Stand up the structure where it will be positioned, and hammer the stakes about 12 feet out from the legs at 45° angles. So that good tension can be applied to each leg, you can attach the guylines to the stakes with a simple rope tackle.
On the throwing side, space out three stakes between the legs and hammer them in to the ground about 25 feet from the structure. On the other side space out the three logs.


")