Scout Meeting Challenge: Patrols Have Fun With Scout Stave Launchers

First of all, let’s acknowledge what appears to be the source for this easy-to-execute design, the website for: Scouts South Africa where you can download a pdf of the design and directions. The activity surrounding the construction of this launcher incorporates sound square lashing technique, teamwork (of course), a geometric study of angles and trajectory, some concentration, and lots of laughter. The ensuing fun can be a real blast, indoors or outdoors*.

Link to: Larger Image
Assembling their Launcher

Here’s what each patrol will need:

  • six Scout Staves
  • seven 6-foot x 1/4-inch  lashing ropes
  • three short lengths of cord (to secure the shot holder to the structure if your using surgical tubing)
  • one pre-made “shot-holder”
  • large supply of newspaper and masking or scotch tape
  • large enough room to spread out

In a nut shell, here’s what happens:

An indoor or outdoor area is set up so there’s plenty of room to launch the “shots.”  Each patrol is provided the necessary materials along with the design drawing. They are each assigned their own designated area (about 10′ x 10′) in which they must stay. On signal, they race to build their Scout Stave Launcher. Using the newspaper and tape, they will also have to set to work and make a supply of “shots.” As soon as they are ready, they can proceed to launch tightly, taped-together newspaper “shots” at designated targets in the shooting area. They can also launch the “shots” for distance.

Balled up newspaper
Balled up newspaper “shots” are launched at targets or for distance.

ScoutStave
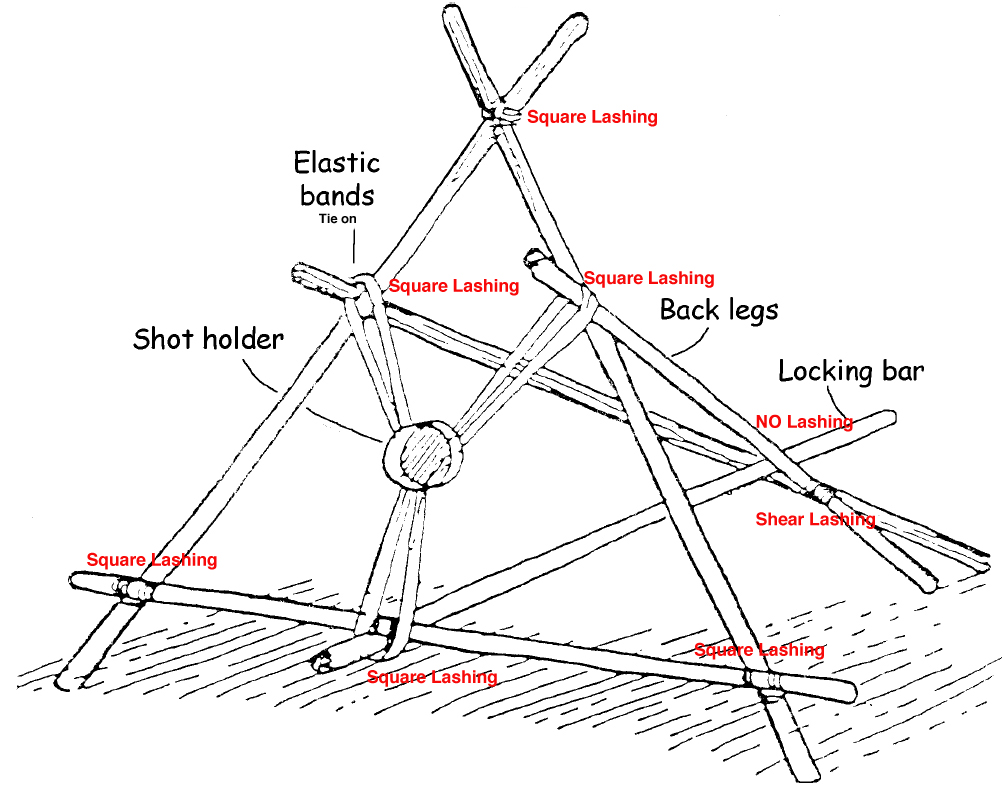
It should be noted, the “locking bar” (refer to the drawing) is only lashed to the bottom crossbar of the A-frame. The angle of fire is adjusted by moving the “locking bar” up and back. Printable  Diagram

Each launching can serve as a point of reference to adjust the “locking bar” and, if necessary, the position of the elastic bands. Remember, the patrol must stay within their duly designated area. Used “shots” can be retrieved at defined intervals, during which no further launching can take place until an “all clear” is sounded.

Canvas Pouch Shot Holder

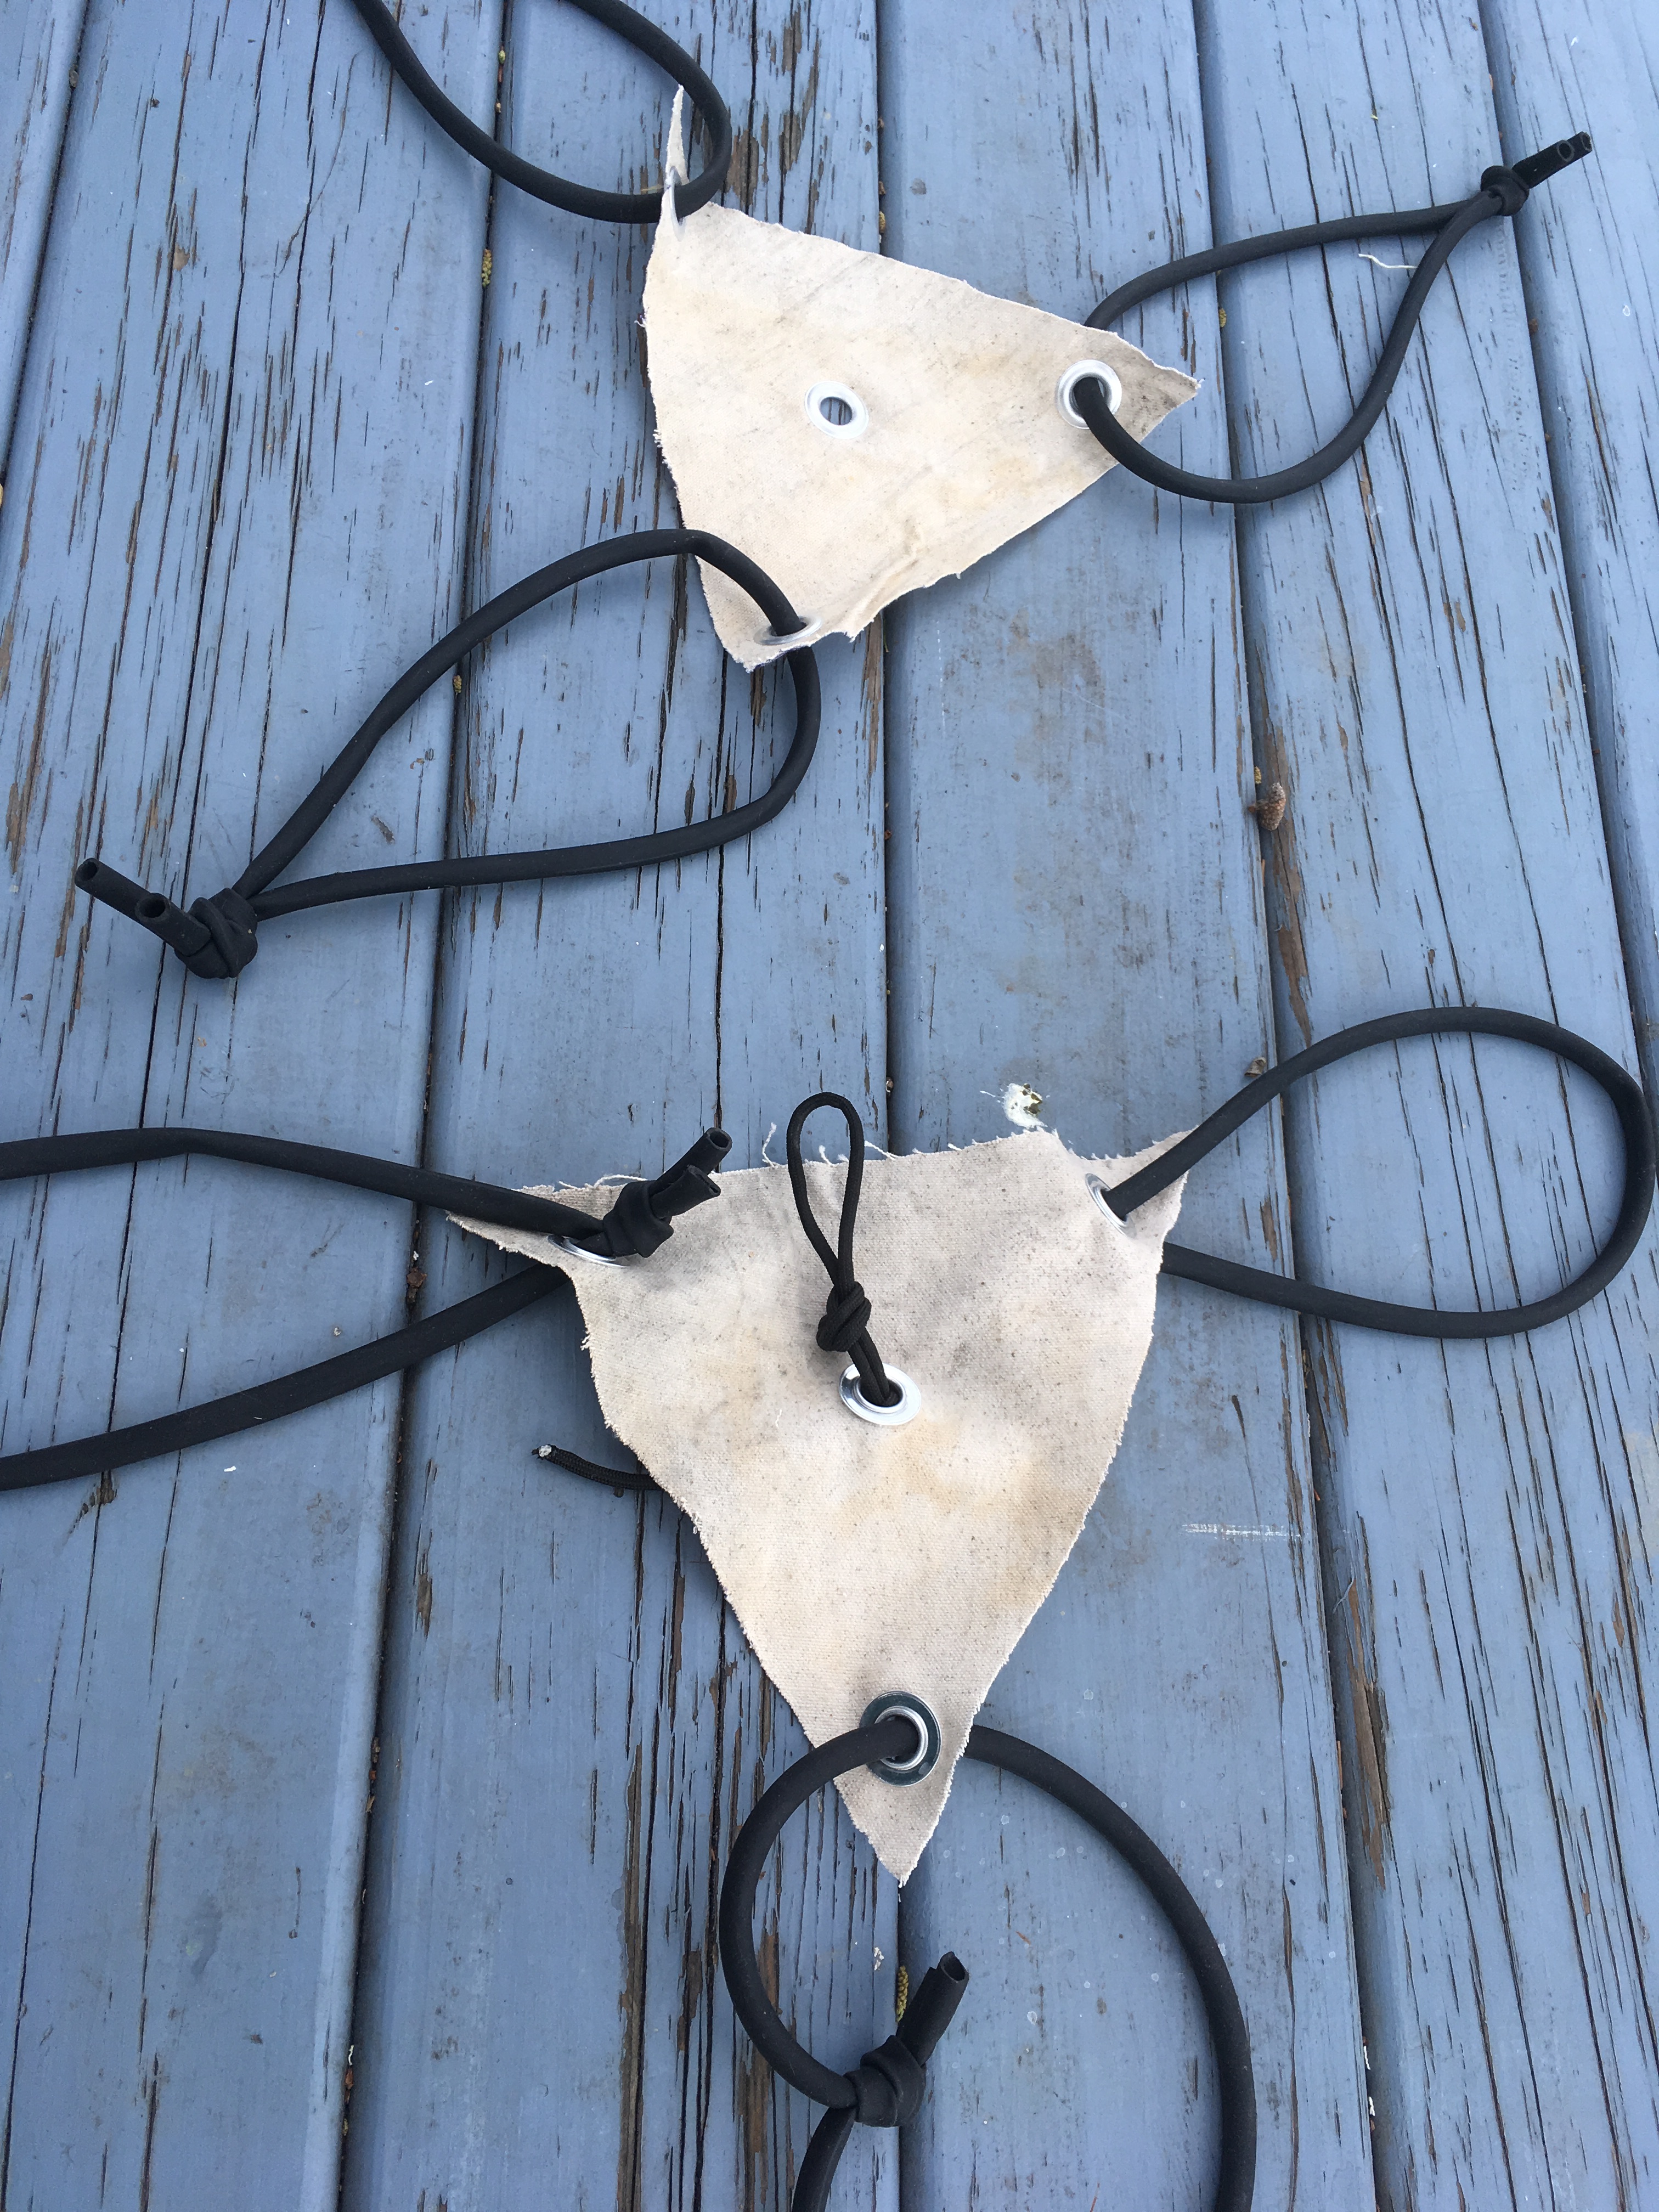
Making a Shot Holder—the most simple approach:

  1. Cut out an equilateral triangle with 12-inch sides from a piece of canvas. 10-oz canvas will work if you double one triangle on top of another.
  2. Place a grommet on each corner of the triangle(s).
  3. Reeve a 24-inch length of surgical tubing through each grommet and  make a loop by joining the ends of each with a tight knot.
  4. If you choose, you can add another grommet to the middle and use it to fashion a pull line.

Tin can shot holder—another approach that works well is as follows:

For each shot holder, you’ll need a can and a length of surgical tube, inner tube, or some kind of  stretch band. Six feet works well with Scout staves.

Ballista rigged with surgical tubing. (Notice the cord used to secure the tubing to the structure.
Launcher rigged with surgical tubing. (Notice the cord used to secure the tubing to the structure.

Prepare the cans. Using 12.5 oz. cans (commonly filled with canned chicken or beef) cut three slits in the bottom the same width as the rubber strips or more narrow if you’re using surgical tubing. Flatten the sharp edges as much as possible against the inside of the can and then apply tape to serve as a cushion between the slits and the stretch material.

Sample Shot Holder made from a strip of a 6' Exercise Stretch Band and a 12.5 oz Can
Sample Shot Holder made from a strip of a 6-foot  Exercise Stretch Band and a 12.5-ounce Can

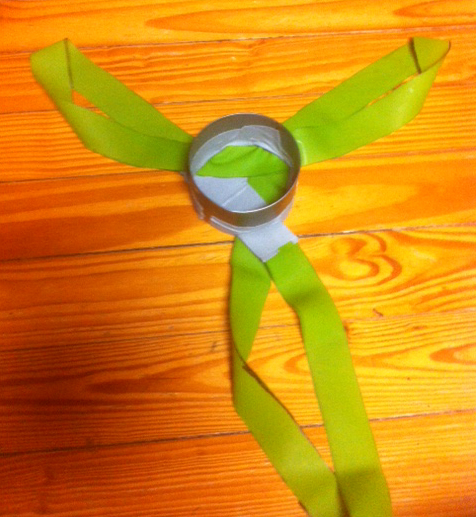
The stretch material. One bicycle inner tube can be cut into three to four 6′ strips each of which are just the right size for one shot holder. If you can’t easily obtain inner tube, heavy duty exercise stretch bands work okay, but are less durable. What works best by far are six foot lengths of 1/4″ surgical tubing! They’re the most stretchy and can withstand a lot of strain. Surgical tubing can be purchased through scuba supply companies.

Attach the rubber. Tie together the ends of the rubber strip or surgical tube making one loop with a circumference of approximately six feet. Feed the loop through one slit in the can. The objective here is to extend an even-sized loop through each slit, by forming bights in the loop and threading them through the other two slits.

*Outdoor action can give rise to a host of variations. “Shots” can consist of tennis balls, and targets can be set up at varying distances. Depending on the elastic bands used to make the shot holder, this simple design can easily launch well over a hundred feet.

NOTE: Eye protection and supervision by an NCS trained shooting sports director is required for this activity.

SCOUT MEETING CHALLENGES MAIN PAGE

Scout Meeting Challenge: Crossing the Alligator Pit

The real challenge built into this activity comes into play after the lashing is finished. The patrol is simply building a very well-lashed A-frame. As with all pioneering endeavors, teamwork is essential. With this interpatrol challenge, it’s absolutely necessary! Cossing the Alligator Pit affords a superlative team building opportunity. Read about and view one patrol’s very impressive accomplishment!

Patrols pull together to assemble their A-frame
Alligator Pit

Materials for each patrol:

  • two 8-foot x 4-inch spars to serve as A-frame shear legs
  • one 6-foot x 3-inch spar to serve as a ledger at the base (crossbar)
  • three 15-foot x 1/4-inch lashing ropes
  • six 20-foot x 1/4-inch lashing ropes  (for guylines)

Method: The “Alligator Pits” are marked on the ground, one for each patrol, 15′ x 15′ square. Patrols line up on one side of their pits. On signal the patrols lash together an A-Frame “walker” using either three square lashings or two square lashings with a shear lashing at the top. At the top they attach two 20-foot lashing ropes, and attach two more ropes at each corner of the crossbar, using roundturns with two half hitches. These are the guylines. The patrol then stands the “walker” upright, and one member climbs on the crossbar. One Scout mans each guyline to help steady and to help propel the Scout on the crossbar as he tries to “walk” the A-Frame across the pit. Only the A-frame “walker” is allowed inside the pit. Note: This activity should only be held indoors if the floor is carpeted. Generally, tile or wood floors will be too slippery and hence minimize the likelihood of success.

Great Team Working Challenge! Each Scout handling a guyline needs to be vigilant!
Great Team Working Challenge! (Each Scout handling a guyline needs to be vigilant!)

SCOUT MEETING CHALLENGES MAIN PAGE Pioneering and Team Building

Rope-Toss-Log-Lift Challenge

Racing over to the log!

If the site where you hold your meetings can feature a “permanent” crossbar about 10 feet high, then your Scouts can frequently practice and enjoy this activity whenever the opportunity is presented. Otherwise, erecting the crossbar is itself a mini-pioneering challenge, and if you have the grounds, can be regularly put up by a patrol  prior to or during as many meetings as desired.

Also referred to as the Rope-Throw-Log-Lift Game and the Heaving Bar, this is an activity requiring a series of rope-handling and knot-tying skills. Because the skills that are called into play aren’t normally combined in such a sequence, and because there’s an element of fast-paced, fun competition, those Scouts knowing how to tie the featured knots most often get a kick out of giving it a go. The activity can be a competition to complete the task in the fastest time between individual Scouts or played with a team of three Scouts, each assigned a specific task.

Here’s how Adolph Peschke describes this activity in the 1993 edition of the Pioneering Merit Badge Pamphlet:

Long log! (Isn't that supposed to be a timber hitch?)
Long log! (Good Half Hitch, but is that a Timber Hitch?)

This game is intended to develop the knot tying skills of an individual Scout or of a team of three Scouts. It is important to know that the knots used (clove hitch, timber hitch, sheep shank) are each tied in a typical application for each knot. Additionally, you will develop the skills of coiling and throwing a rope.

To prepare for this challenge, you should practice tying the individual knots and coiling and throwing a rope. The challenge starts for a single Scout with the rope coiled ready to throw. The rope is thrown over the cross spar. If the throw misses the mark, the Scout recoils the rope and throws again. If the throw is good, he uses the end of the rope he is holding to tie a clove hitch on the stake next to where he’s standing.

Next he moves to the end of the rope that was thrown over the cross spar and uses it to tie a timber hitch  around a short length of log (about 4 inches in diameter and 4 feet long). Then he ties a half hitch around one end of the log (forming a Killick Hitch).

To complete the challenge, he moves to the part of the rope between the stake and the upright structure, and ties a sheep shank to shorten the rope enough to suspend the log above the ground.

This is how it should look!

When the challenge is played with a team of three Scouts, the first Scout throws the rope over the cross spar and ties the clove hitch on the stake. the second Scout moves to the log and ties the timber hitch with the additional half hitch. The third Scout ties a sheep shank to shorten the rope and hold the log off the ground. The challenge comes when the game is played while being timed with a stopwatch. As a patrol, the times of the individual Scouts can be added up for a total patrol score.

Three Scouts at once!

The following materials will be needed so that three Scouts or three teams of Scouts can play simultaneously:

  • three 50-foot x 1/4 or 3/8-inch throwing ropes
  • two 8 to 10-foot x 2 to 3-inch legs
  • one 10-foot x 2 to 3-inch crossbar
  • two 15-foot x 1/4-inch lashing ropes
  • seven stakes
  • three 4-foot x 4-inch logs
  • four 20-foot guylines

To set up the upright structure, lash the cross bar to the legs with tight square lashings. About 3/4 of the way up each crossbar, attach two guylines with a roundturn with two half hitches. Stand up the structure where it will be positioned, and hammer the stakes about 12 feet out from the legs at 45° angles. So that good tension can be applied to each leg, you can attach the guylines to the stakes with a simple rope tackle.

On the throwing side, space out three stakes between the legs and hammer them in to the ground about 25 feet from the structure. On the other side space out the three logs.

SCOUT MEETING CHALLENGES MAIN PAGE

Rope-Toss-Log-Lift Challenge at the Jamboree