This fundamental trestle bridge design yields a solid structure. With Adolph Peschke’s text as the main point of reference, under the following photos there are some guidelines that will help in its successful construction:
Building the Trestles and WalkwaysLashing on the Walkway Underspar and PlankTransporting the Subassemblies to the Ravine and Attaching the Walkways to the Trestles
When using the length of spars in the list of materials, choose a ravine or stream that is at least wide enough to assure the interlocking trestles can be spread at a distance that will allow the formation of a comfortable angle of just about 45°.
Make it a priority to lash the top ledgers as low as necessary to assure they will end up about 1 foot above the level of the banks. Whatever the height, they need to be at least 6 inches from the end of the trestle legs, so when the trestles interlock, the “V” that is formed on each side is deep enough to rest the 3 inch-diameter transom in between.
The bottom ledgers need to be lashed at least 6 inches up from the butt ends of the trestle legs to assure there’s enough leg to heel in as necessary when it comes time to even the transom and add stability.
The following text is by Adolph E. Peschke as presented in the 1998 printing of the 1993 edition of the Pioneering Merit Badge Pamphlet:
Pioneering is the knowledge and skill of using simple materials to build structures that are used in a wide range of Scouting activities. These skills are sometimes referred to as “backwoods engineering.”
Down through the ages, people have used ropes, spars, and simple hardware to build bridges, towers, and even their own shelters. In the early development of our country, pioneering methods were used in mining and transportation, to clear the wilderness, and to build roads and bridges. So it is understandable that the term “backwoods engineering” was applied.
The same skills can be used by Scouts to build pioneering projects ranging in complexity from a simple camp gadget to a signal tower.
Whatever the project, the same applied principles of physics, geometry, and math are used to build pioneering projects and structures. But, keep in mind that all the information (in this pamphlet*) is eventually used for a practical, hands-on application—that is, to build something.
Pioneering is a good foundation for many Scouting activities. You must learn, and then use, such disciplines as planning ahead and teamwork. You can also put to use the basic skills learned in rank advancement, such as knot tying.
But most of all, pioneering provides a practical way to experience the joy of accomplishment when you’ve built something that is needed for yourself or others; it can be something that makes living in camp easier and more comfortable. Pioneering can be both fun and challenging when you use your skill and knowledge to choose the right materials (ropes and spars) and build a usable structure.
The basics of pioneering, such as tying knots, making lashings, using rope tackle, constructing anchors, and basic rope knowledge can be done at home. The projects and structures (shown in this pamphlet**) can usually be constructed with materials available at summer camp or at council camping events.
Single Lock Bridge Photo Scanned from 1967 Field Book
The following text is by Adolph E. Peschke as presented in the 1998 printing of the 1993 edition of the Pioneering Merit Badge Pamphlet:
The single lock bridge shown here is a well-established and basic design. The list of spars shown for this project should build a bridge to span a creek or ravine approximately 4 feet deep and 18 feet from bank to bank.
Trestles. The bridge consists of two trestles and two walkways. Begin by building the two trestles as subassemblies. Adjust the length of the spars for the trestle so that when they are placed in the creek, as shown in Drawing 2, the tops of the ledgers will be about 1 foot above the level of the banks of the creek. This will give a comfortable slant to the walkways.
Drawing 1: Trestle Schematic
When constructing the two trestles, build only one trestle first. Then as the second trestle is being built, make sure that the legs are narrower at the top and fit between the legs of the first trestle (see Drawing 1).
Walkways. Next, the two walkways are constructed as subassemblies. Each walkway consists of two lateral spars. six cross spars, and two longer cross spars. One of these two longer cross spars is used as an underspar at the end of the walkway that is attached to the transom. The other longer cross spar is used to attach to the stakes. (Refer to Bridge Walkways.)
Drawing 2: Interlocking Trestles
Assembly. After building the trestles and walkways, take them to the assembly site (the creek or ravine). Place the trestles in the center of the creek so that the tops of the trestles are interlocked (see Drawing 2). Then lift a 3-inch diameter transom spar to fit on top of the interlocked trestle legs. Now, heel in the bases of the legs in holes 4 to 6 inches deep. As you’re heeling in the legs, level the transom spar so that the walkways don’t slant when they’re added.
Next, the two walkways are put into position (see Drawing 3). Lash the underspars on the walkways to the transom spar with Strop Lashings at three points. Finally, the cross spars at the ends of the walkways are lashed to the stakes.
By lashing the walkways to the transom spar and lashing the ends of the walkways to the stakes, you make a complete walkway unit that will prevent movement and provide a sturdy bridge deck.
The following text is by Pioneering Legend, Adolph Peschke, author of the renowned 1993 edition of the Boy Scouts of America’s Pioneering Merit Badge Pamphlet, from his treatise entitled “Pioneering With Laminated Spars.” Some additions have been included in this post, for the purpose of practical elaboration.
Suggestion: Prior to using them to build a project, to eliminate the lashings from slipping on the smooth surfaces of the Laminated Spars, wrap six inches of friction tape tightly around the areas where the spars will intersect one another .
Building an A-frame using Laminated Spars
Just what are laminated spars? They are similar in size and length to the natural tree spars that have been used for many years bt Scouts in the construction of Pioneering structures i.e.: bridges, towers, and in other camping projects.
This kit of Laminated Spars are fabricated using pieces made from standard lumberyard shapes. Here, two or more wood shapes are glued and nailed together to obtain a strong cross-section and length of the finished spar needed in building structures using ropes and spars. This method of gluing and nailing pieces of wood together has long been used by wood workers to gain the strength that a single piece of wood does not provide.
Lashing together 2 A-frames made with Laminated Spars
Important to Scouts is the fact that the same knots and lashings used with natural spars in building bridges, towers, etc. can be used with these Laminated Spars.
Because natural spars have become harder for Scout troops to obtain due to changes in conservation practices and the fact that suitable species of trees that provide the best spars are just not available for harvest in many areas of the country, Laminated Spars are a means for the Scout troop to have its own “kit” for a full program of “boy sized” Pioneering for teaching – learning – advancement – or just fun and action projects.
T h e T r o o p K i t
4 ea. Trestle Legs, 2-1/4″ x 2-1/4″ x 6′
4 ea. Ledgers Upper/Lower, 2-1/4″ x 2-1/4″ x 4′
1 ea. Transom, 2-1/2″ x 3″ x 4′
4 ea. “X” Braces, 1-1/2″ x 2- 1/4″ x 6′
12 ea. Walkway Cross Spars, 1-1/2″ x 3″ x 3′
4 ea. Walkway Cross Spars, 1-1/2″ x 3″ x 4′ (a little longer than specified but more thrifty)
4 ea. Walkway Laterals, 2-1/2″ x 3″ x 10′
2 ea. Walkway Planks, 2″ x 8″ x 8′
Refer to the Pioneering Merit Badge Pamphlet for knots, lashings, and building instructions for the Single Lock Bridge.
Materials: It is not necessary to buy choice lumber. A good construction grade should do, if you can buy from a lumberyard that lets you pick and select what you buy.
Note: The lumberyards refer to size and shapes in nominal dimensions, i.e.
2″ x 4″ actually is: 1-1/2″ x 3-1/2″
2″ x 6″ actually is: 1-1/2″ x 5-1/2″
1″ x 4″ actually is: 3/4″ x 3-1/2″
1″ x 6″ actually is: 3/4″ x 5-1/2″
Reference the sizes shown on the sketches are actual i.e. 3/4″, 1 and 1/2″, 2 and 1/4″, 2 and 1/2″ , 3″. Also lengths are stated in feet: 4′, 6′, 8′, etc. When possible, select species Fir or Yellow Pine. Avoid large knots and “White Wood.”
Fabrication of Laminated Spars – All work should be done or supervised by adult leaders and/or skilled craftsmen.
TRESTLE LEGS & LEDGERS: (as per The Troop Kit)
Materials needed: one 1 x 6 x 4-foot., one 2 x 6 x 4-foot, one 1 x 6 x 6-foot, one 2 x 6 x 6-foot boards
These lumberyard shapes may be bought in 8 and 12-foot. lengths.
Rip lumber to 2-1/4-inch strips and cut to 4 and 6-foot lengths.
Spread glue evenly on both pieces and nail with 6D Hot Dip Galvanized Nails along both sides with 10-inch staggered spacing. Leave clearance for 1/2-inch Round Over Router Bit. Paint the ends of the 4′ spars white, and the 6′ spars red.
–
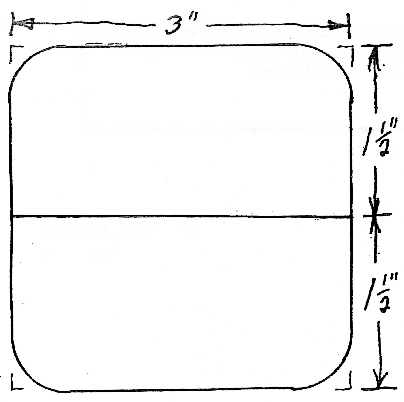
THE TRANSOM SPAR: The Transom Spar is a stout spar used on many different bridges to support the walkways where they meet at the center of the bridge. When the walkways are lashed to it, it makes a continuous unit.
Material needed: The Transom Spar can be made from one 2 x 4 x 8-foot stock. Rip the lumber to 2-1/2 inches and cut it into two 4-foot lengths.
Spread glue evenly on two sides and nail using 10D Hot DIpped Galvanized Nails. Drive nails from both sides at an angle (to prevent penetrating the opposite side). Router 1/2-inch round over all four edges. Paint ends white.
–
–
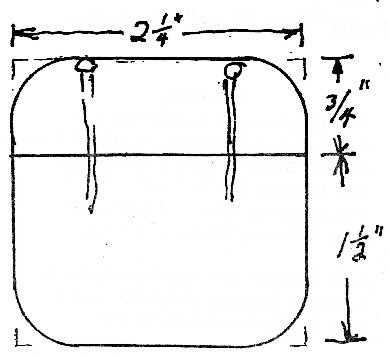
TRESTLE “X” BRACES (as per The Troop Kit)
Materials needed: Four 1 x 6 x 6-foot boards. Rip each piece into three 1-1/2-inch strips.
Note: Once you have ripped the three pieces into into 3/4 x 1-1/2-inch strips, it is easier to run the 1/2-inch round over the edges. See the sketch BEFORE routing. One piece gets 2 edges rounded, and the other two get one edge only. Becasue the strips are narrow, it is best to route round overs before nailing.
Use 1 and 1/4-inch Ring Shank Nails.
The finished spar is 1-1/2″ x 2 -1/4″ x 6 feet.
Paint the ends red.
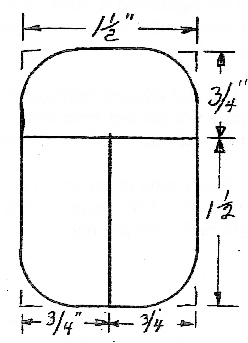
WALKWAY CROSS SPARS (as per The Troop Kit)
Materials: Six 1 x 6 x 6-foot boards and two 1 x 6 x 8-foot boards
These spars have the same cross section as the “X” Braces above. Twelve of them are made from 6-foot sections and then cut into 3-foot lengths, and four of them are made from 8-foot sections and cut into 4-foot lengths.
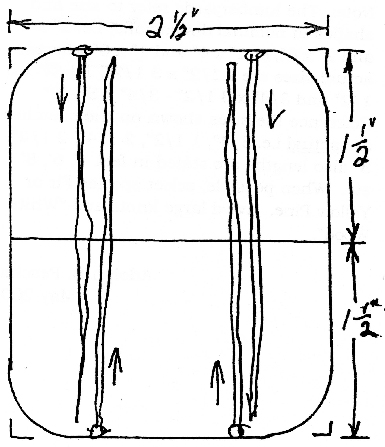
WALKWAY LATERAL SPARS (as per The Troop Kit)
Materials: eight 2 x 4 x 10-foot boards.
Rip these to 3 inches. It will take two to make each 3-inch x 3-inch x 10-foot spar. Round over with 1/2-inch bit on two edges only. Spread glue and nail from both sides using 10D Hot Dipped Galvanized Nails.
Note: Drive nails on an angle to prevent the tip from penetrating the far side.
Paint ends black.
–
Tools: The most practical method to reduce sizes of lumberyard shapes to the dimensions called for on the sketches is to use a circular table saw for ripping and an electric router to make the round-over cuts on the edges.
Caution: All power tools must be operated only by skilled adults, in accordance with the manufacturers specifications. Work in a safe place and follow safety rules.
Older Scouts may help with gluing and nailing.
A few “C” clamps will be needed to keep the pieces in line while being nailed.
Double A-Frame Monkey Bridge built with Laminated Spars
Glue: Use Tightbond II (Blue Label) and spread with a roller to get a complete and even spread.
Nails: Use Hot Topped Galvanized Nails. Your spars will get wet from time to time so rust-proof nails are the best choice.
Paint: Small cans of brush on are best and much cheaper. A 4-inch gauge marker for the ends will make the job neater.
Note: Use the Boy Scouts of America Pioneering Merit Badge Pamphlet for instructions in knot tying and lashing. With this Troop Kit of Laminated Spars, you should be able to build the Single Lock Bridge.
Adolph E. Peschke
May, 2001
Some more notes: It will definitely pay off to wrap the spars with friction tape at the points where the lashings will be tied! (Same goes for slick, green bamboo.) In lieu of tape, use a bastard cut wood rasp file and form a slight roughed out indentation at the places where lashings will be applied, to eliminate sliding on the slick surface of the spars.
The colors for coding the spars at the tips are suggestions and bot universal. The colors chosen can be in accordance with those used by your unit, district, or council.
Prepare eight 2-1/2″ x 3″ x 8′ spars and four 2-1/4″ x 2-1/4″ x 6′ spars and you have the poles required for a Double A-Frame Monkey Bridge.