Troop 86 from Sumter, SC wanted to do a pioneering project and they selected the Double A-Frame Monkey Bridge. Great place to start, and a great way to illustrate sequential programming. What skills enter into the picture? A whole bunch! And with each step along the way, there’s an activity wherein each campcraft skill can be put into action, in a fun way, as reinforcement.
B.-P. wrote: “I am inclined to suggest to Scouters that in addition to the technical details of knotting, lashing, and anchorages, there is an educative value in Pioneering since it gives elementary training in stresses, mensuration, etc.” In addition to the “mensuration” skills that come into play when setting out the area for the bridge’s A-frames and anchors, a good deal of measuring takes place to assure the A-frames are as close to identical as possible, the pairs are joined together in similar fashion, an the spanner ropes are spread evenly. (Hand in hand with the building, Scouts do a lot of planning.)
SEQUENTIALLY-PRESENTED SKILLS AND RELATED ACTIVITIES
Open-Ended Clove Hitch – How else would you want to secure the hand ropes to the A-frames? — How-to Video / Activity Video —
Using Half Hitches to tie a Clove Hitch – A simple process always makes it easy to tie a clove hitch and finish many types of lashings. Several are used to attach the spanner ropes. — How-to Video / Activity Video —
Round Lashing – Three or four can be used to join together the bottoms of the A-frames on each side. Round lashings can also be used to attach a flag pole(s) to an A-frame(s). — How-to Video / Activity Video —
Square Lashing – This project can use fourteen of them for both building the A-frames and then joining them together. — How-to Video / Activity Video —
3-2-1 Anchor – The skill is to carefully drive in the stakes at the proper angle and applying the tourniquets to join the groupings. — Explanatory Video —
Roundturn with Two Half Hitches – You can use this pioneering knot to attach the hand ropes to the anchors. — How-to Video / Activity Video —
III A. In the BSA, the square knot is commonly referred to as a joining knot and tying it is a requirement to earn the Scout rank. However, the square knot (reef knot) is first and foremost a binding knot. For our purposes, its primary use will be to complete a Mark II Square Lashing.
III B. A roundturn with two half hitches is one of the basic knots that is very reliable for a number of uses in pioneering work. It is easy to tie and untie and does not reduce the strength of the rope due to sharp turns when under a hard pull.
OBJECTIVES
Scouts will show they understand the square knot is used as a binding knot and will demonstrate they can always tie it (instead of a granny knot) by relying solely on the appearance of the first overhand knot. Refer to Foolproof Way to ALWAYS Tie a Square Knot Right.
Scouts will demonstrate how a roundturn can be used to temporarily hold the strain on a rope.
Scouts will demonstrate they can tie two half hitches around the standing part of a rope and draw them up tight against a roundturn.
MATERIALS
3-foot length of 3/16 or 1/4-inch braided nylon or polyester cord for each Scout
Length of 1/2-inch nylon or polyester cord and a vertical pole or tree, to serve as a large visual aid
Sturdy horizontal pole, lashed between two trees or anchored uprights about 3-1/2 feet off the ground
One 15-foot x 1/4-inch manila lashing rope for every two Scouts
PROCEDURE A
Standing End on Top, Standing End on Bottom
Utilizing the 1/2-inch cord and vertical pole or tree, the instructor demonstrates how a square knot is used to secure a line or rope directly around an object.
While tying an overhand knot (half knot) around the pole, the instructor explains how it’s always possible to know how to tie the second overhand knot just by looking at the first. This can be illustrated by positioning the two running ends so they are perpendicular to the standing part wrapped around the pole, (see Illustration 1) It’s pointed out that one running end is on the bottom and the other is on the top. When bringing the ends together to tie the second overhand knot, the end on the bottom should stay on the bottom and the end on top should stay on the top, and then the second overhand knot can be tied to form the square knot correctly 100% of the time. This is demonstrated by the instructor!
Using their 3-foot cord, Scouts tie an overhand knot around their thigh, and then position the two ends so they lie at right angles to the part wrapped around their thigh. They then practice carrying the bottom and top ends together to form a square knot.
Scouts bring their 3-foot cords to the horizontal pole(s) and each ties an overhand knot around the pole. When all the overhand knots are in place, they back away and change places with another Scout. The “new” overhand knot is interpreted, and relying only on its appearance, Scouts complete the square knot.
Finishing a Square Knot By Relying Solely on the Appearance of the First Overhand Knot
5. Alternating the position of the running ends of overhand knots tied around the horizontal pole, races are run between individuals to determine that the ability to rely only on the appearance of the initial overhand knot has been mastered. Reviews are conducted as necessary.
Finishing a Square Knot By Relying Solely on the Appearance of the First Overhand Knot
PROCEDURE B
1. The instructor wraps the 1/2-inch cord around the horizontal pole forming a roundturn. He explains that a roundturn goes around the pole twice, and when maintaining a grip on the running end, a good deal of stress can be held because of the friction around the pole created by the roundturn.
Applying a Roundturn to a Horizontal Pole
2. The instructor ties a half hitch around the standing part of the rope and cinches it up to the roundturn on the pole.
3. The instructor ties a second half hitch around the standing part and cinches that up to the first. He explains that these two half hitches have formed a clove hitch around the standing part and the knot is often called two half hitches. He further explains that when two half hitches are tied like this after a roundturn, the knot is called a roundturn with two half hitches and, as will be seen later, is often used on guylines and anchor points when building a pioneering structure.
Adding Two Half Hitches to the Roundturn
4. The class is divided into twos. The first Scout holds the end of the 15-foot rope and stands about 12 feet away from the horizontal pole. The second Scout goes to the pole and with the other end of the rope applies a roundturn, while the first gives the rope some tension with a slight, steady pull. When the roundturn is completed, the second Scout lets go of the standing part and with one hand grabbing the running end, he holds the strain still applied by the first Scout. He then adds two half hitches. When the roundturn with two half hitches is tied, the second Scout lets go of the rope entirely. The two Scouts switch so that everyone in the class can demonstrate they are comfortable tying the knot.
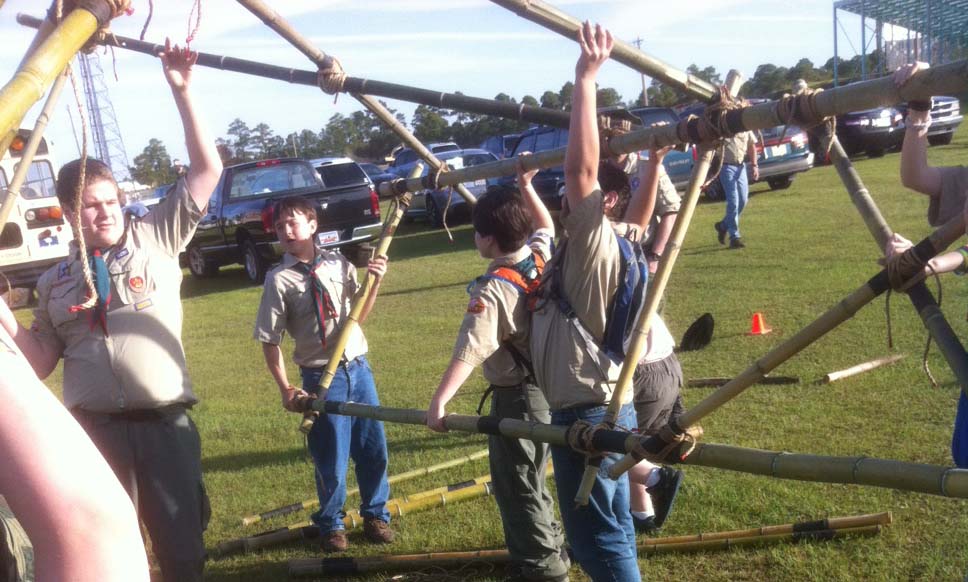
Using the 14′ Double Ladder Signal Tower as a point of reference, here are the plans for a very tall campsite gateway that stands out (and up) and serves as an impressive feat of Scout engineering. One of the perks included in this project is it provides an opportunity for new Scouts to experience hoisting a “boy-sized” structure replete with their own special colors e.g. their patrol flags.
Since this 14-foot structure isn’t climbed on, the spars can be considerably thinner in diameter. Bamboo is ideal. Lashing on those flags attached to each corner creates a spectacular effect and hence the name “4 Flag Tower!”
14′ Tower Gateway Schematic / Gateway to a Scout Expo Photo
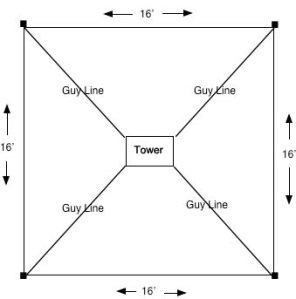
Note: This design is not self-standing. Therefore, using it as a gateway at a camporee or Scout Expo with the necessary guylines requires an area wide and deep enough to accommodate a 16 x 16-foot space.
Scouts lash together a 4′ Side.
Materials Needed:
four 2-1/2 to 3-inch x 14-foot leg spars
six 2-inch x 8-foot X-brace spars
four 2-inch x 6-foot X-brace spars
four 2-inch x 6-foot support spars
six 2-inch x 4-foot leg spreader
forty-five 15-foot x 1/4-inch lashing ropes
four 25-foot guylines
eight 24-inch pioneering stakes
Assemble the 4-foot sides. Begin by laying out two pairs of 14-foot spars for the tower legs, side by side, 3 and 1/2 feet apart. Be sure the butt ends are even at the bottom so the tower will stand up straight.
NOTE:All lashings need to be very tight.
Diagram 1
Lash the legs together starting with a 4-foot bottom leg spreader about 6 inches up from the butt ends. Lash on a 4-foot middle leg spreader in the middle of the 14-foot legs (7 feet up), and a 4-foot top spreader about 3 inches from the top of the 14-foot legs.
When the legs are joined with the three 4-foot spreaders, lash on two 6-foot X-brace spars using square lashings to lash the ends to the legs, and a diagonal lashing where they cross, forming a trestle in the bottom half of the legs (see diagram 1). Three of the ends are lashed to the outside of the legs, and one on the inside, so that a slight gap is created where they cross. As the diagonal lashing begins, this gap will be cinched together with the timber hitch. Repeat the whole process with the other two 14-foot legs.
Diagram 2
Join the 4-foot sides. Turn both sides up horizontally, parallel to one another about 5 and 1/2 feet apart. Make sure the bottoms are even.
Lash on one of the 6-foot support spars directly above the 4-foot middle spreader (see diagram 2).
Lash another one of the 6-foot support spars directly under the 4-foot side spreader at the very top.
Lashing the X Braces with a Diagonal Lashing.
Now, lash on two of the 8-foot X brace spars diagonally between the two 6-foot supports using square lashings to lash the ends to the legs, and a diagonal lashing where they cross forming a trestle in the top part of the wide (6-foot) side (see diagram 2). Three of the ends are lashed to the outside of the legs, and one on the inside, so that a slight gap is created where they cross. As the diagonal lashing begins, this gap will be sprung together with the timber hitch.
Lash the other side. To make the lashings on the other side, you have to get the whole crew together to carefully lift and roll the tower over 180° so that it’s laying on the X-brace, and the other sides of the 4-foot sides are easier to get to.
Repeat the same procedure as before.
Scouts carefully lift the structure and rotatie it 180° to lash the other side.
Lash on the middle X-brace. This X-brace is what will keep the four sides from racking. Lash the two remaining 8-foot X brace spars diagonally across the legs just under the 4-foot middle leg spreader (see Tower Gateway Schematic on the top of this page). Use square lashings to lash them to the legs and a diagonal lashing where they cross. To accomplish this, some crew members will have to hold up the top of the tower so that there is better access to all four ends of the 8′ X brace spars.
Lash on the flags. If you want a flag or flags to fly from the top of the tower, lash the flagpole(s) to the top of each tower legs using a couple of tight round lashings.
Tower Gateway Layout
Anchors and guylines. When all the lashings are done, move the tower to where it will be hoisted. Before actually hoisting the tower, lay out the position of the four legs on the ground. Then determine where the four anchors for the guylines will be placed to steady the legs of the tower.
Using the pioneering stakes, build four 1-1 anchors. Each should extend 16 feet, 45° out from the leg.
NOTE: Make sure the flags are unfurled before hoisting the tower.
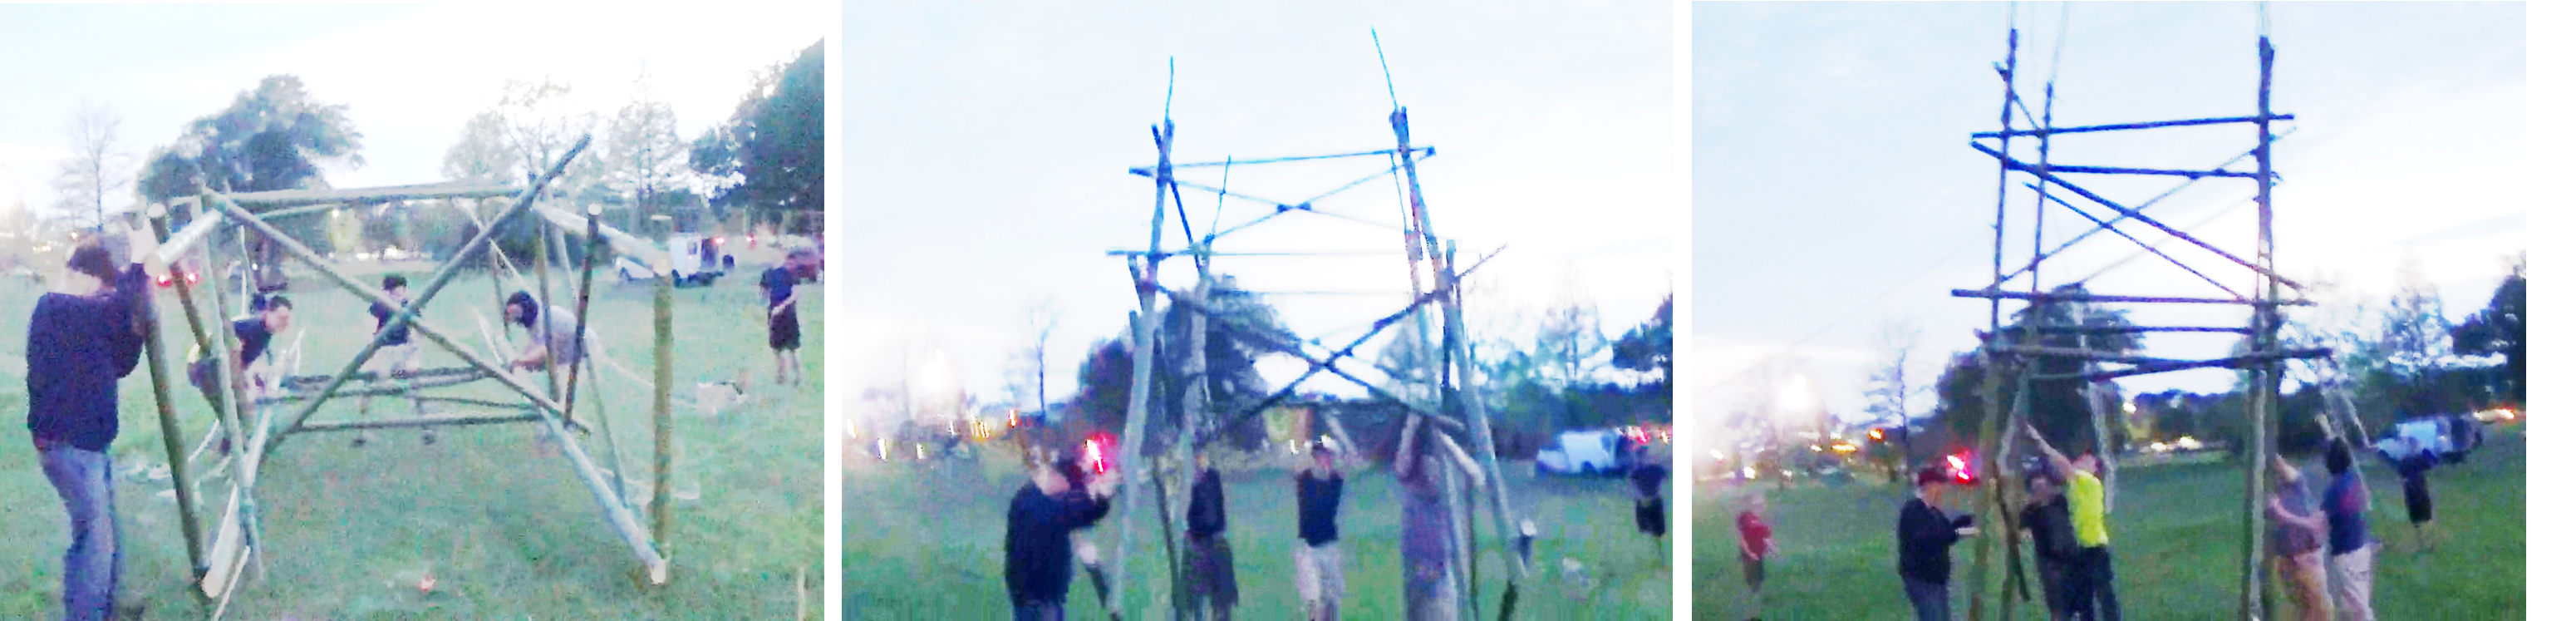
Hoisting the tower. You’ll need a whole crew to do the hoisting. Get ready to hoist the tower by delegating the following:
One signal caller who tells the crew members when and how fast to pull on the ropes.
One safety officer who observes for all safety considerations and signs of trouble during the hoisting.
Four Scouts to serve as “Lifters” to lift the top 6′ support spar that’s on the ground. Their job is to first left and then push the tower up.
Two Scouts, one on each of the 2 guylines attached to the legs, to make sure the tower isn’t over pulled and topples over
Four “Pullers” who will use the two guylines as hoisting ropes to pull the tower until it is standing
We did it!
When everyone is in position, the signal caller should direct the Scouts on the hoisting ropes (the pullers) to hoist the tower into position, while the lifters start lifting. Care should be exercised not to over pull the tower.
As soon as the tower is standing, four Scouts should temporarily tie the guylines to the anchors using a roundturn with two half hitches.
Heeling the tower. If the tower is uneven, you can heel the the butt ends of the legs 4 to 6 inches deep as needed to make it more level.
Tighten the guylines. As soon as the tower is in position, go to each of the anchors and untie the Roundturn with Two Half Hitches and replace it with a rope tackle. Use the rope tackles to hold the tower steady, by gradually applying strain to each of the four guylines at the same time. Do this by tying a butterfly knot in each guyline about 6 to 8 feet from the anchor. Then wrap the running end of the guyline around the forward stake of the anchor and back through the loop in the butterfly knot. When rope tackles are tied to all four anchors, gradually tighten the lines. Apply enough strain to each of the guylines to hold the tower firm and in a vertical position. Then tie off the rope tackles and secure the running ends with half hitches.
Hoisting a Larger Version: 17′ high x 8′ wide x 6′ deep
The kind of rope ladder referred to here is constructed using two lengths of rope and short spars (3′ x 2″ are ideal) to serve as ladder rungs. To easily and effectively attach the rungs to the ropes, a Marlin Spike Hitch, also known as a lever hitch can be used. As John Thurman explains in Pioneering Principals, “The vital thing to remember is that the knotted part of the hitch must be under each ladder rung so that when a weight is put on the rung the knot will work in support. The ladder used the other way round can result in the rungs slipping as the weight goes on to them.”
Simple Slip Knot
The method applied here is very similar to tying the old fashioned Slip Knot where you make an overhand loop, reach through underneath, grab the standing part of the rope and pull it through.
In the process of making a rope ladder, after pulling the standing part through, stick the ladder rung inside the new loop you just formed. Tying the Marlin Spike Hitch in this manner assures you will have the part of the hitch with the knot under the ladder rung.
Depending on the diameter of the short spars, to space the ladder rungs about a foot apart, make the next overhand loop about 15 inches away from the previous rung.
Preparing the Marlin Spike HitchInserting the Ladder Rung
It’s easy to adjust the position of the rungs by loosening the Marlin Spike Hitches and moving them with the short spars up and down on each side until the desired distance between the rungs is achieved and they are nicely horizontal and perpendicular to the ropes. Then, give the rope on either side of the rungs a good pull to tighten the hitch back up.
When tying on the rungs, start at the top of the ladder. For a shorter ladder, you can attach the ropes to their anchor point and tie on the rungs vertically. For a long ladder that needs to be prepared before attaching it to the top anchor points, construct the ladder on the ground.
When the ladder is completed and attached at the top, don’t forget to tie it off at the bottom, which will measurably increase stability and the ease of climbing. This can be done by driving in a pioneering stake in line with each rope at a 45° angle. Pull the ropes taut and tie them to their respective stakes with a roundturn with two half hitches or a rolling hitch.
The following text is by Adolph E. Peschke as presented in the 1998 printing of the 1993 edition of the Pioneering Merit Badge Pamphlet:
This is one of the basic knots that is very reliable for a number of uses in pioneering work. It is easy to tie and untie and does not reduce the strength of the rope due to sharp turns when under a hard pull.
You start by making a roundturn. This provides extra surface around the spar when chafing or slipping might be a problem. Once you’ve made the roundturn, the rope has a grip on whatever it’s around (see 1). The strain on the rope can then be adjusted before finishing off with two half hitches (see 2 and 3).
The knot is well suited for both ends of a guyline. When it is used in a place where you will not have easy access, as at the top of a tower, secure the running end, (after the two half hitches are tied) with a piece of light cord.
It can be tied in the middle of a long rope by making a long bight with enough rope to make two half hitches after the roundturn.
1, 2, and 3 (below) illustrate the half hitches tied loosely. In actual use both half hitches are pulled up tight.
Tying a Roundturn with Two Half Hitches
To make the knot, start by making a roundturn over a spar.
Next, make a half hitch around the standing part of the rope. Then make another half hitch.
When both half hitches are made, pull them tight, and secure the ends with a small cord.
PIONEERING USES
At both ends of large hand and foot ropes for a monkey bridge. Be sure to secure the running ends with a light cord.
When wear is a factor when tied to an iron ring.
For guylines because it does not jam, and is easy to untie when adjustments are needed.
The following text is by Adolph E. Peschke as presented in the 1998 printing of the 1993 edition of the Pioneering Merit Badge Pamphlet:
Pioneering is the knowledge and skill of using simple materials to build structures that are used in a wide range of Scouting activities. These skills are sometimes referred to as “backwoods engineering.”
Down through the ages, people have used ropes, spars, and simple hardware to build bridges, towers, and even their own shelters. In the early development of our country, pioneering methods were used in mining and transportation, to clear the wilderness, and to build roads and bridges. So it is understandable that the term “backwoods engineering” was applied.
The same skills can be used by Scouts to build pioneering projects ranging in complexity from a simple camp gadget to a signal tower.
Whatever the project, the same applied principles of physics, geometry, and math are used to build pioneering projects and structures. But, keep in mind that all the information (in this pamphlet*) is eventually used for a practical, hands-on application—that is, to build something.
Pioneering is a good foundation for many Scouting activities. You must learn, and then use, such disciplines as planning ahead and teamwork. You can also put to use the basic skills learned in rank advancement, such as knot tying.
But most of all, pioneering provides a practical way to experience the joy of accomplishment when you’ve built something that is needed for yourself or others; it can be something that makes living in camp easier and more comfortable. Pioneering can be both fun and challenging when you use your skill and knowledge to choose the right materials (ropes and spars) and build a usable structure.
The basics of pioneering, such as tying knots, making lashings, using rope tackle, constructing anchors, and basic rope knowledge can be done at home. The projects and structures (shown in this pamphlet**) can usually be constructed with materials available at summer camp or at council camping events.