A crew of Scouts went about erecting a FLOATING FLAGPOLE made entirely of Scout staves. They lashed together five staves for the pole and two staves each for the three supporting uprights. The idea was to rely upon the strain of the guylines to keep the uprights straight, without sinking them into the ground. The problem was the two staves making up each upright were just too rickety to effectively withstand the stress created during the hoisting process.
All in all, it worked, but attention should be directed to the lashings joining the stoves for the uprights. —> Use longer lashing ropes or apply three round lashings, and, make sure they’re really tight!
When tying the basic, oft-used, simple “two-half-hitches” (double-half-hitch), instead of applying a clove hitch around the standing part, there’s a thing about mistakingly tying a lark’s head. This accident rears its head time and again, and many Scouts (both youth and adult) somehow don’t recognize the difference. Fact remains, tying a lark’s head around the standing part (cow hitch) doesn’t provide the same holding effect or friction as forming a clove hitch. Mostly, it does the trick, BUT, it’s not the same and shouldn’t be considered as such.
A clove hitch is formed by tying two half hitches in the same direction. The lark’s head is made up of two half hitches tied in opposite directions (see above video).
This becomes a “bigger” issue when tying a taut-line hitch. If the half hitches aren’t tied in the same fashion (if the running end isn’t spiraling around the standing part in the same direction), instead of a rolling hitch around the standing part, what you get is a lark’s head along with an extra round turn. This provides less friction. It will not grab the guyline as well, and hence is less effective.
In addition to the campcraft jobs it does so well, the lark’s head is useful in Pioneering too. Besides coming into play to hang all kinds of stuff, it’s how we start off the Filipino diagonal lashing.
Several campcraft skills come into play in order to successfully complete this Simple Flagpole challenge. Each patrol flies their patrol flag from a 14′ flagpole they construct using the following materials:
four Scout Staves (or 3 Scout Staves if their patrol flag is already tied to a 5′ pole)
At most Scouting events, there isn’t a permanently-installed, tall, metal pole for raising and lowering the colors. During opening ceremonies at these Scout gatherings, a tall flagpole made by joining long spars together can impress and inspire.
Opening Ceremony at a District Camporee
What is meant by tall? Naturally, the height of the flagpole depends on the size of the flag and the size of the area where it will be raised. For the most part, the flags used in Scouting are 3 x 5 feet, and the average size outdoor flagpole for a 3 x 5-foot flag is 20 feet. Of course, the main criteria for flagpole height is how far away you want the flag to be seen. But also, flying a flag high is synonymous with pride, and the taller the pole the greater the impact. However, this post is about a simple flagpole and not a pioneering display of goliath proportions. The specific flagpole featured on this page topped out at 32 feet, which was impressive, but not uncanny.
Building and putting up a taller flagpole requires more attention than one for an easy campsite setup, but all in all it’s still a relatively simple operation. Basically, four things are needed:
Long spars
An effective way to join the spars together so the flagpole will be rigid
A series of planned steps to take before standing the flagpole up *
A crew to lift the flagpole to its vertical position
Long spars. Depending on your point of reference, the definition of long spars is relative, and will hinge on what’s available in your geographic area and how practical it is to procure and transport them. Naturally, the longer the spars the fewer you’ll need to make the pole tall, which of course has obvious advantages. Again, depending on your point of reference, a long spar can be seen as having a length anywhere from 10 to 20 feet.
Simple, Tall, Pioneering Flagpole
In the flagpole featured on this page, there are three long spars: 16-foot bottom, 14-foot middle, and 10-foot top. The lower the spar, the larger the diameter. The butt end of the next spar up should be as near to the same diameter as possible to the top of the one it’s joining.
West Country Round Lashing Joining Two Bamboo Spars
An effective way to join the spars together so the flagpole will be rigid. Obviously, the rigidity of the flagpole is a primary concern. You don’t want it to bend and you don’t want it to come apart. It has to ever-withstand the stress of its own weight in a vertical position, as well as the weakening forces of wind, rain, and varying temperatures. When it comes to joining spars together to extend their length, there are basically four lashings that can be employed. For the tightest and most secure lashing, the West Country Round Lashing works really very well.
When the utmost rigidity is required, a quarter of the spars’ lengths should overlap each other. Using long lengths of 1/4-inch manila rope, start each of the two lashings approximately 1-1/2 to 2 inches from the ends of the overlapping spars and tie at least ten tight half knots (overhand knots) towards the middle of the overlap. Depending on the length of the lashing rope and the size of the spars, for added security, additional lashings can be tied e.g. in the photo to the left, where the bottom spar and the middle spar overlap, four West Country Round Lashings were applied.
* A series of planned steps to take before standing the flagpole up. Before transforming the finished flagpole from horizontal to vertical, these steps need to be taken:
Determine the spot on the ground where the flagpole will stand and dig a hole about 4 inches deep with a diameter just a little larger than that of the flagpole’s butt end.
Position the flagpole so the bottom is right over the hole.
To attach the rope halyard, tie a small rope grommet and pulley to the top of the flagpole with a prusik.
Reave the prepared rope halyard through the tackle.
Attach four guylines of the proper length (see: Guylines.) Tie the guylines to the flagpole about 3/4 up the pole with four rolling hitches. Tie them on so they will each line out to their respective anchors.
Measure out the proper distance from the bottom of the flagpole in four perpendicular directions and mark the spots where the front pioneering stake will be driven into the ground for each 1-1 anchor. The rule of thumb is drive in the stakes at a distance equal to twice the height from where the knots were tied, measured out from the base of the flagpole.
Build four 1-1 anchors in readiness for attaching the four guylines.
A crew to lift the flagpole to its vertical position. When ready, four crew members each take hold of a guyline and position themselves in line with their respective anchors. Additional crew members line up along the length of the flagpole ready to walk the pole up to its vertical position. One member is stationed at the bottom to guide the pole into the hole as the others lift. When everyone is in position, a signal caller gives the go ahead to lift. Those with the guylines pass the ends of their lines behind the front stake of their anchor. Once the flagpole is standing upright, each guyline is secured to its anchor with a rope tackle. Final adjustments can then be made to each guyline until the pole is standing straight.
Ah, the clove hitch. It’s a simple way to attach a rope to a pole, it’s side-to-side adjustable and is frequently used to start and finish a variety of lashings. Some folks don’t like it because in various applications, it’s not the most secure or reliable choice. But, in those instances, there are numerous alternatives. See the following photos—all close clove hitch relatives.
Clove Hitch / Rolling Hitch / Constrictor / Spar Hitch
The clove hitch is one of the most-frequently-used knots Scouts learn, so common, yet it can also be very elusive, especially when it comes to completing certain lashings. In the knot-tying universe, the clove hitch is a whole lot more prevalent than most of us realize, and it can be tied in a variety of ways and from a variety of different perspectives.
Of course they’re all Clove Hitches!
Two Half Hitches. Here’s what John Thurman says in Pioneering Projects: “The first and everlasting thing to remember about the clove hitch is that it is composed of two half hitches. What a very obvious thing to say, but there is hardly one Scout in a hundred who learns what it means. If only we can get Scouts to learn that if you make one half hitch and another half hitch and bring them together they make a clove hitch, what a lot of time the Movement would save in the amount of fiddling and fumbling that goes on when a clove hitch is the order of the day. We would be able to start in the sure knowledge that we can make clove hitches and pass quickly on to better and brighter things.”
Starting from the right and proceeding the the left. / Starting from the left and proceeding to the right.
Before addressing the various ways to approach tying a clove hitch, did you ever wonder why the basic knot, two half hitches is called “Two Half Hitches?” (The name “Double Half Hitch” has also been used.) What’s a half hitch anyway? Well, now we know it’s half a clove hitch, (the line wraps around the object and then passes under itself) but how many of us have realized that in actuality, two half hitches is a clove hitch tied around the rope’s standing part? That’s what it is! On a side note, the very useful taut-line hitch is nothing but a clove hitch started off with a roundturn (called a rolling hitch), which is also tied around the rope’s standing part. As mentioned above, the clove hitch is whole lot more prevalent than most of us realize, and indeed it can be tied in a variety of ways. Here we go:
A Hitching Post with a Series of Half Hitches
Hitching Race during a Troop Meeting’s Gathering Period
Open-End Clove Hitch (Clove Hitch on a Bight). Back in the 60s at Camp Wauwepex, a Scout camp on Long Island, one of the attractions in the Scoutcraft area was a vertical pole about 4 feet tall with a rope attached near the bottom. This was a “Hitching Post.” It was put up so Scouts could see how many Half Hitches they could throw over the top of the pole as quickly as possible. Watching fellow Scouts who had mastered the simple technique provided enough motivation to learn how to do it too, and it was easy to get quite good at it. As we were throwing hitches over the pole with greater and greater alacrity, we weren’t aware that every two of these hitches was a clove hitch. Nor would we have cared. It was just fun to see how fast we could get. VIEW VIDEO: Hitching Race
When preceding from the left, all that needs to be done is:
Form another right underhand loop and place it over the pole (on top of the pervious one).
Voila! Clove hitch!
When preceding from the right, instead of right underhand loops, form left underhand loops.
In no position to tie anything but an “Open-Ended Clove Hitch!”
Without being informed, one can just look at two of these half hitches and see they look exactly like a clove hitch. Of course, that’s because these two half hitches are a clove hitch. Throwing two half hitches over the open end of a vertical pole is the hands down, quickest way of tying a clove hitch. After you’ve done it for awhile, it takes about a second. A common way to refer to this “Clove Hitch on a Bight” is to call it an “Open-Ended Clove Hitch.” It’s exactly what the doctor ordered when you need to tie a clove hitch over the end of a spar. It’s also the only way to tie a clove hitch in the middle of a long line, like when securing a hand rope on the top of an A-frame during the construction of a Double A-frame Monkey Bridge (unless you want to pull foot after foot of rope through the hitches because you’re using an alternate method, or… you just don’t know any better).
Open-End Clove Hitch
It’s really surprising how many folks, old and young, aren’t familiar with this simple method of tying a clove hitch. Here’s an amusing illustration: A young Scout was competing at a camporee for the best time in completing a Rope-Toss-Log-Lift Challenge. After throwing the rope over the crossbar and tying the end to a log with a timber hitch, the third step is to secure the other end of the rope to a stake in the ground with a clove hitch. Ah! An open ended pole! So, this young Scout completes the first two steps, runs over to the stake and, bam! He ties an Open-Ended Clove Hitch over that stake in nothing flat. The jaw of the Scouter conducting the event drops down. With mouth open and a look of bewilderment on his face, he leans down, scratches his head, and examines the knot. Yes, to his surprise, indeed it’s a clove hitch! This skinny, young Scout did something the adult had never seen before, and the old guy was astonished!
Finishing a Lashing with Two Half Hitches.
Finishing a Diagonal Lashing with Two Half Hitches forming the Clove Hitch
Here’s the story: When you learn how to do this, number one, it’s faster. Number two, it’s also easier to securely finish off the frapping turns, because it’s a cinch to snug both half hitches in close and pull them real tight, which is definitely something you want to do.
You’ve got to love this design. It’s compact, it’s sturdy, and it’s ingenious!
This drying rack is based on suspending two concentric, equilateral triangles to make six cross sections for hanging wet clothing or towels during a long term encampment, and there’s no reason you can’t put it up on an overnighter if there’s a practical need. All that’s been said before regarding the advantages of this kind of campsite improvement apply to this simple camp gadget:
It takes up less space while drying more wet things.
It eliminates the clutter of clothing and towels haphazardly strewn around on tables, tree branches, tent platforms, or overcrowded on a disorganized array of drooping clothes lines.
It can be set up in a location where there is the most sunshine.
It’s especially useful when camping in an open area with few trees.
Materials (adapt these as you like)
three 4-foot x 1-inch sticks
three 5-foot x 1-inch sticks (Scout staves are ideal)
one 6-foot x 1-1/2 to 2-1/2-inch straight pole for the upright (or an additional 5-foot Scout stave)
one 30-inch pioneering stake
eight camp gadget lashing ropes (6 to 10-foot)
three 15-foot lashing ropes
three small stakes
Two Equilateral Triangles
Procedure
Lash the triangles. Start by lashing together two equilateral triangles, one smaller for the top (three 4-foot sticks), and the larger one for the bottom (three 5-foot staves). Use square lashings. One easy way is to lash two at 90° and then bend them in and tie the third square lashing to make the triangle. This yields a nice, tightly-lashed triangle, (but be careful you’re not putting too much stress on the ropes and poles when preparing to apply the third lashing).
Pioneering Stake
Erect the upright. Pound in a pioneering stake and lash the 6-foot pole to it securely with two tight strop lashings or round lashings. Making this upright stand up vertically without moving or wobbling at all is a key to a good and sturdy clothing dryer. So, solidly pound in the stake and make sure it’s as straight as possible. Also, make sure the lashings are well-tied and tight.
—> ALTERNATIVE APPROACH: A clothes drying rack can be erected without having to either pound in a stake or sink the center pole, by using the same principle as when erecting a flagpole. The key is using the support ropes as guylines. SEE PHOTO.
Rolling Hitches
Attach the triangles. Lay the triangles on the ground over the upright, first the larger triangle, and then the smaller one on top.
Tie each corner of the smaller triangle to a support rope so it will be suspended about 5 feet above the ground. Use clove hitches which can be adjusted as necessary to assure the triangle hangs evenly and the 4-foot sticks are horizontal. Continuing with each of the three support ropes, repeat this process for the larger triangle so that it will hang about 4 feet above the ground.
Clove Hitch
Taut Line Hitch at Stake
Anchor the support ropes. Hammer in a small stake a foot or so out, in line with each corner of the bottom triangle. Using the remaining length of the support ropes, attach them to the stakes with a simple taut-line hitch. This will further stabilize the clothing dryer and enable you to make fine-tune adjustments to the way the triangles lay. (You can also just make them fast to the stakes with a roundturn with two half hitches, or another clove hitch.)
An assembled clothes drying rack at the 2013 Jamboree gets the once over.
The kind of rope ladder referred to here is constructed using two lengths of rope and short spars (3′ x 2″ are ideal) to serve as ladder rungs. To easily and effectively attach the rungs to the ropes, a Marlin Spike Hitch, also known as a lever hitch can be used. As John Thurman explains in Pioneering Principals, “The vital thing to remember is that the knotted part of the hitch must be under each ladder rung so that when a weight is put on the rung the knot will work in support. The ladder used the other way round can result in the rungs slipping as the weight goes on to them.”
Simple Slip Knot
The method applied here is very similar to tying the old fashioned Slip Knot where you make an overhand loop, reach through underneath, grab the standing part of the rope and pull it through.
In the process of making a rope ladder, after pulling the standing part through, stick the ladder rung inside the new loop you just formed. Tying the Marlin Spike Hitch in this manner assures you will have the part of the hitch with the knot under the ladder rung.
Depending on the diameter of the short spars, to space the ladder rungs about a foot apart, make the next overhand loop about 15 inches away from the previous rung.
Preparing the Marlin Spike Hitch
Inserting the Ladder Rung
It’s easy to adjust the position of the rungs by loosening the Marlin Spike Hitches and moving them with the short spars up and down on each side until the desired distance between the rungs is achieved and they are nicely horizontal and perpendicular to the ropes. Then, give the rope on either side of the rungs a good pull to tighten the hitch back up.
When tying on the rungs, start at the top of the ladder. For a shorter ladder, you can attach the ropes to their anchor point and tie on the rungs vertically. For a long ladder that needs to be prepared before attaching it to the top anchor points, construct the ladder on the ground.
When the ladder is completed and attached at the top, don’t forget to tie it off at the bottom, which will measurably increase stability and the ease of climbing. This can be done by driving in a pioneering stake in line with each rope at a 45° angle. Pull the ropes taut and tie them to their respective stakes with a roundturn with two half hitches or a rolling hitch.
The following text is by Adolph E. Peschke as presented in the 1998 printing of the 1993 edition of the Pioneering Merit Badge Pamphlet:
Pioneering is the knowledge and skill of using simple materials to build structures that are used in a wide range of Scouting activities. These skills are sometimes referred to as “backwoods engineering.”
Down through the ages, people have used ropes, spars, and simple hardware to build bridges, towers, and even their own shelters. In the early development of our country, pioneering methods were used in mining and transportation, to clear the wilderness, and to build roads and bridges. So it is understandable that the term “backwoods engineering” was applied.
The same skills can be used by Scouts to build pioneering projects ranging in complexity from a simple camp gadget to a signal tower.
Whatever the project, the same applied principles of physics, geometry, and math are used to build pioneering projects and structures. But, keep in mind that all the information (in this pamphlet*) is eventually used for a practical, hands-on application—that is, to build something.
Pioneering is a good foundation for many Scouting activities. You must learn, and then use, such disciplines as planning ahead and teamwork. You can also put to use the basic skills learned in rank advancement, such as knot tying.
But most of all, pioneering provides a practical way to experience the joy of accomplishment when you’ve built something that is needed for yourself or others; it can be something that makes living in camp easier and more comfortable. Pioneering can be both fun and challenging when you use your skill and knowledge to choose the right materials (ropes and spars) and build a usable structure.
The basics of pioneering, such as tying knots, making lashings, using rope tackle, constructing anchors, and basic rope knowledge can be done at home. The projects and structures (shown in this pamphlet**) can usually be constructed with materials available at summer camp or at council camping events.
John Thurman lists the rolling hitch (also known as a Magnus Hitch) as one of the essential pioneering knots. It’s similar to a clove hitch, but it’s a lot less likely to slip under a sideways pull. When securing a guyline to a horizontal spar, the rolling hitch can be used in lieu of a roundturn with two half hitches. It is also useful to attach a rope to another rope that has strain on it. Make sure that the direction of the pull exerted on the rolling hitch is against the double strand.
Here’s how Adolph Peschke describes the rolling hitch in the ’93 edition of the Pioneering Merit Badge Pamphlet:
As you become more involved in pioneering activities, you will find that there are many uses for the rolling hitch. After the roundturn is made, it supplies enough grip for you to complete the knot with ease, even when the line is under strain. Further adjustment can be made without completely untying the knot, by loosening the knot slightly, pulling the rope tight, and tightening the knot again.
When the rolling hitch is tied to a spar, pull can be exerted either perpendicular to or along the length of the spar. After exerting heavy pressure, it will untie easily. When you need extra gripping power, just add extra turns. It works well with slippery or wet rope.
Pioneering Uses
When you want to tie a rope to a stake or a spar, the Rolling Hitch can be loosened easily to take up slack, and then retightened.
To attach a light tackle, double the rope over to form a bight, and tie a Rolling Hitch with a loop for the tackle (see figure 11).
To form a hand or shoulder loop to pull a spar, tie two rolling hitches, one at each end of a short rope (see figure 12).
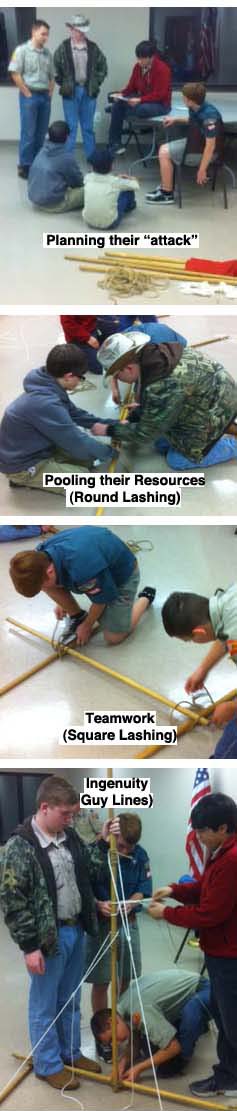
When the patrols have learned their round lashing and square lashing, they’ll be ready for this indoor challenge which gives them an opportunity to use what they’ve learned in a new way. Additionally, they get to plan their “attack,” pool their resources, use their ingenuity, and put into practice the teamworking skills necessary to complete the task.
Materials needed for each patrol:
six 5-foot Scout Staves
seven 6 to 10-foot x 1/4-inch manila lashing ropes
four light guylines
one 15-foot light line (for halyard)
one 3-foot cord (to make top loop for halyard)
two pencil-sized sticks (if needed to secure patrol flag to halyard through existing grommets)
their patrol flag
The challenge. Ask the patrols to each build a self-standing flagpole capable of raising and lowering their patrol flag. Have the necessary materials on hand, and present them with the following design:
NOTE: This challenge can be presented without the design! If no design is provided, and just the challenge is given as stated above, the Scouts will be confronted with having to figure out their own approach that will work! However, the design is ingenious and sooner or later worthy of being shared.
Some thoughts:
1) This self-standing flagpole is ideal when a flagpole is desired indoors (or outdoors when there’s no way to drive stakes into the ground or dig a hole).
Set a time limit and make it a race.
2) Depending on the ceiling’s height, the flagpole can be built higher merely by lashing on additional pole sections.
3) To shorten the pole if the ceiling is lower than 10 feet, just round lash two staves together.
4) Naturally, following the design, the Patrol Leader can have members of his patrol divide the tasks so that the pole and the support frame are constructed simultaneously.
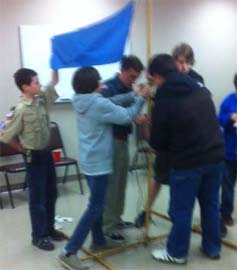
Got it up!
5) The method of placing two 5-foot staves end to end, and lashing a third joining stave in the middle where the two others touch can be seen as somewhat of a departure, but will yield a very stable 10-foot flagpole, provided the four Round Lashings are tight and well-spaced.
6) The 3′ cord for the halyard loop can be fastened to the top stave in a variety of ways: a bowline with a clove hitch, a bowline with two half hitches, a doubled over rolling hitch, etc., etc.
7) The guylines can also be attached in a variety of ways (and will be), though rolling hitches around both the pole and the support frame are recommended.
Flagpole using 5 Scout Staves erected for the Troop Meeting’s Opening Ceremony
Flags engender pride! Flying ’em high is great for Scout spirit, and making a flagpole is really easy. All you need are straight sticks (Scout Staves work great), rope for round lashings, rope for guylines, and three stakes.
Scout Stave Flagpole with a Halyard in the Pioneering Village at the 2017 National Jamboree
The key to making a simple flagpole out of shorter poles is round lashings and knowing where to tie them. The space where the two poles are joined, gets two tight round lashings—one on either side of the overlap and right near the ends of each pole. The length and thickness of the poles being lashed together will determine how much they need to overlap, and how many tight wraps need to be taken. Using 5-foot Scout Staves, you can simply overlap them about 10 inches with a couple of 6-foot lashing ropes. With practice, a Scout patrol can make a 15-foot flagpole out of four Scout staves in a few short minutes.
15-Foot Scout Stave Flagpole without a Halyard
The key to lifting and securing a simple flagpole is tying on three guylines about 3/4 of the way up, and extending them out equidistant from one another. The stakes should form an equilateral triangle, and should ideally be hammered in a distance away from the flagpole of at least twice the height of where they’re tied. So, if the flagpole is 15 feet, and the guylines are attached 11 feet up, the stakes should be 22 feet from the pole for optimum stability. NOTE: Under many circumstances, this distance can be much shorter and still provide the support to hold the flag up, even during lengthy periods of use.
Quick Lash and Attach
While the flagpole is being lashed together, a Scout or Scouts can be putting the stakes in the ground, pacing out the proper distance and hammering them in to form that equilateral triangle.
Before raising the pole, the three guylines should be tied at about 3/4 the way up using roundturns with two half hitches or rolling hitches. Then when the flagpole is being held erect, three Scouts can each take a guyline and attach it to a stake with a tight taut-line hitch, or for taller, heavier flagpoles, a rope tackle.
If the flag is not to be ceremoniously raised and lowered, or with shorter flagpoles, a halyard is not necessary.

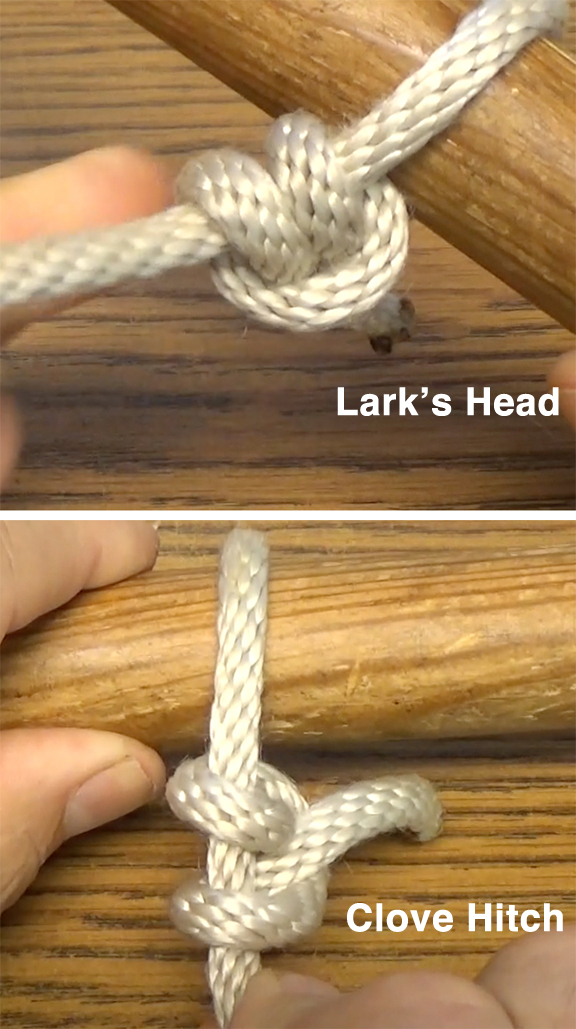 applying a clove hitch around the standing part, there’s a thing about mistakingly tying a lark’s head. This accident rears its head time and again, and many Scouts (both youth and adult) somehow don’t recognize the difference. Fact remains, tying a lark’s head around the standing part (cow hitch) doesn’t provide the same holding effect or friction as forming a clove hitch. Mostly, it does the trick, BUT, it’s not the same and shouldn’t be considered as such.
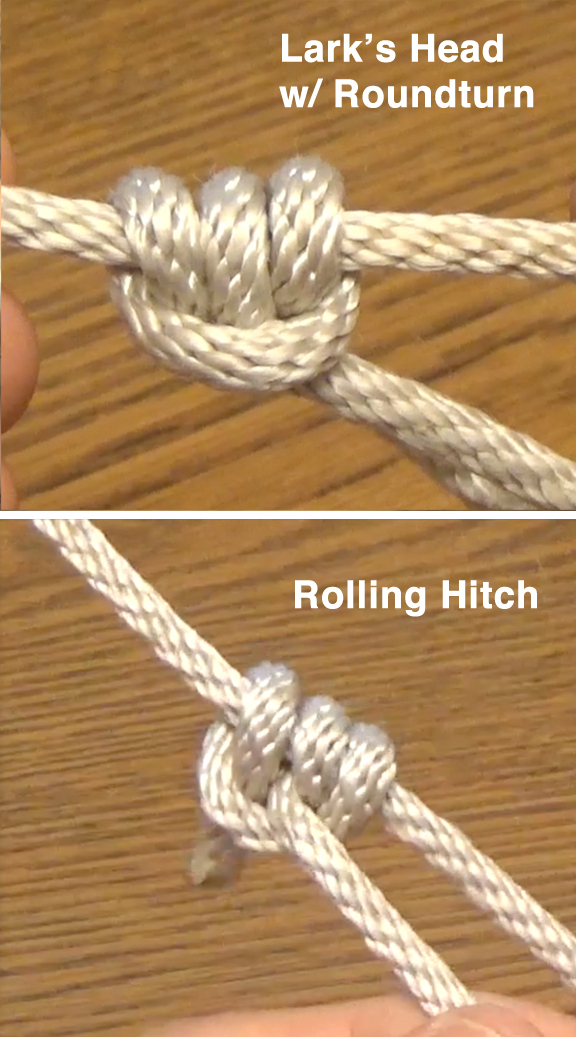 A clove hitch is formed by tying two half hitches in the same direction. The lark’s head is made up of two half hitches tied in opposite directions (see above video).