This small camp table can be comprised almost completely of Scout staves. It is 100% functional and provides a convenient raised surface for personal, patrol, or general use. It’s simple design makes it quick and easy to set up, and it is remarkably stable.
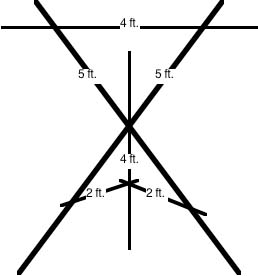
Make the table legs. Start by lashing together four Scout staves into two sets of shear legs with 6-foot manila lashing ropes. If you prefer, square lashings can be used instead of shear lashings. (In lieu of Scout staves, straight poles an inch or so in diameter are just fine.)
Lash on the table top supports. Next, with two square lashings, lash a 2-1/2-foot stick to connect each set of shear legs about 30 inches off the ground. (A Scout stave cut in two is ideal.) This will form two A-frames, one for each side of the table. Make sure each of these support sticks are lashed on straight and at the same distance from the bottom end of both sets of legs.
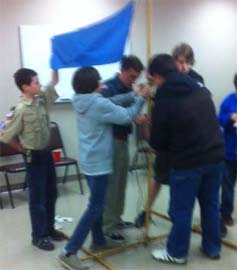
Securely hold up the A-frames. This is surely the best part. Find the midpoint of a 20-foot line. At about two feet away, tie a clove hitch at the top of one of the Scout staves of one of the A-frames. Repeat this process on the other side attaching the line with a clove hitch to one of the Scout staves of the other A-frame.
Secure each end of the 20-foot line to stakes driven into the ground on either side, about 5 feet away, so the line extends out evenly from each end of this table framework. You can use round turns with two half hitches, taut-line hitches, or rope tackles. Here’s the beauty of this configuration: you can manipulate the distance between the A-frames by adjusting the clove hitches, and provide optimum stability to the table by placing a good, reasonable strain on the line at each stake. It will stand up in an impressively rigid fashion.
Lash on the table top. Finally, lay 12 Scout staves, (or similar poles) side by side, on top of the 2-1/2-foot support sticks, and using binder twine, lash them on with floor lashings.
Two Half Hitches Over the Top of a Pole Forming a Clove Hitch
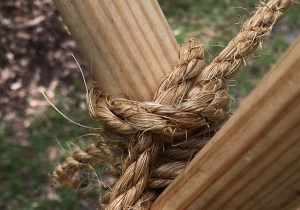
II. In Pioneering, half hitches are everywhere! Two of them next to each other is a clove hitch, and that’s something we use time and time again. As John Thurman declares, “If only we can get Scouts to learn that if you make one half hitch and another half hitch and bring them together they make a clove hitch, what a lot of time the Movement would save in the amount of fiddling and fumbling that goes on when a clove hitch is the order of the day.”
OBJECTIVES
Scouts will demonstrate they can tie half hitches around a horizontal pole, proceeding from both the right and the left.
Scouts will demonstrate they can tie a round lashing by starting and ending the lashing with two half hitches.
Scouts will lash together two staves to make a longer pole by using two properly positioned round lashings.
Horizontal Hitching Post Lashed Between Two 6′ Uprights
MATERIALS
Suspended horizontal hitching post or similar setup, to accommodate the entire class
Two or more 5-foot Scout Staves for every Scout (the more the better)
Four 6 to 10-foot x 1/4-inch manila lashing ropes for every Scout (the more the better)
6-foot x 1-1/2-inch diameter spar set up as a crossbar with a 6-foot length of 1/2-inch nylon or polyester cord, attached in the middle, to serve as a large visual aid
PROCEDURE A
Starting at the center of the 6-foot spar, the instructor slowly ties a half hitch for all to see, proceeding from the left and initially carrying the running end over the top of the spar.
The half hitch is untied and slowly tied again for all to see. This is repeated as necessary while, in like manner, the class ties their own half hitch around the horizontal hitching post.
When each Scout can tie the half hitch, the instructor slowly demonstrates the tying of two half hitches in succession. (No mention needs to be made that this is a clove hitch.)
When all Scouts can accomplish this, three and four half hitches are tied in succession. Scouts give it a go.
Starting again at the center, steps 1-4 are repeated on the other side, this time proceeding from the right and initially carrying the running end over the top of the spar.
Click on the Images for LARGER Views!
Click on Image for LARGER Views!
Two Round Lashings Joining Together Two Scout Staves
PROCEDURE B
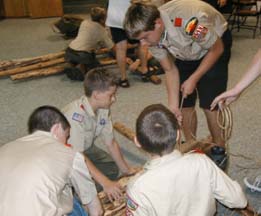
Using two Scout Staves and a lashing rope, the instructor demonstrates how, by holding in one hand the two staves and the long end of the rope as the standing part, he can tie two half hitches around both staves working with the running end. This forms a clove hitch which will start off the round lashing. It will be easy to see that since the long end of the rope will be used for the wrappings, to start the lashing, the half hitches will be applied moving towards the nearest end of one of the staves.
Scouts apply the technique, tying the clove hitch around two staves in the manner shown.
The instructor demonstrates wrapping the longer end tightly and neatly around both staves, leaving enough rope to finish the lashing with two half hitches.
Scouts practice lashing two staves together with two round lashings. The space where the two poles are joined, gets two tight round lashings—one on either side of the overlap and right near the ends of each pole. (See photo to the left.)
Scouts combine into one group and, using all the materials on hand, join all the staves tightly together into one very long pole, with round lashings.
The square lashing is the basic type of lashing for most pioneering projects. The more a Scout ties them, the more they become like second nature. That means, when the tying of an efficient and tight square lashing is “no sweat,” building a pioneering structure will be easier and more successful. This, of course, makes the experience more fun.
So, to assure the Scouts are ready and able to tackle projects that are challenging, fun, and rewarding, they need to feel confident and happy they can easily tie tight square lashings.
Touching the ceiling!
This challenge is very simple, but, it’s fun, and requires each patrol to tie eight tight square lashings. It’s great for new Scouts and a useful team-building activity and practice session “disguised” as a fun, fast-paced interpatrol competition.
Materials for Each Patrol:
two 8-foot x 4-inch spars
four 3-foot x 2-inch ladder rungs
eight 15-foot x 1/4-inch lashing ropes
Method: with the above materials, each patrol will lash together a ladder with four rungs, spacing the rungs FROM THE BOTTOM ABOUT ONE FOOT APART, using eight square lashings. When sturdy, the whole patrol will stand the ladder up and take turns climbing to the top.
Some years ago a newly-formed and very young troop, barely a year old, attended a Council-wide Camporee. One of the patrol competitions was an Everyone on the Tripod race. They entered three patrols. When the smoke cleared, and the judging was completed, out of over fifty patrols present at the camporee, they placed first, second and third. Why? Well, one reason was they were familiar with the activity having done it at a couple of troop meetings as an interpatrol competition. But, perhaps the main keys to their new-found success was they had an active pioneering program in place, and had been taught the Mark II Square Lashing and the tripod lashing found in an old edition of the BSA Fieldbook (Tripod Lashing with Plain Turns).
This is a WONDERFUL interpatrol challenge!
Lashing the Tripod Legs Together
Materials required for each patrol:
three 8-foot x 3 to 4-inch tripod leg spars
three 6-foot x 3-inch tripod support spars
six 15-foot x 1/4-inch lashing ropes
one 20-foot x 1/4-inch lashing rope
Here’s the Procedure:
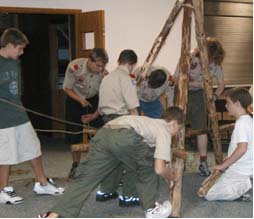
On signal, patrol members lash the three 8-foot spars into a tripod, using the 20-foot rope.
Lashing on the Support Spars
When finished, they set up the tripod and using six square lashings, lash a 6-foot spar between each of the legs.
When all lashings are completed and the tripod is strong and secure, all the patrol members stand on the 6-foot spars, making sure their weight is evenly distributed.
Of course, this challenge lends itself equally, if not more so, to being presented outdoors.
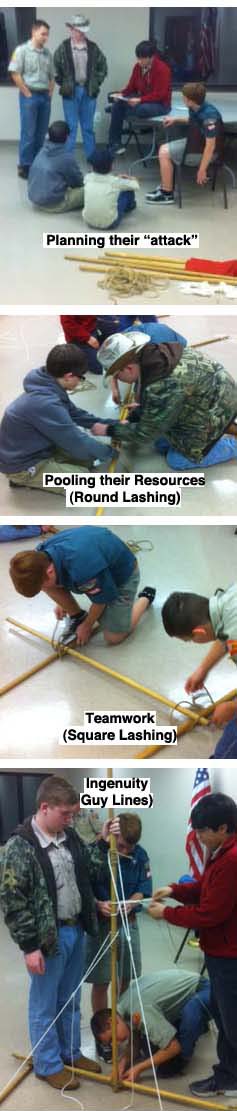
When the patrols have learned their round lashing and square lashing, they’ll be ready for this indoor challenge which gives them an opportunity to use what they’ve learned in a new way. Additionally, they get to plan their “attack,” pool their resources, use their ingenuity, and put into practice the teamworking skills necessary to complete the task.
Materials needed for each patrol:
six 5-foot Scout Staves
seven 6 to 10-foot x 1/4-inch manila lashing ropes
four light guylines
one 15-foot light line (for halyard)
one 3-foot cord (to make top loop for halyard)
two pencil-sized sticks (if needed to secure patrol flag to halyard through existing grommets)
their patrol flag
The challenge. Ask the patrols to each build a self-standing flagpole capable of raising and lowering their patrol flag. Have the necessary materials on hand, and present them with the following design:
NOTE: This challenge can be presented without the design! If no design is provided, and just the challenge is given as stated above, the Scouts will be confronted with having to figure out their own approach that will work! However, the design is ingenious and sooner or later worthy of being shared.
Some thoughts:
1) This self-standing flagpole is ideal when a flagpole is desired indoors (or outdoors when there’s no way to drive stakes into the ground or dig a hole).
Set a time limit and make it a race.
2) Depending on the ceiling’s height, the flagpole can be built higher merely by lashing on additional pole sections.
3) To shorten the pole if the ceiling is lower than 10 feet, just round lash two staves together.
4) Naturally, following the design, the Patrol Leader can have members of his patrol divide the tasks so that the pole and the support frame are constructed simultaneously.
Got it up!
5) The method of placing two 5-foot staves end to end, and lashing a third joining stave in the middle where the two others touch can be seen as somewhat of a departure, but will yield a very stable 10-foot flagpole, provided the four Round Lashings are tight and well-spaced.
6) The 3′ cord for the halyard loop can be fastened to the top stave in a variety of ways: a bowline with a clove hitch, a bowline with two half hitches, a doubled over rolling hitch, etc., etc.
7) The guylines can also be attached in a variety of ways (and will be), though rolling hitches around both the pole and the support frame are recommended.
This wash station is the ideal First Class Camp Gadget! It’s sturdy, portable, and very useful when camping away from washroom facilities. Inherent in its design is a sound approach to a variety of pioneering concepts and skills. When this project’s built with all the lashings tight and all the legs, cross bar, and support pieces properly positioned, it’s a fine example of a well-engineered, highly functional camp gadget. Each of the three legs making up the tripod gets a lashed on support piece, and the wash station’s stability stems from the fact the design contains three triangles.
Getting it done!
To start, you’ll need six good, straight sticks as follows:
two 2-foot x 3/4 to 1-inch for the leg braces
two 4-foot x 3/4 to 1-inch for the back leg and crossbar
two 5-foot x 3/4 to 1-inch for the front legs
For the lashings, you’ll need:
one 10-foot x 1/4-inch manila rope for the tripod lashing
six 6-foot x 1/4-inch manila ropes for the square lashings
NOTE: This and several types of camp gadgets can be happily lashed together simply using binder twine!
You’ll also need
bar of soap in a sock with a 3-foot cord
small to medium-sized towel with a 3-foot cord
No. 10 can with a bail or 4-quart cooking pot with a bail.
Here’s the assembly procedure:
Position of the sticks.
Make the tripod. Using the 10-foot rope, lash the two 5-foot sticks and one 4-foot stick together with a tight tripod lashing. The 4-foot stick should be in the middle. Make sure the “butt” ends of all three these sticks are even. Separate the legs and set the tripod up. The success of this project relies on a well-tied, tight tripod lashing.
Lash on the braces. Using four tight square lashings, with the 6-foot ropes lash one end of the 2-foot sticks to the 5-foot legs and the other end of the 2-foot sticks to the four-foot leg.
Lash on the crossbar. Using two more square lashings, tightly lash the other 4-foot stick to the top extended sections of the two 5-foot sticks to make a cross bar for the towel and soap-in-a-sock.
Add the soap, water, and towel. Tie the end of one 3-foot cord to the soap-in-a-sock and the end of the other 3-foot cord to the towel, and hang them on either side of the 4-foot crossbar.
Washing his hands before breakfast on a cold, winter camping trip.
Hang the can filled with water to the end of the 4-foot stick extending from the front of the tripod.
During the camping trip, change the water as necessary. See that the soap-in-a-sock is not left in the can after use as it will melt.
One of the beauties of using metal containers is that in cold weather, the can of water can be heated in the fire.
The Chippewa Kitchen can be seen as the indisputable KING of all “camp gadgets.” It’s the ultimate camp kitchen pioneering project, providing a huge element of convenience to a wide range of camp cooking operations. The Chippewa Kitchen can provide a raised surface for food preparation, a nifty place to hang tools and utensils, a framework from which a pot can be safely suspended over a cooking fire, and primarily, a convenient, raised cooking surface for cooking over hot coals.
There are all kinds of Chippewa Kitchens. They come in all sizes and shapes.
When our troop first started making Chippewa Kitchens, we built them with one 10-foot tripod, with one 6-foot crossbar, and two 8-foot crossbars each of those extending out so that a shelf could be constructed where we’d pour the coals and do the cooking. We’d tie a rope from the top of the tripod and hang an 8 qt. pot over a fire built on the ground in the middle between the three legs of the tripod. This always worked well, but with all the weight from the mineral soil, coals, food, and dutch ovens, it was a lot less stable. That design tended to make it difficult to keep the tripod from leaning and the crossbar extensions from shifting lower. DOUBLE TRIPOD CHIPPEWA KITCHEN. Our more recent constructions consist of two 8-foot tripods connected with two parallel 8-foot or 10-foot platform supports over which we lash the cooking platform. With this design, you can build a cooking fire under one or both tripods and suspend a pot over each. Of course the platform is superb for Dutch Oven use and ideal for foil cooking.
Looking good and feeling good at Playcard Environmental Education Center during Swampfest.
Materials needed for a Double Tripod Chippewa Kitchen
two 10-foot x 3-inch platform support spars (For a smaller Chippewa Kitchen, 8-foot spars work great.)
six 8-foot x 3-inch tripod leg spars
four 6-foot x 2-1/2-inch tripod braces
two 6-foot x 2-1/2 to 3-inch front tripod braces (to support the platform support spars)
twenty to forty 3 to 4-foot x 2-inch floor spars (depending on the size of the cooking surface required)
sixteen 15-foot x 1/4-inch manila lashing ropes for square lashings
two 20-foot x 1/4-inch manila lashing ropes for tripod lashings
binder twine for floor lashing
piece(s) of burlap, terry cloth, or canvas to cover cooking platform
Here’s a procedure to make a Double Tripod Chippewa Kitchen:
Build the tripods. Lay three 8-foot tripod legs side by side and lash them together with a tight tripod lashing. Make sure the butt ends are at the bottom and even.
Stand the tripod up by crossing the outside legs underneath the middle leg.
Repeat this process for the second tripod.
Labelled Chippewa Kitchen Spars (Click on the photo for a larger view.)
Lash on the tripod braces. Connect the two outside legs with one of the 6-foot front tripod braces. With tight square lashings, lash the brace so it is perpendicular to the ground and three feet high. Lash another 6-foot tripod brace to each outside leg and connect them to the middle leg with square lashings, about two feet and two and a half feet high respectfully.
Repeat this process for the second tripod, making sure the front tripod brace connecting the outside legs is again, three feet high.
Position the tripods. Place the tripods so the 6-foot tripod braces lashed to the outside legs (the stout ones that are three feet off the ground) are facing each other. These braces are the ones that will hold up the long platform support spars, which in turn will support the cooking platform. The distance between the two tripods should be close enough so the long platform support spars can extend over each brace by at least six inches.
Lash on the platform support spars. Place the long platform support spars parallel to each other on top of the three foot high tripod brace on each tripod. Space them apart so the shortest floor spar will extend over their edges by six inches on either side. Lash them in place with tight square lashings.
Lash on the floor spars. The cooking surface is made up of 3 to 4-foot x 2-inch floor spars, depending on how wide a cooking area will be required. These are lashed onto the parallel platform supports with a floor lashing using binder twine.
Prepare the cooking surface. Prior to adding 2 to 3 inches of mineral soil, and to keep he mineral soil from falling though spaces between the floor spars, spread pieces of burlap, terry cloth, or canvas over the platform.
Finally, cover the platform with a layer of mineral soil thick enough to protect the floor spars from the intense heat that will be generated from the coals during cooking.
Construction is logical and easy. Burlap is a practical layer between the platform floor spars and the mineral soil.
A Covered Double Tripod Chippewa Kitchen during an American Legion Open House