—> CLICK HERE FOR INSTRUCTIONS, FURTHER INFORMATION AND ILLUSTRATIONS!


—> CLICK HERE FOR INSTRUCTIONS, FURTHER INFORMATION AND ILLUSTRATIONS!


—> CLICK HERE FOR INSTRUCTIONS, FURTHER INFORMATION AND ILLUSTRATIONS!


This wash station is the ideal First Class Camp Gadget! It’s sturdy, portable, and very useful when camping away from washroom facilities. Inherent in its design is a sound approach to a variety of pioneering concepts and skills. When this project’s built with all the lashings tight and all the legs, cross bar, and support pieces properly positioned, it’s a fine example of a well-engineered, highly functional camp gadget. Each of the three legs making up the tripod gets a lashed on support piece, and the wash station’s stability stems from the fact the design contains three triangles.

To start, you’ll need six good, straight sticks as follows:
For the lashings, you’ll need:
NOTE: This and several types of camp gadgets can be happily lashed together simply using binder twine!
You’ll also need
Here’s the assembly procedure:
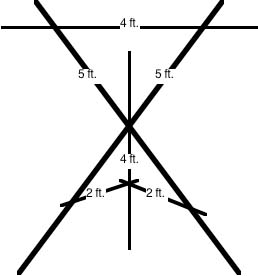
Make the tripod. Using the 10-foot rope, lash the two 5-foot sticks and one 4-foot stick together with a tight tripod lashing. The 4-foot stick should be in the middle. Make sure the “butt” ends of all three these sticks are even. Separate the legs and set the tripod up. The success of this project relies on a well-tied, tight tripod lashing.
Lash on the braces. Using four tight square lashings, with the 6-foot ropes lash one end of the 2-foot sticks to the 5-foot legs and the other end of the 2-foot sticks to the four-foot leg.
Lash on the crossbar. Using two more square lashings, tightly lash the other 4-foot stick to the top extended sections of the two 5-foot sticks to make a cross bar for the towel and soap-in-a-sock.
Add the soap, water, and towel. Tie the end of one 3-foot cord to the soap-in-a-sock and the end of the other 3-foot cord to the towel, and hang them on either side of the 4-foot crossbar.

Hang the can filled with water to the end of the 4-foot stick extending from the front of the tripod.
During the camping trip, change the water as necessary. See that the soap-in-a-sock is not left in the can after use as it will melt.
One of the beauties of using metal containers is that in cold weather, the can of water can be heated in the fire.


It’s a sight right out of the old frontier, a cooking fire with some game roasting on a wooden spit supported by two forked sticks. It’s easy to make, and the wooden spit is often a crossbar from which pots are suspended for boiling water and cooking food. In the photo to the left, the forked sticks are placed outside the fire ring and round lashed to two pioneering stakes driven into the ground deep enough to hold the sticks upright (click on the photo to catch the detail).
As this photo shows, if the crossbar is long enough, one side of the fireplace can be set up to simultaneously cook food over coals on a grill, in a frying pan, or in foil packets. If the fireplace is to be used for a campfire, and the crossbar is not needed, it can simply be lifted off and set aside.

This old fashioned camp gadget can also be set up without any lashing, as seen in the photo to the right. Just find a couple of straight sticks with a branch growing out at about 45° and saw them to size. (Procure them in a conservation-minded way!) Sharpen the bottom and the forked sticks can be hammered directly into the ground without breaking.
Once fashioned, these two prepared straight sticks, along with the crossbar, can be reused repeatedly on future front country outings. They’re a whole lot more portable than other gear that’s carted into a campsite, and very functional.
