
As an illustration to depict the description in the Outdoor Skills section of National Camping School, the following video portrays an example of a Scoutcraft Area in a long-term residential Scout camp:
Tag: Scoutcraft
Dovetail Notch for Camp Gadgets: Pioneering Without Rope

Back in the spring of 1976, while walking through the Mortimer L. Schiff Scout Reservation, then the BSA National Training Center, there was a memorable encounter with a tall man. Seeing the young Scouter, the tall man figuratively embraced him with a smile, warmly acknowledging the younger man like they were lifelong brothers in a worldwide family. A light-hearted conversation ensued. The tall man was Ken Cole, Jr., editor of the 1967 edition of the Boy Scouts of America Fieldbook which had just recently been reprinted.

Here’s an amusing side note: With a twinkle in his eye, he related a little “story” about how on his flight over to Schiff, a passenger sitting next to him in the smoking section asked him for a light. He described how he casually retrieved some belly button lint from a plastic bag, and nonchalantly lit the man’s cigarette with flint and steel. Boy, was that guy ever surprised. The account was related with such sincerity, the thought whether or not this actually happened never occurred to the young man. Ken was so engaging and easy to be around, it really didn’t matter.
Ken happened to be carrying a bow saw, and extolled its virtues as a most useful woods tool. He then bragged about how wonderful was the dovetail notch, and proceeded to effortlessly create one in a stick he picked up from the side of the path. It was a happy demonstration. Ken was a very happy guy.

There’s a whole section on “dovetailing” in the 1981 printing of the BSA Pioneering Merit Badge Pamphlet: “With the handy bow saw and a pocket knife, you can make excellent joints for log structures without lashings. This is done by making a triangular notch in the “receiving” log and a tapered end in the other log or pole. This is called “dovetailing” and if done correctly, it provides a tight, rigid joint that is neat and strong.”

The following is extracted from the 1976 Boy Scout Fieldbook:
When you must hold two pieces of wood together, and you don’t have rope for lashing and there are no nails or wire, you can do it with a dovetail notch. The dovetail joint, as you know, is a familiar cabinet makers trick. However, you don’t have to be a skilled carpenter to make this dovetail notch. Four cuts by a saw and a few strokes with your knife to pry out the wood in the notch is all there is to it. The notch will hold slender unshaped round sticks for quick work and thicker tight-fitting dovetails for heavy loads.

Hand Wash Station

This wash station is the ideal First Class Camp Gadget! It’s sturdy, portable, and very useful when camping away from washroom facilities. Inherent in its design is a sound approach to a variety of pioneering concepts and skills. When this project’s built with all the lashings tight and all the legs, cross bar, and support pieces properly positioned, it’s a fine example of a well-engineered, highly functional camp gadget. Each of the three legs making up the tripod gets a lashed on support piece, and the wash station’s stability stems from the fact the design contains three triangles.

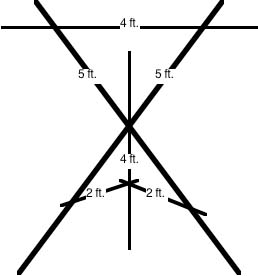
To start, you’ll need six good, straight sticks as follows:
- two 2-foot x 3/4 to 1-inch for the leg braces
- two 4-foot x 3/4 to 1-inch for the back leg and crossbar
- two 5-foot x 3/4 to 1-inch for the front legs
For the lashings, you’ll need:
- one 10-foot x 1/4-inch manila rope for the tripod lashing
- six 6-foot x 1/4-inch manila ropes for the square lashings
NOTE: This and several types of camp gadgets can be happily lashed together simply using binder twine!
You’ll also need
- bar of soap in a sock with a 3-foot cord
- small to medium-sized towel with a 3-foot cord
- No. 10 can with a bail or 4-quart cooking pot with a bail.
Here’s the assembly procedure:
Make the tripod. Using the 10-foot rope, lash the two 5-foot sticks and one 4-foot stick together with a tight tripod lashing. The 4-foot stick should be in the middle. Make sure the “butt” ends of all three these sticks are even. Separate the legs and set the tripod up. The success of this project relies on a well-tied, tight tripod lashing.
Lash on the braces. Using four tight square lashings, with the 6-foot ropes lash one end of the 2-foot sticks to the 5-foot legs and the other end of the 2-foot sticks to the four-foot leg.
Lash on the crossbar. Using two more square lashings, tightly lash the other 4-foot stick to the top extended sections of the two 5-foot sticks to make a cross bar for the towel and soap-in-a-sock.
Add the soap, water, and towel. Tie the end of one 3-foot cord to the soap-in-a-sock and the end of the other 3-foot cord to the towel, and hang them on either side of the 4-foot crossbar.

Hang the can filled with water to the end of the 4-foot stick extending from the front of the tripod.
During the camping trip, change the water as necessary. See that the soap-in-a-sock is not left in the can after use as it will melt.
One of the beauties of using metal containers is that in cold weather, the can of water can be heated in the fire.
Tool Rack

Fundamentally speaking, as long as a campsite is safe and clean, all’s well. However, especially for longer term camps (or when displaying demonstrations of Scoutcraft skills), there’s definitely something to say for the added convenience of a campsite tool rack. Set up in a prominent location (in or near an axe yard), a tool rack serves as a reminder to put tools back where they belong. A place for everything, and everything in its place, especially wood tools, goes a long way in not just keeping things well-organized, but also towards limiting accidents.
Construction is very simple. Basically, all that’s needed are four poles; two 6-foot uprights, and two 5-foot cross pieces work fine. The cross pieces are connected to the uprights with four square lashings.
Tools are hung on the rack, suspended by a looped cord attached to the top cross piece with a lark’s head.

If the two upright’s cannot be sunk or hammered into the ground, pound in a couple of pioneering stakes and hold the uprights in a vertical position by lashing them firmly to the stakes with a couple of tight round lashings.
Check out a tool rack rain cover at the bottom of the post.
Forked Sticks and Crossbar


It’s a sight right out of the old frontier, a cooking fire with some game roasting on a wooden spit supported by two forked sticks. It’s easy to make, and the wooden spit is often a crossbar from which pots are suspended for boiling water and cooking food. In the photo to the left, the forked sticks are placed outside the fire ring and round lashed to two pioneering stakes driven into the ground deep enough to hold the sticks upright (click on the photo to catch the detail).
As this photo shows, if the crossbar is long enough, one side of the fireplace can be set up to simultaneously cook food over coals on a grill, in a frying pan, or in foil packets. If the fireplace is to be used for a campfire, and the crossbar is not needed, it can simply be lifted off and set aside.

This old fashioned camp gadget can also be set up without any lashing, as seen in the photo to the right. Just find a couple of straight sticks with a branch growing out at about 45° and saw them to size. (Procure them in a conservation-minded way!) Sharpen the bottom and the forked sticks can be hammered directly into the ground without breaking.
Once fashioned, these two prepared straight sticks, along with the crossbar, can be reused repeatedly on future front country outings. They’re a whole lot more portable than other gear that’s carted into a campsite, and very functional.
