Simple Camp Table

This small camp table can be comprised almost completely of Scout staves. It is 100% functional and provides a convenient raised surface for personal, patrol, or general use. It’s simple design makes it quick and easy to set up, and it is remarkably stable.

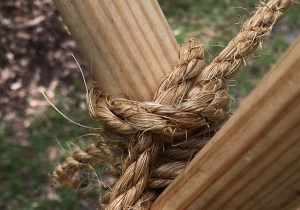
Make the table legs. Start by lashing together four Scout staves into two sets of shear legs with 6-foot manila lashing ropes. If you prefer, square lashings can be used instead of shear lashings. (In lieu of Scout staves, straight poles an inch or so in diameter are just fine.)

Lash on the table top supports. Next, with two square lashings, lash a 2-1/2-foot stick to connect each set of shear legs about 30 inches off the ground. (A Scout stave cut in two is ideal.)  This will form two A-frames, one for each side of the table. Make sure each of these support sticks are lashed on straight and at the same distance from the bottom end of both sets of legs.

Securely hold up the A-frames. This is surely the best part. Find the midpoint of a 20-foot line. At about two feet away, tie a clove hitch at the top of one of the Scout staves of one of the A-frames. Repeat this process on the other side attaching the line with a clove hitch to one of the Scout staves of the other A-frame.

Secure each end of the 20-foot line to stakes driven into the ground on either side, about 5 feet away, so the line extends out evenly from each end of this table framework. You can use round turns with two half hitches, taut-line hitches, or rope tackles. Here’s the beauty of this configuration: you can manipulate the distance between the A-frames by adjusting the clove hitches, and provide optimum stability to the table by placing a good, reasonable strain on the line at each stake. It will stand up in an impressively rigid fashion.

Lash on the table top. Finally, lay 12 Scout staves, (or similar poles) side by side, on top of the 2-1/2-foot support sticks, and using binder twine, lash them on with floor lashings.

SaveSave

SaveSave

SaveSave

Boys’ Life Article

Hand Wash Station

This Wash Station is a Great First Class Camp Gadget!
Washing up before lunch.

This wash station is the ideal First Class Camp Gadget! It’s sturdy, portable, and very useful when camping away from washroom facilities. Inherent in its design is a sound approach to a variety of pioneering concepts and skills. When this project’s built with all the lashings tight and all the legs, cross bar, and support pieces properly positioned, it’s a fine example of a well-engineered, highly functional camp gadget. Each of the three legs making up the tripod gets a lashed on support piece, and the wash station’s stability stems from the fact the design contains three triangles.

Scouts sharing the work to lash together a wash station.
Getting it done!

To start, you’ll need six good, straight sticks as follows:

  • two 2-foot x 3/4 to 1-inch for the leg braces
  • two 4-foot x 3/4 to 1-inch for the back leg and crossbar
  • two 5-foot x 3/4 to 1-inch for the front legs

For the lashings, you’ll need:

  • one 10-foot x 1/4-inch manila rope for the tripod lashing
  • six 6-foot x 1/4-inch manila ropes for the square lashings

NOTE: This and several types of camp gadgets can be happily lashed together simply using binder twine!

You’ll also need

  • bar of soap in a sock with a 3-foot cord
  • small to medium-sized towel with a 3-foot cord
  • No. 10 can with a bail or 4-quart cooking pot with a bail.

Here’s the assembly procedure:

The design for making a wash station.
Position of the sticks.

Make the tripod. Using the 10-foot rope, lash the two 5-foot sticks and one 4-foot stick together with a tight tripod lashing. The 4-foot stick should be in the middle. Make sure the “butt” ends of all three these sticks are even. Separate the legs and set the tripod up. The success of this project relies on a well-tied, tight tripod lashing.

Lash on the braces. Using four tight square lashings, with the 6-foot ropes lash one end of the 2-foot sticks to the 5-foot legs and the other end of the 2-foot sticks to the four-foot leg.

Lash on the crossbar. Using two more square lashings, tightly lash the other 4-foot stick to the top extended sections of the two 5-foot sticks to make a cross bar for the towel and soap-in-a-sock.

Add the soap, water, and towel. Tie the end of one 3-foot cord to the soap-in-a-sock and the end of the other 3-foot cord to the towel, and hang them on either side of the 4-foot crossbar.

Washing his hands before breakfast on a cold, winter camping trip.

Hang the can filled with water to the end of the 4-foot stick extending from the front of the tripod.

During the camping trip, change the water as necessary. See that the soap-in-a-sock is not left in the can after use as it will melt.

One of the beauties of using metal containers is that in cold weather, the can of water can be heated in the fire.