

This wash station is the ideal First Class Camp Gadget! It’s sturdy, portable, and very useful when camping away from washroom facilities. Inherent in its design is a sound approach to a variety of pioneering concepts and skills. When this project’s built with all the lashings tight and all the legs, cross bar, and support pieces properly positioned, it’s a fine example of a well-engineered, highly functional camp gadget. Each of the three legs making up the tripod gets a lashed on support piece, and the wash station’s stability stems from the fact the design contains three triangles.

To start, you’ll need six good, straight sticks as follows:
- two 2-foot x 3/4 to 1-inch for the leg braces
- two 4-foot x 3/4 to 1-inch for the back leg and crossbar
- two 5-foot x 3/4 to 1-inch for the front legs
For the lashings, you’ll need:
- one 10-foot x 1/4-inch manila rope for the tripod lashing
- six 6-foot x 1/4-inch manila ropes for the square lashings
NOTE: This and several types of camp gadgets can be happily lashed together simply using binder twine!
You’ll also need
- bar of soap in a sock with a 3-foot cord
- small to medium-sized towel with a 3-foot cord
- No. 10 can with a bail or 4-quart cooking pot with a bail.
Here’s the assembly procedure:
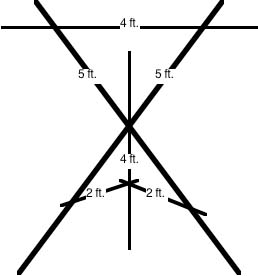
Make the tripod. Using the 10-foot rope, lash the two 5-foot sticks and one 4-foot stick together with a tight tripod lashing. The 4-foot stick should be in the middle. Make sure the “butt” ends of all three these sticks are even. Separate the legs and set the tripod up. The success of this project relies on a well-tied, tight tripod lashing.
Lash on the braces. Using four tight square lashings, with the 6-foot ropes lash one end of the 2-foot sticks to the 5-foot legs and the other end of the 2-foot sticks to the four-foot leg.
Lash on the crossbar. Using two more square lashings, tightly lash the other 4-foot stick to the top extended sections of the two 5-foot sticks to make a cross bar for the towel and soap-in-a-sock.
Add the soap, water, and towel. Tie the end of one 3-foot cord to the soap-in-a-sock and the end of the other 3-foot cord to the towel, and hang them on either side of the 4-foot crossbar.

Hang the can filled with water to the end of the 4-foot stick extending from the front of the tripod.
During the camping trip, change the water as necessary. See that the soap-in-a-sock is not left in the can after use as it will melt.
One of the beauties of using metal containers is that in cold weather, the can of water can be heated in the fire.

thank you for this shared info
https://boyslife.org/hobbies-projects/funstuff/156996/build-a-hand-wash-station/
Tall Tripod. Rope: on one end, a gallon milk jug, filled with water, on the other, a mesh bag from cherry tomatoes or onions with a bar of Ivory in it. Loop over/around top end of tripod. Refill jug when necessary (Patrol assigned duty). Drape old towel over top end of tripod (cross piece is “luxury”). If rain take in towel. “A Scout is Clean”…..