What Pioneering Merit Badge SHOULD Be!

“Pioneering is practical and character building: the two essential ingredients of any program material for Scouts.” (Lord Baden-Powell)

Mew Top Montage

Pioneering Merit Badge, which as we all know used to be required for Eagle, should give Scouts a taste of pioneering! Of course they should be taught about safety and gain some general knowledge, but much more importantly, they should be introduced to the Scouting traditions and the fun that this activity embodies. They should DO pioneering!

SIngle Trestle Montage

Taking part in building pioneering projects contributes to the development of self-esteem and provides a sense of accomplishment. It necessitates working hard and working together towards a common goal. Besides being really cool and impressing people in and out of Scouting, building a real pioneering structure requires the mastery of a set of useful Scout skills that can be applied over a lifetime of outdoor activities—activities for both work and recreation.

A-Frame Bridge 5

Pioneering Merit Badge should be presented as a series of planned challenges and opportunities leading up to memorable experiences that are rewarding and unique. The recipients of this merit badge should be inspired to share their acquired skills and the fun they had with other Scouts in their unit.

Bridge Building

As Gilwell Park Camp Chief, John Thurmann  stated, “To me, the over-riding reason for presenting Pioneering is that boys like it. There are few activities which, properly presented, have a greater appeal to the Scout than Pioneering and ever since the introduction of Wood Badge training, Pioneering has been given a full share in the program of Scouters’ training. In the summer months when Scouters at Gilwell are building bridges, towers, and rafts, and boys are in camp, it has been all too common to hear from the boys such remarks as, ‘I wish we did that in our Troop’ or ‘We never do anything like that’.”

Tower Montage

But there are reasons for Pioneering other than the fact that Scouts like doing it. B.-P. wrote: “I am inclined to suggest to Scouters that in addition to the technical details of knotting, lashing, and anchorages, there is an educative value in Pioneering since it gives elementary training in stresses, mensuration, etc., and it also develops initiative and resourcefulness to use local material. Additionally, it gives practice in team work and discipline.” In other words, (“Pioneering is practical and character building: the two essential ingredients of any program material for Scouts.”)

CHippewa Montage

PIONEERING MERIT BADGE WEBSITE

The Guided Discovery Process

The following piece was composed for a BSA ScoutCast. The concept applies admirably to pioneering when Scouts, who have the proper “tools” and are capable and ready, care to embrace the construction of any-size pioneering project.

splThe Guided Discovery Process is a fancy term for what? Guided Discovery is an approach where Scouts are asked a question which leads them to examine a situation, and then discover the best way to proceed. Put another way, Guided Discovery enables Scouts to think for themselves in order to solve problems and find solutions. This approach is Scout-based. By Scout-based I mean the focus is on the learning and the Scout, not on the teaching and the teacher.

Asking a question is a big part of this process. Asking the right questions takes as much skill as giving the right answers. The idea is, the right kind of question is going to get the Scouts thinking. It’s their thinking that leads them through a path of discovery where they can figure out for themselves what they need to do.

When Scouts are faced with a challenge or have a problem, it’s natural they’ll frequently have there own questions. But with Guided Discovery, we, don’t just spoon feed them the answer. Instead, in order to guide them through this path of discovery, we present them with a counter question—a question which requires them to find their best answer by applying what they know, using their resources, and coming to their own valuable conclusion. And why is their conclusion so valuable? It’s, because whatever a Scout learns through a process of discovery is his. It’s something he’s arrived at through his own efforts. So, he owns it.

Guided discovery as a process. There’s a lot that junior leaders have to go through before they can take the reins and run the troop. All through their ranks and as they mature, Scouts are gaining knowledge. Not just facts, but skills and techniques too. Let’s talk about a brand new troop where we want to enable the newly elected SPL to run things. With the Guided Discovery Process, the first thing he needs is a vision. He’s can be given a picture of a troop that’s involved with an exciting program that reflects what they want, they’re learning, they’re advancing and they’re having a lot of fun. And also, everything’s planned and carried out by them. In this vision, the only time the Scoutmaster’s in front of them is for a minute at the end of the meeting. The rest of the time, it’s all up to them.

Now once the Scout is given a vision like this, the second thing he needs is the strong desire to make it happen. We’ll assume he already has desire, that he’s motivated to be an effective Senior Patrol Leader.

The third necessary thing any junior leader needs are the prerequisite tools to carry out their job. And here, it’s the Scoutmaster’s responsibility to make sure they learn or at least have access to all these necessary tools. For example, the new SPL needs to know that putting up the Scout sign is a means to getting the troop’s attention. This is a basic tool. Now, discovering how to use this tool most effectively, that’s something else. See, this is a technique. And techniques can be gained… through Guided Discovery.

Back to the Scout sign. Like maybe the SPL had a terrible time at a meeting to get his troop quiet when he held up the sign. After the meeting, the Scoutmaster might ask,  “So, how do you think things went tonight? Were you able to control the troop the way you’d like?” And the SPL might answer, “The troop doesn’t ever really get quiet when the sign goes up.” The Scoutmaster might then ask a guiding question like, “Well, when you hold up the sign, what do you think the Scouts see?” Now, after mulling this over, if the SPL just scratches his head, the Scoutmaster might ask, “What do you want them to see?” That question should serve to further guide him and get his wheels turning.

Through this process, he can start zooming in and find his own answer. If he pictures the troop as he’s holding up the sign, he might remember how even some of his own leaders were still carrying on. Ah-ha!  There’s a key! He’s gotta make it clear to his leaders that as soon as he puts up his sign, they need to quickly get quiet and put up theirs. This way, the rest of the troop is going to have a good example to follow. What’s important here is that he comes to the conclusion on his own. He was guided to find a solution for himself. but it’s actually his discovery. See how this is different than just telling him the Patrol Leaders Council leads by example!?

So through guided discovery, a junior leader can find the solution to his problem and gain needed techniques. Learning these techniques by discovering them is a way he can make these techniques his own. You know what I mean? When he finds a solution to his own problem, through his own efforts, he owns that solution!

So, now as he gains techniques, he can use them to do a good job. And this is good. Because doing a good job gives him confidence. And with confidence, a motivated junior leader can start using his own initiative to make everything better. Junior leaders using initiative is amazing. All I can say is, when this happens, it’s awesome! (So the process? A vision, a desire, the tools, the techniques to use them, gaining confidence, and finally using initiative.)

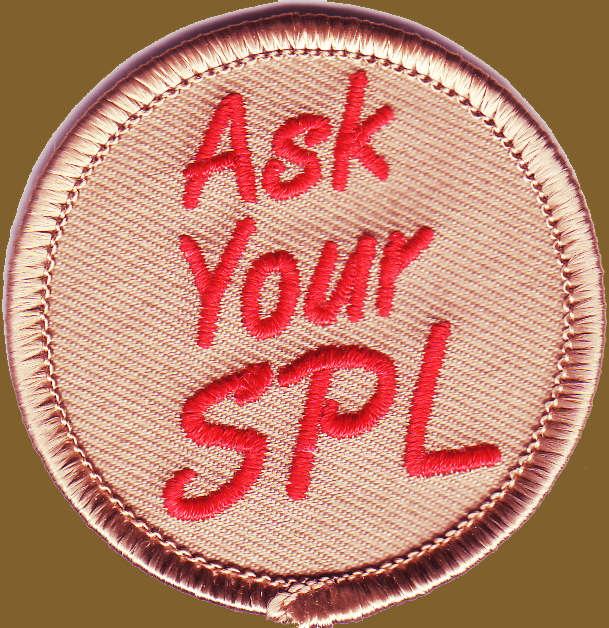
How does a Scoutmaster shift the attention off himself as the leader to the Senior Patrol Leader? When a Scoutmaster is approached by the SPL with a question or problem, with guided discovery, he won’t just dole out hard and fast answers. Instead, again, he asks a counter question. “This is your troop. What do you think needs to be done?”  If it’s not a matter of health and safety, then reflecting the situation back onto the SPL with a question, is shifting the attention off of himself. As for the rest of the troop, have you ever seen T-shirts for the adults with the back saying, “Ask the Senior Patrol Leader?” I even came across a little, round, patrol medallion sized patch for a Scouter’s right sleeve saying, “ask the SPL.”

How does the Scoutmaster instill his knowledge to the Senior Patrol Leader? Well, first, by inspiring him with a shared vision, and of course encouraging him whenever appropriate, then by providing him with all the necessary resources so he can do things independently. Along the way, the Scoutmaster serves as a mentor, but a Scoutmaster really needs to lead by following one step behind. Can you picture that? That means, he knows where the SPL and the troop are heading and what they need, but from there, he enables them to discover things on their own.

Some other examples of the Guided Discovery Process. The December, 2015 Scoutcast addressed the advantages of always having a Plan B.  Plan-B-Prepared. A perfect example of a Guided Discovery question that will get a Scout thinking is: “What if?” Asking Scouts questions beginning with what if is a good way to get them thinking about alternatives and also getting them to develop their troop’s resources.

Here’s a couple more guided discovery scenarios: Recently, I videoed a troop and saw two Scouts carry a third through a 4-foot wide track as part of an activity. Are you familiar with Handicap Obstacle Course? Anyway, these two Scouts really struggled to carry the third. They hadn’t learned the “two handed carry?” or the “four-handed seat?” Now, after their struggle, it could just be explained to them how to do these carries. But, it would be better to ask them, “How would you like to find out how to carry an injured person a whole lot easier, even if he was heavier?” and then guide them: “Where can you see how to do this in your own handbooks?” They’re most likely gonna want to check this out, because after what they just went through, they’re definitely ready to learn something better than what they did, but the emphasis is on them to discover it themselves, and that’s what carries a whole lot more weight. See, when we pour ourselves into finding our own solutions, we become invested in the process. When someone makes an investment, they’re much more likely to feel involved. Like, think about this:  Won’t you be much more likely to read a book if you buy it, as opposed to someone just giving it to you?

Another scenario, and I like this one, is about using woods tools to prepare tinder and kindling and then build and light a fire. As Scout leaders, before a Scout tries anything where safety enters the picture, we must make sure they have the necessary tools. In this case, the prerequisite tools are knowing how to safely use woods-tools, and knowing how to be careful with fire. So, here’s a Scout who we observe knows how to properly use a knife and axe, and he’s prepared all the tinder and kindling he needs to start and feed a cooking fire. He’s got everything he needs, a safe area, a proper surface, a fire bucket nearby, but, before he tries to light a fire, he mixes together all his tinder and kindling into the fire pit, and then, try as he will, each time he puts a match to this mess, it goes out. He finds he can’t light a fire. He wants to, right? But he’s come face to face with a stumbling block, and he recognizes this. He’s definitely ready to learn what needs to be done next. But, using guided discovery means we don’t show him how to do it, and we don’t hover over him providing guidance every step of the way either. He needs to get actively involved with learning how to do this, himself. Remember, with this approach, it’s all about the learning, not the teaching. Guided Discovery happens when we ask questions. Here, we might ask something like, “Why do you think this fire won’t stay lit?” Let him think about this. A follow up question might be, “Looking at all your tinder and kindling here, what will burn the easiest when you touch a match to it?” The Scout will naturally answer the light weight stuff—the tinder. Now, after getting him thinking about what needs to be done, he should be given the opportunity to explain what he’s going to do, and if his explanation is good, then let him do it.

How does a Scoutmaster know what his role is?  In Scoutmaster Position Specific Training, after being introduced to Scouting’s Aims and Methods, right before looking at the Patrol Method, there’s a 20 minute session where the qualities of a Scoutmaster are discussed as well as basically what a Scoutmaster’s role is— what he must be, what he must know, and what he should and shouldn’t do. Also, in the Troop Leader Guidebook Volume 1, Chapter 15, it’s called “Adult Leader Roles and Responsibilities.” It’s very well spelled out.

Are there any resources available to assist Scoutmasters and Advisors on how to facilitate leadership? Beyond Scoutmaster Position Specific Training, Woodbadge goes more deeply into communication and leadership. But additionally, when it comes to assuring junior leaders are successful, I really feel IntroductIon to Leadership Skills for Troops serves as an invaluable resource. There are also some books out there that are all about Youth Leadership Training and Working the Patrol Method, and they’re filled with really good stuff. And, here’s one more good resource—Scout leaders who themselves have well run, successful troops. Most any Scoutmaster or Assistant Scoutmaster, who’s passionate about what he does, loves to talk about his troop, especially when it comes to talking about what his Scouts do to run things well.

Additional Information Let’s refer to the three basic roles of the Scoutmaster (1) of course, is to make sure the rules of the BSA and chartered partner are followed, (2) is the Scoutmaster should be a good mentor and positive role model, and the big (3) and this is where we’re placing the emphasis, is to train and guide Scout leaders. The Guided Discovery Process does this, by asking the right kinds of questions, and then getting out of the way.

1) Guided discovery provides the framework within which, Scouts can lead themselves to realize a vision they have.”

2) Provide the Scouts the objective, equip them with the tools and the skills or the resources to learn how to use them, and turn them loose.”

3) Scouts will learn to lead by practicing leading and experiencing the results of their hands-on leadership efforts.”

4) Why” and “How” questions enhance the Scouts’ ability to make decisions, which is one of the central goals of empowerment.”

Don’t you love the word empowerment? When Scouts run their own troop, they’ve been empowered to do this. A troop run by motivated Scouts who have with the right skills, and techniques, is bound to have good membership and the highest retention rate.


Consistency, anyone?

This short commentary is one part surmise and three parts observation. It’s composed of a series of events with a predictable outcome. Except to those familiar with Scout Pioneering, and Scout competitions, the whole scenario will appear obscure. But to the Scouts involved, it’s far from obscure. On the contrary, whenever something like this happens, it’s downright confusing, and without being melodramatic, maybe a little traumatic too. No real names are used in this account, and no fingers are being pointed at any individuals. The characters in stories like this are always well-intentioned and without malice. There are no wrongdoers involved… just victims.

Scout Pioneering is about building structures with poles and rope. They can be useful, they can be for fun, and often they’re both. Knowing how to tie knots and lashings is a basic Scouting skill that’s been a part of our movement for over a hundred years. In all bonafide Scout Pioneering settings, when two poles cross each other, but do not touch, a Diagonal Lashing is often used to spring the poles together. The lashing is so-named, because the wraps run diagonal to the poles. Additionally, those who are experienced in building pioneering structures accept the fact that joining two poles together that cross from 45º to 90º calls for a Square Lashing. There’s more contact between the rope and the poles than with a Diagonal Lashing, and hence a Square Lashing provides a better hold. The Square Lashing gets its name from the fact the wraps run square to the poles. The name has nothing to do with at what angle the poles cross.

Enter “Ned”: Without knowing any better, Ned, a well-meaning Scouting volunteer, reasons quite innocently the Diagonal Lashing should be used whenever Scouts join two poles that cross each other at less than a perpendicular angle. So from this viewpoint, which, because of its name, appears logical, Ned concludes Scouts should use Diagonal Lashings when making an A-frame. After all, the angles formed by the poles are less than 90º. Without any real, hands on exposure to pioneering, he’s not familiar with the fact the lashing is reserved for springing two poles together when they cross but don’t touch. To him, his assumption about the lashing is obvious. He proceeds to write up a description of a Scouting activity featuring his misunderstanding about the use of Diagonal Lashings. Since he’s an intelligent, well-respected Scouter…somehow, it get’s printed, and then again reprinted, in official BSA publications.

Enter the “Raccoon Patrol”: As part of a troop that regularly embraces large pioneering projects, the Raccoon Patrol is well-versed in building A-frames. During inter-patrol competitions at Scout meetings, they do well in A-frame Chariot Races. On outings they build camp see-saws where the roller bar for the plank is supported by two heavy duty A-frames. They have also helped to build several monkey bridges relying on sturdy A-frames as sub assemblies. Belonging to a unit with a successful pioneering program, they’ve been taught to make their A-frames using three Japanese Mark II Square Lashings. In addition to being supported in certain BSA publications, their grasp of Scouting skills stems from Scouters who’ve served on the pioneering staff at national jamborees and who, themselves, have learned from some of the most esteemed Scout Pioneering legends.

Enter “Nancy”: On staff at summer camp, Nancy volunteers to conduct an A-frame Chariot Race as part of the camp-wide skills event towards the end of the week. Her reference material is one of the BSA publications containing Ned’s well-meaning misconception, directing Scouts to construct an A-frame using Diagonal Lashings. Without any real experience putting together an A-frame, she’s basing her thinking on what she has read. Furthermore, since the content is featured in an official publication, she requires each patrol taking part in the activity to build their A-frame in just that way.

Reenter the “Raccoon Patrol”: Participating in the camp-wide competition, the Raccoons confidentially arrive at Nancy’s station, all revved up to be the fastest patrol in the A-frame Chariot Race. Nancy proceeds to explain her rules for putting together the A-frame, which immediately confuses the Raccoons. In their attempt to comply, they bungle the Diagonal Lashings, something they seldom use. At the top, they ask if they can tie a Square Lashing in lieu of a Shear Lashing, and Nancy acquiesces. But, they are further penalized because Nancy insists that if they’re going to tie a Square Lashing, it must start and end with a Clove Hitch. She has never seen or heard of a Japanese Mark II Square Lashing. It isn’t in the official publication she is using as her reference. At that point, the Raccoon’s performance is so poor, they don’t even bother to race. With disgruntled comments, they leave Nancy’s station. They are hurt and bewildered.

Are these kinds of scenarios rare at Scout skill events? The answer is, no. They take place at Boy Scout summer camps, district and council camporees, and OA conclaves. Scouts have been penalized, disqualified, and even politely insulted by facilitators who base their event’s rules on material that contradicts what some may have adopted from other official publications. This is a sad state of affairs. Scouts become frustrated, angry, and disillusioned—feelings that shouldn’t obtain at a Scouting event.

What about this conflicting information presented in different official publications? Are there ways around the confusion? The answer is, yes. At the time of this writing, a national task force is taking steps to assure the publications all provide compatible information pertaining to Scout skills—approaches that are sensible, practical, and proven to be the most efficient. This is a lengthy process and will take time. Everything that appears in official BSA publications should be exemplary, but change happens slowly. Until Scout skills are presented consistently across the board, the following is felt to be an advisable practice: during inter-troop, district, or council events, in competitions like the A-frame Chariot Race, let the patrols complete the challenge in anyway they can. Don’t permit their efforts to be circumscribed by a rigid set of exacting rules. As long as what they build is safe and gets the job done, the Scouts should be allowed to experience success.

Pioneering Program Curriculum X: Double Floor Lashing

This is the tenth post in a series that will eventually comprise an activity-based, unit pioneering program curriculum.

SUPPORTING VIDEO: How to Tie a Double Floor Lashing

Double Floor Lashing

Floor Spars and Platform Supports

X. This lashing is useful when building any kind of raised surface for a: platform, deck, raft, table, bench, chair, or Chippewa kitchen.

OBJECTIVE
  • Each Scout will tie a complete floor lashing, attaching floor spars to a platform support.

MATERIALS (for every two Scouts)

  • six 3-foot x 2-inch floor spars
  • two 4 to 6-foot x 3-inch platform support spars
  • two 15-foot x 1/4-inch manila lashing ropes

PROCEDURE

A. Instructor will demonstrate the floor lashing and then, with the guidance of the instructor, Scouts will:

  1. Lay out the two support spars parallel to one another so they are about 30 inches apart.
  2. Place the floor spars over the support spars, in the middle and against one another, making sure  the ends extend out from the support spars 2 to 3 inches on either side.
  3. Up against the first floor spar, tie one end of the lashing rope to the platform support with a cove hitch, leaving enough “tail” at the end to twist around the long end of the rope before continuing.
  4. Close to the clove hitch, make a bight in the running end and on the inside of the platform support, pass it over the first floor spar. (A bight is formed by doubling back a length of the rope against itself to form a U.) 
  5. Grab this bight and pass it underneath the platform support.
  6. Loop the bight over the first floor spar on the outside of the platform support.
  7. Tighten both loops around the first floor spar by pulling the running end (extending between the first and second floor spars on top of the platform floor).
  8. Repeat this process for each floor spar until you reach the other end.
  9. Secure the running end of the rope to the other end of the platform support, with tight half hitches.

View Video

Steps 4, 5, 6

Steps 7 and 8
Steps 7 and 8

Simple Lift Seat
Simple Lift Seat

B. The above procedure can be implemented by two Scouts simultaneously lashing both ends of the floor spars to their respective platform supports. When a platform is completed in a manner where the floor spars are snug, one Scout can sit on the floor spars and four Scouts can carefully lift him up.


SCOUT MEETING CHALLENGE: Lift Seat

PIONEERING PROJECT: Chippewa Kitchen

PIONEERING CURRICULUM: MAIN PAGE

Single Pull 2-Ring Monkey Bridge Configuration

7:1 Rope Tackle Monkey Bridge Configuration
Single Pull 2-Ring Monkey Bridge Anchor Configuration

We’ve seen how block and tackles and even commercial-grade come-alongs have been employed to tighten hand and foot ropes during the construction of various monkey bridge projects, especially those spanning longer distances and using larger diameter ropes. On the other side of the coin, in the presentation of his Double A-Frame Monkey Bridge, Adolph Peschke says, “Whatever strain three or four Scouts can put on the foot rope by pulling it by hand will be enough.”

The simple rope tackle provides a 3:1 mechanical advantage and is frequently used to apply the desired tension to both hand ropes and foot rope—often on both sides of the bridge. Adjusting the strain on individual ropes during use of the bridge can result in a slight complication—the spanner ropes can lose their symmetry.

7to1RopeTackleBridgeEnd
On the side of the bridge where the tension will be adjusted, the hand and foot Ropes are attached to one large ring.

A method that will alleviate this issue, and also provide a greatly increased mechanical advantage, is to utilize a Single Pull 2-Ring Configuration. After attaching the hand ropes to their respective spars with Clove Hitches, (adjusting the strain on the sections of the hand ropes between the double A-frames to match the sag of the foot rope) this approach is executed as follows:

  • Use a roundturn with two half hitches to attach the hand and foot ropes to a rope grommet at one anchor point. At that side of the bridge, they will remain fixed.
  • Pulling the three ropes so each receives the same degree of strain, attach each to one large ring at the other side of the bridge, again using Roundturns with Two Half Hitches.
  • With a length of 1/4 or 3/8-inch manila (preferred), using a roundturn with two half hitches, connect one end to the same large ring.
  • The other ring is in the rope grommet which is attached to the anchor.
    The other ring is in the rope grommet which is attached to the anchor.

    Reeve the running end of this rope through the ring in a rope grommet which is situated about four feet away and already fixed at the anchor point on this side of the bridge.

  • Carry the running end back and reeve it through the large ring. (If you now pull on the running end, there’s a 2:1 mechanical advantage.)
  • To increase the strength of this connection enabling it to withstand all the strain exerted on the bridge during heavy operation, reeve the running end back through the ring in the rope grommet and then through the large ring two or more times.
  • Now when you adjust the tension of the hand and foot ropes with this pull rope, the mechanical advantage is greatly increased. Secure the entire configuration with two Half Hitches cinched up against one of the rings.

Some Notes: This arrangement can be configured any way you like, e.g. when using 3/8-inch manila, attach the pull rope to the large ring, reeve it through both rings twice, and then finally secure the configuration at the large ring. Or, instead of first tying the pull rope to the large ring (the ring that’s functioning as the moving block) initially tie it to the ring in the rope grommet (fixed block). Then proceed to reeve it through the other ring, back again, etc.

With each turn on the rings, make sure the rope doesn’t cross on top of itself as this would interfere with adjusting the strain.

This kind of rope tackle can exert too much force on the bridge components, so carefully monitor how tight everything is getting and don’t just give the rope a willy-nilly pull.

Catapults at the Jamboree

Soldiers play with Large Catapult
Soldiers play with the “giant” Catapult

Before the Pioneering Area catapults were all completed and positioned in readiness for the thousands of jamboree participants who would be hiking up to Garden Ground Mountain, a little change of pace occurred which translated into a memorable moment. One morning during the building process, some soldiers passing though our area were attracted to the “giant” catapult with the heavy wooden counter weights, double throwing arm, and trebuchet-style swing extension. They were tempted to give it a try and what followed was a scene featuring modern day warriors coupled with ancient weaponry. (Click on the photo for a larger view.)

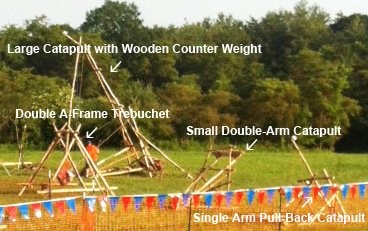
In addition to the “giant” catapult, three other catapult designs were featured up on Garden Ground Mountain in the pioneering area. Eventually, they were positioned on the far side of Peschke Field, facing a clear expanse of ground which was sectioned off to serve as a shooting area.

Periodically, to the amusement and awe of onlookers and those passing by, the 10′ Double A-Frame Trebuchet with a 200 pound counter weight would launch a large monkey fist in a high arc far down the length of the firing range.

Scouts load the smaller, counter-weighted catapult and launch their shot by pulling together to snap the arm up.
Scouts load the smaller, counter-weighted catapult and launch their shot by pulling together to snap up the arm.

A Trebuchet at Jambo-Palooza
The Trebuchet at Jambo-Palooza

The most excitement from the jamboree catapults was generated during Sunday’s Jambo-palooza festivities. A specially-built 8′ trebuchet was prepared, transported from Garden Ground, and set up at the stadium in Summit Center where it fired water balloons into throngs of Scouts gathered down range waiting to get doused. And, when it was apparent that a T-shirt was to be launched, the ensuing scrambling to catch it or grab it was over the top! (Click on the photo for a larger view.)

JAMBOREE PIONEERING AREA: MAIN PAGE

Three Featured Catapult Designs


AT&T Spoof “Signal” Tower at the Jamboree

After a supply of bamboo was used for the gateway to Peschke Field up on Garden Ground Mountain, a team of Pioneering staff received the inspiration to use most of what was left over to comically copy one of AT&T’s nearby cell towers.

The AT&T Cell Tower made out of Bamboo in the Pioneering Area of the 2013 National Jamboree
The AT&T Cell Tower made out of Bamboo in the Pioneering Area of the 2013 National Scout Jamboree

The 30-foot clever creation received a good deal of acclaim as Scouts and Scouters observed the structure and came to the obvious conclusion that the bamboo tower was a tongue-in-cheek reproduction of the highly technical real thing.

A central aspect of pioneering is to ingeniously and skillfully make do with what one has and use it to the best possible advantage, sometimes out of necessity, sometimes for utility, and sometimes for fun. 

PIONEERING AREA: TOWERS

JAMBOREE PIONEERING AREA: MAIN PAGE

Single A-Frame Bridge Pictorial

The Single A-Frame Bridge is made up of three subassemblies. Please refer to Bridge Walkways as a point of reference for two of the three of these subassemblies. The following photos will enliven the text and instructions featured in Adolph Peschke’s informative, older pioneering merit badge pamphlet. Click on the photos for larger views:

Lashing the top of the legs with a two pole shear lashing. Lashing on the ledger to the bottom of the legs. Lashing on the transom at the desired distance from the butt ends of the legs. All square lashings are lashed tightly, especially on the transom.
Captured from the 2013 Jamboree Pioneering Area

Carry the assembled A-Frame to the creek or ravine. Standup the A-Frame in the desired position. Carry over the walkways and place them on the A-Frame’s transom. Connect the underspars of the walkways to  the transom with three strop lashings.
Captured from the 2013 Jamboree Pioneering Area

Single A-Frame Bridge Materials and Instructions

Single A-Frame Bridges at the Jamboree

Single A-Frame Bridges at the Jamboree

A triumphant success—posing on their Single A-Frame Bridge
A Triumphant Success—posing on their Single A-Frame Bridge

In the Pioneering Area of the 2013 national jamboree, we put together a couple of Single A-Frame Bridge kits, so Scouts and Venturers could build this simple crossing bridge during their visit to Garden Ground Mountain. Each kit included:

  • two pre-constructed walkways
  • two 12-foot leg spars (shear legs)
  • one  5-foot transom spar
  • one 6-foot ledger spar
  • two pre-positioned anchors
  • four pioneering stakes
  • two guylines
  • five lashing ropes

Whenever a crew wanted to build a bridge, we provided an overview of the design and gave them a quick introduction to tying a rope tackle and the Japanese Mark II Square LashingWhat follows are some photo montages of the Single A-Frame bridges built from the kits during the jamboree. For larger and largest views, click on the photos once, and then once again:

Positioning their A-Frame in the ditch while preparing the guylines, and lashing the walkways to the transom.

Lashing the ledger tightly to the legs and putting tension  on a guyline.
Lashing the transom to the legs and putting tension on a guyline.

Positioning their A-Frame and hammering stakes in the corners of the walkways.

Lashing on the Transom
Lashing on the transom to the legs.

Lashing on the ledger and holding the A-Frame up while adjusting the height of the transom.

The shear lashing at the top of the legs, and lashing the ledger at the bottom.
The Shear Lashing at the top of the legs, and lashing the ledger at the bottom.

Lashing the A-Frame legs with a shear lashing, and lashing on the ledger.
Lashing the A-Frame legs with a Shear Lashing, and lashing on the transom.

Carrying their A-Frame to the ditch and placing the walkways on the transom.

Lashing on the transom and attaching the walkways.

Tightly frapping a square lashing for the transom and working together to join the walkways to the A-Frame.
Tightly frapping a Square Lashing for the transom and working together to join the walkways to the A-Frame.

Strop lashing the walkways to their A-Frame.

On occasion, a pair of Scouts wanted to build a bridge, and with persistence, and the help of staff or friendly Scouter, they were able to get it done.

Dynamic Duos!
Dynamic Duos!

JAMBOREE PIONEERING AREA: BRIDGES

JAMBOREE PIONEERING AREA: MAIN PAGE

Related article


1974 Pioneering Pamphlet Revision with Some Vintage Action Photos!

Though there have been some changes and modifications through the years, in most respects, pioneering in the Boy Scouts remains constant. Why Pioneering!

The following text has been extracted from the Introduction to the 1981 Printing of the 1974 Revision of the BSA Pioneering Merit Badge Pamphlet. Most of the action photos have been scanned from the Pioneering Projects section. (Many are also featured in the GREAT 1976 printing of  the 1967 revision of the Boy Scout Field Book.)

Crossing a Stream on an X-frame Monkey Bridge!

Remember Robinson Crusoe? He was the guy who was shipwrecked on a desert isle and managed to survive. Of course he was lucky—he salvaged a lot of useful equipment. But his story makes you wonder what you’d do if the same thing happened to you.

Have you ever thought what you’d like to have if you found yourself all alone in a wilderness with no chance of escape? So let’s make the problem easier—you can choose just one item, one “tool,” to take with you.

Interlocking the Trestles on an Single Lock Bridge!
Interlocking the Trestles on a Single Lock Bridge!

Only one tool? Impossible, you may think. The guys who have this merit badge would be very likely to choose rope. For with it anyone skilled in the outdoor arts of pioneering can build many useful things.

It’s one of the oldest tools we know. Thousands of years ago, primitive men twisted vines or plant fibers to make rope that they used to attach handles to their simple tools. Ropes were used in building the pyramids.

Lashing on Walkway Cross Spars!

In Central and South America, Indian tribes were crossing deep valleys on rope suspension bridges long before the first explorers arrived from Europe. And with the help of rope our own pioneers could, when they had to, build a temporary bridge that would enable woman and children to cross a stream safely. They could build a raft to carry a winter’s catch of fur to market.

Take a look at this pamphlet, and you’ll discover why rope would be a good “tool” to have in the wilderness. Everyone of the requirements depends on rope. Pioneering, in the Scout sense, means being able to construct a great variety of things with poles and rope. In order to build a bridge without nails or a tower without bolts, the builder needs ropes—plus the knowledge of how to use them. Most pioneering is concerned with lashing poles together to make something—usually temporary—that makes living in the outdoors a little easier.

In pioneering, the use of knots and lashings is of supreme importance. A wrong knot, an insecure lashing, or a weak rope could lead to disaster. Did you know, for example, that tying a Bowline in a rope cuts its efficiency by 40%? And that a Square Knot reduces the rope’s efficiency by 50%? Which means that it’s only half as strong as an unknotted rope. Knots, turns, and hitches weaken a rope by forming a bend that distributes the load on the fibers unequally.

Lashing on Walkway Floor Spars.

All this knowledge comes in handy in pioneering—but our wilderness has shrunk so much that the average troop no longer can go into the woods and cut the trees needed for building a rope-lashed tower. However, there are isolated areas where Scouts might get permission to clear out some trees, and the thinning might make the ones left standing grow better. A troop that can acquire poles this way should keep them perhaps on a campsite—and use them over and over.

Lashing Together a 24' Signal Tower Side!
Lashing Together a 24′ Signal Tower Side!

Most often the best bet for anyone who wants to learn pioneering is summer camp. Here there will be the poles, the ropes, and—just as important—someone with the skills to teach you how to make Square Lashings, Diagonal Lashings, and Shear Lashings. Ever hear of a parbuckle? Can you tie the required 10 knots and explain their use? The best way to learn is by observing someone who already knows.

Our pioneers were good at improvising. They had to be. Without being able to improvise they never could have settled the wilderness., built bridges and houses, and turned it into the comfortable communities we live in today. Scouts who want to try their hands at pioneering will learn to improvise—and will be using some basic engineering principles that still have plenty of applications.

Hoisting a 24' Signal Tower!
Hoisting a 24′ Signal Tower!

For example, engineers working in mountainous areas often use rope conveyers in preference to rigid railways. The aerial cableway used in the construction of the Hoover Dam in Colorado consisted of six steel-wire ropes crossing a 1,256-foot span. The “bucket” or carriage they supported could carry 150 tones of excavated material away from the site at one time or bring in the same amount of concrete from the mixing plant.

Tightening the Lashings on a 24' Signal Tower
Tightening the Lashings on a 24′ Signal Tower!

You need not wait until you get to summer camp to begin your own pioneering. Even in a big city, you can learn to tie the knots and find out the best applications for each. Learn how to make Eye, End, and Short splices. And learn how to make lashings by building scale models. A scale of 1 inch to 1 foot is convenient and easy to use: This means that a tower 24 feet tall will scale down to 24 inches in your model.

Pioneering merit badge is not one of those required for Eagle. But in a time when most people have no understanding of what our ancestors had to know to live in the wilderness, pioneering is a cultural tie with the past, an emergency skill worth learning, and a real test of your cooperative spirit. The patrol or troop has to work together as a team, and learning the give-and-take in carrying out a construction project is as important as learning the technical skills of pioneering.

Favorite Pioneering Knots: Timber Hitch

VIEW VIDEO: How to Tie a Timber Hitch

Steps to Tying a Timber Hitch

The following text is by Adolph E. Peschke as presented in the 1998 printing of the 1993 edition of the Pioneering Merit Badge Pamphlet in the Lashing Section describing the traditional diagonal lashing…

When putting crossed braces on a structure to keep it from racking (as used when making a trestle), the most important lashing is the diagonal lashing where the spars cross.

When the cross spars are properly assembled on the trestle, they will be standing apart where they cross. That is, there will be a few inches of space between the spars where they cross at the center of the X. To pull them tightly together, a timber hitch is used to start the lashing. As the timber hitch is pulled tight, the spars are sprung together.

 and in the Basic Knots Section describing the timber hitch:

The timber hitch is a knot that can be tied quickly. As strain is put on the rope, the knot gets tighter, yet it remains easy to untie.

To tie a timber hitch, first wrap the running end around the timber log or spar. Then loop the running end around the standing part of the rope, continuing to wrap the running end around itself a few more times. This will form a hitch that will tighten on the timber as the rope is pulled. After the timber is dragged or hoisted into position, the timber hitch is easy to untie.

TImber Hitch Drawing

When pulling or lifting a timber, log, or spar, throw a hitch around it at the end that is being pulled or lifted.
Killick Hitch

A note about this final half hitch: when using the timber hitch to lift or pull an object, that added half hitch combined with the timber hitch forms what has been referred to as a Killick Hitch. John Sweet in Scout Pioneering suggests this combination when making a lobstick to throw a line over a branch. The Killick Hitch is also known as a Kelleg Hitch. The timber hitch is most always exampled as the first step in tying the combination.

Double Tripod Chippewa Kitchen


—> CLICK HERE FOR INSTRUCTIONS, FURTHER INFORMATION AND ILLUSTRATIONS!

After assembling the tripods and lashing on the braces, Scouts lash on the cooking platform on a Double Tripod Chippewa Kitchen

Scouts cut a couple of burlap bags before adding a layer of mineral soil to make the cooking surface.

—> CLICK HERE FOR INSTRUCTIONS, FURTHER INFORMATION AND ILLUSTRATIONS!

 Lit charcoal chimneys are placed on the cooking surface and monitored.

Pouring out the Charcoal. When the coals are ready, they're spread over the cooking surface of the Chippewa Kitchen.

—> CLICK HERE FOR INSTRUCTIONS, FURTHER INFORMATION AND ILLUSTRATIONS!

Foil food packets are cooked over the coals on a Chippewa Kitchen

Why Pioneering!

John Thurman
John Thurman

Some special quotes by JOHN THURMAN, Camp Chief, Gilwell Park from 1943-1969 pertaining to pioneering in the Boy Scouts:

Because It’s FUN!

There are few activities which, properly presented, have a greater appeal to the Scout and Senior Scout than Pioneering and ever since the introduction of Wood Badge training, Pioneering has been given a full share in the programme of Scouters’ training. In the summer months when Scouters at Gilwell are building bridges, towers, and rafts, and boys are in camp it has been all too common to hear from the boys such remarks as, ‘I wish we did that in our Troop’ or ‘We never do anything like that’.”


Why Pioneering? To me the over-riding reason for presenting Pioneering is that boys like it. Some years ago we started providing simple equipment which Troops in camp at Gilwell can use. The demand is insatiable. Year by year we add more, but we never provide enough; because as one Troop sees another using the equipment and building a bridge they want to try it also and the desire to do Pioneering spreads like a contagious disease throughout the camp.

But there are reasons for Pioneering other than the fact that, generally speaking, Scouts like doing it. B.-P. wrote: “I am inclined to suggest to Scouters that in addition to the technical details of knotting, lashing, and anchorages, there is an educative value in Pioneering since it gives elementary training in stresses, mensuration, etc., and it also develops initiative and resourcefulness to use local material. Additionally, it gives practice in team work and discipline. In other words, Pioneering is practical and character building: the two essential ingredients of any programme material for Scouts.”

These projects are all built by troops in the Northern District in Gauteng, South Africa. This district holds regular inter-troop Pioneering competitions, as well as a Scouter's competition. The above photo shows the winning Scouters from 2008, 1st Athol, in front of their 35ft-span suspension bridge, built in 4.5 hours.
The winning Scouts from 2008, 1st Athol, South Africa, in front of their 35ft-span suspension bridge, built in 4.5 hours.

“The modern cynic may think it is all very old-fashioned but the short answer to this is, ‘Yes, of course it is, but so is breathing and sleeping and other things that mankind has been doing for a long time.’ It does not follow that because an activity has been used for a long time it is out-dated and, in fact, I am prepared to say that there is more interest in Pioneering today than ever before, perhaps because facilities have improved and perhaps because some of us have made an effort to present Pioneering to the Movement in a more imaginative and varied way.

“Quite apart from that, though, Pioneering is not old-fashioned in its purely technical sense. I was showing a Managing Director of a large civil engineering firm round Gilwell when a Wood Badge Course was pioneering near the Bomb Hole. He displayed very great interest in the Pioneering and looked closely at all that was happening. From our point of view there was nothing unusual going on; this was a usual routine exercise with two or three bridges being built, a couple of towers, and a raft. As we walked away my civil engineering friend said, ‘I am delighted that the Scout Movement is still doing this: it is tremendously important. Despite the fact that modern machinery and equipment is magnificent there often comes a time when a man has to use ingenuity and improvise in order to move the job forward and the engineer who has the spirit that your kind of training produces is the man we want in our business.'”


And, relevant to this endeavor:

“I hope that Districts will more and more accept responsibility for making pioneering equipment available to be borrowed or hired by any troop. The more expensive things become the more necessary to work on a communal basis, and the Scout community is the Scout District. I know the problems—somewhere to store the gear and someone to look after it, but these are problems which a live District can overcome if real determination is there to give Scouts pioneering practice, and I am satisfied that it comes high in the list of things Scouts want to do. Determination remains the enduring answer to most problems.”