What length(s) should we cut the rope into? Depending on the diameter of the spars and what you’re building, 15 feet is the most common, 20 feet is often called for. For camp gadgets and many Scout meeting challenges, 6-1/2 and 10-foot lengths are good for working with Scout Staves.
Where can I get manila rope? 1/4-inch is commonly available at Lowes and Home Depot, but Get Pure Manila Rope and Don’t Be Fooled! For larger quantities, procure a box containing 1,200 feet from a reputable rope supplier.
Can I just tape the ends? Sure, but that’s not going to last long. Learn to tie a Sailmaker’s or West Country Whipping to assure the ends don’t unravel during use. Refer to: Whipping
Some Questions about Spars:
What kind of trees make good spars? Whatever’s growing in your area that will yield a straight spar with a minimum of taper will work. Pine is widely used because it grows so straight and when stripped of its bark and dried out, it makes spars that are not too heavy and suitable for “Scout-size” projects. Hardwoods can also be used and because of their strength, slightly smaller diameters can be selected to save on the weight. Refer to: Pioneering Kit
Where do we get them? In most parts of the country, there are large, forested areas where with the proper permission and clearance we can harvest the spars we need. Most natural and planted stands require thinning at certain stages of their development in order to sustain good tree growth throughout the life of the stand. Thinning is beneficial to the overall health of a stand of trees.* Refer to: Stumbling Block 3
What lengths and how thick? Depends on what you’re building. Most projects, that already have been happily built, come with a list of materials which detail the size of the spars you’ll need. 6, 8, 10, and 12-foot lengths are the most commonly used for “Scout-size” projects. Diameters vary from 2 to 4 inches at the butt end. Start with what you need to complete the project(s) at hand.
From certain perspectives, the following pioneering kit presented in the informative older Pioneering Merit Badge Pamphlet is undoubtedly very extensive for a single unit, and better suited for a kit stored in a large shed or storage facility earmarked for multi-unit use in a District or Council.
—> For a unit interested in putting together their own pioneering kit, a good place to start is to gather the materials necessary to undertake the specific project or projects the unit wishes to build. More supplies can be added to the unit’s kit to meet additional demands for materials, as required by the desire and wherewithal to tackle new and different projects.
The following text is by Adolph E. Peschke as presented in the 1998 printing of the 1993 edition of the Pioneering Merit Badge Pamphlet:
The easiest way to make sure that you have all the necessary ropes, spars, and equipment ready to build a pioneering project is to put together a pioneering kit. It saves a lot of time if the pioneering kit is organized and ready to go so you don’t have to spend time gathering all your equipment every time you want to build a pioneering project.
The pioneering kit described here consists of enough spars and ropes to build the projects shown in this pamphlet. It is designed to be used by a troop at summer camp to build “boy-size” structures: that is, projects that can be built by Scouts of Scouts BSA age. This kit is also ideal to provide the equipment necessary for teaching pioneering skills to new Scouts.
The sizes and quantities of ropes and spars described here should be a good starting point for your pioneering kit. You can always add more equipment as the number of Scouts participating increases, or if some Scouts become more skilled in building a wider range of projects.
SPARS
Knowing that this pamphlet might be used by Scouts all over the world presents some problems concerning availability of suitable species of trees to use for spars. Generally, pine makes the best spars because pine trees are straight. Also, when pine is stripped of its bark and dried out, it makes spars that are not too heavy, therefore suitable for “Scout-size” projects.
If pine is not available, cut spars from the straightest trees you can find. It might be to your advantage to make spars from hardwood species of trees. Given the strength of hardwoods, you might be able to use slightly smaller diameters as a weight-saving measure. Don’t overlook softwood spars for light, smaller projects.
Some lumberyards and farm supply stores carry round, treated fence posts that can be used for short lengths. Barn poles might also be available for a few of the longer lengths. Remember that barn poles are quoted at the top diameter, not the butt end. The supply yard might let you select and match what you need.
On all spars, you should remove the bark and cut the ends square. It is recommended that you cut all the spars to exact, even lengths, regardless of their butt diameter, as shown in the chart below.
Large Pioneering Kit: SPARS for Multi-Unit Use
Color-Code for Spars
There are several combinations of lengths and diameters of spars suggested for this pioneering kit. This is because various projects might require the same length spar, but in different diameters depending on where it is to be used in the structure.
Both ends of the spars in your pioneering kit should be color-coded with a band of paint to denote length. Here are the colors that can be used to easily show the lengths of the spars without having to measure them each time.
ROPES
The best all-around rope to use for pioneering projects is pure manila, three-strand, twisted. (Refer to the “Rope” section.)
All ropes in your pioneering kit should be whipped on both ends. In the case of plastic rope, whether it’s twisted or braided, it must be first melted back and then whipped.
Large Pioneering Kit: ROPES for Multi-Unit Use
Rope Color-Code
Ropes cut to the standard lengths shown above should have the ends color-coded with a dab of paint to denote the length. Here is a recommended color-coding system for all rope, regardless of diameter of the rope:
You might also have a need for ropes of specific diameters and lengths that are used for projects that are built often. These should be identified with a tag and coiled separately. These ropes, along with slings, grommets, strops, and anchor ropes should be stored in a separate box.
OTHER EQUIPMENT
In addition to spars and ropes, your pioneering kit should contain some basic equipment needed for building projects. This equipment includes
2 round-point long-handle shovels
4 wooden mallets
50 pioneering stakes
4 binder twine boxes
1 bow saw
1 hand ax
10 wooden cleats and nails
8 welded steel rings, 3/8″ x 3″
8 screw pin shackles, 3/8″
10 quick links, 5/16″
You might also find that putting this equipment on a trailer that can be pulled by a truck will help get your pioneering kit to your project site. The trailer will also help you move your pioneering kit to a dry shelter when not in use.
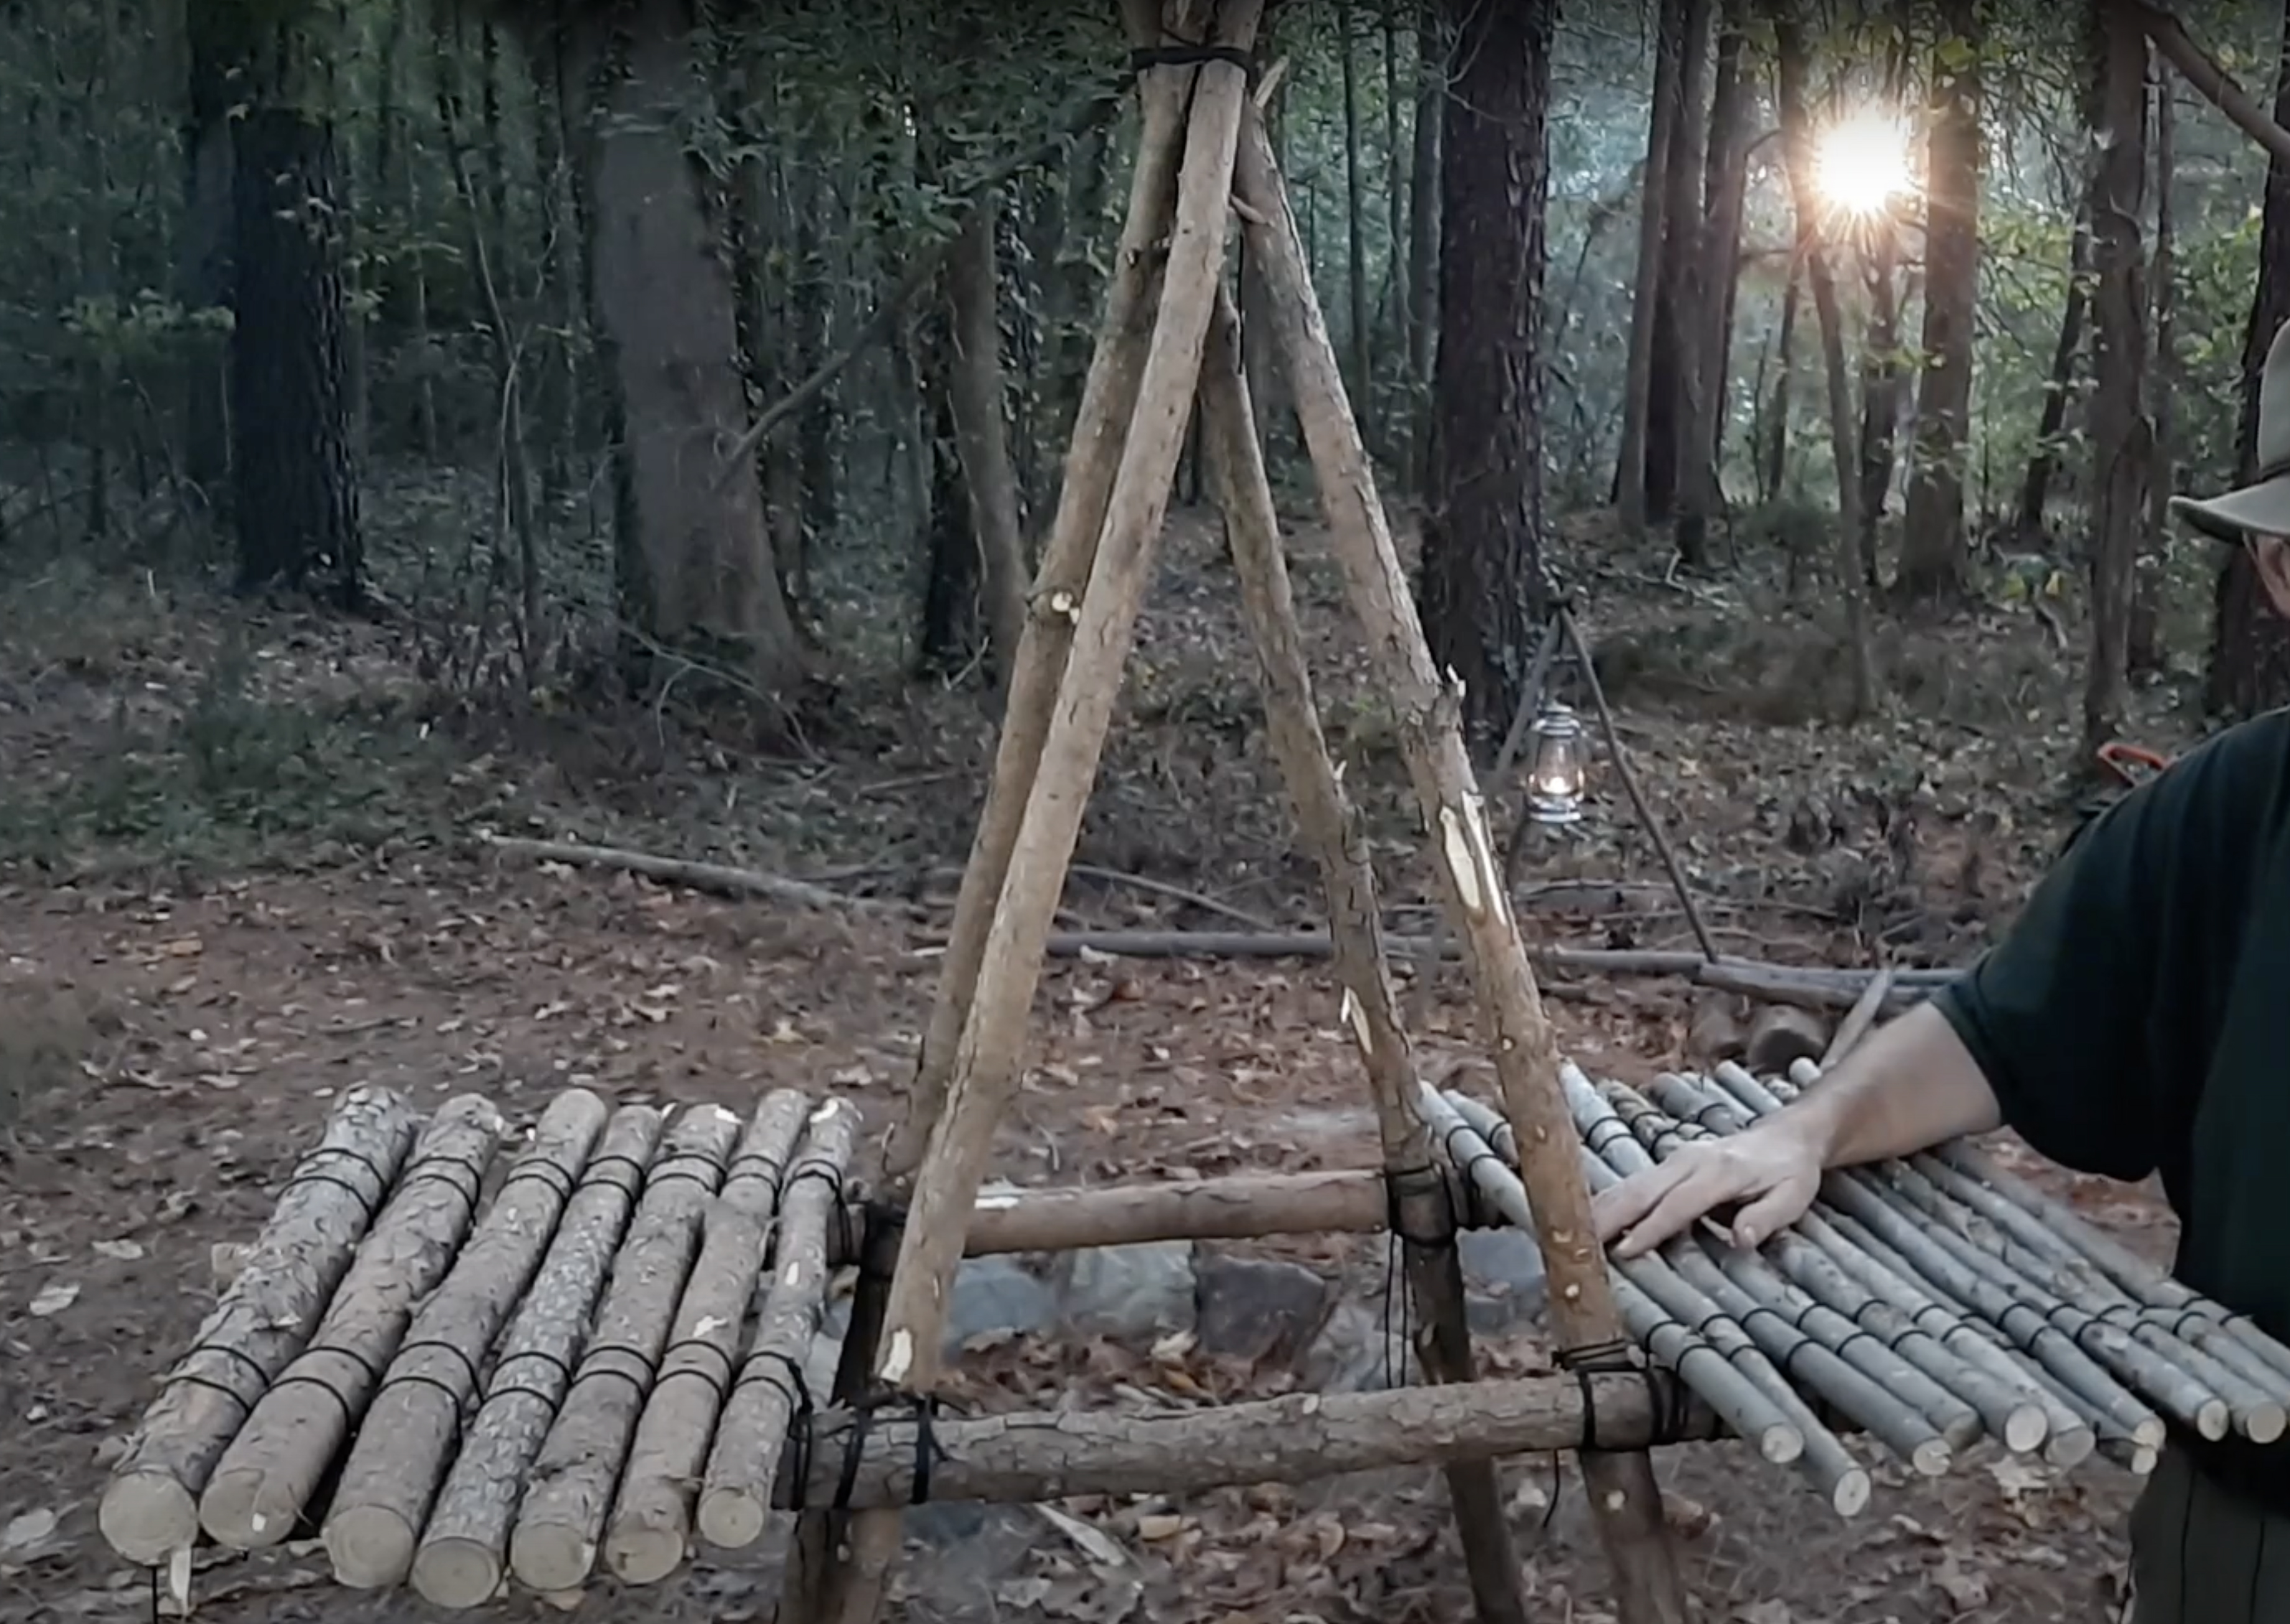
The Chippewa Kitchen can be seen as the indisputable KING of all “camp gadgets.” It’s the ultimate camp kitchen pioneering project, providing a huge element of convenience to a wide range of camp cooking operations. The Chippewa Kitchen can provide a raised surface for food preparation, a nifty place to hang tools and utensils, a framework from which a pot can be safely suspended over a cooking fire, and primarily, a convenient, raised cooking surface for cooking over hot coals.
There are all kinds of Chippewa Kitchens. They come in all sizes and shapes.
When our troop first started making Chippewa Kitchens, we built them with one 10-foot tripod, with one 6-foot crossbar, and two 8-foot crossbars each of those extending out so that a shelf could be constructed where we’d pour the coals and do the cooking. We’d tie a rope from the top of the tripod and hang an 8 qt. pot over a fire built on the ground in the middle between the three legs of the tripod. This always worked well, but with all the weight from the mineral soil, coals, food, and dutch ovens, it was a lot less stable. That design tended to make it difficult to keep the tripod from leaning and the crossbar extensions from shifting lower. DOUBLE TRIPOD CHIPPEWA KITCHEN. Our more recent constructions consist of two 8-foot tripods connected with two parallel 8-foot or 10-foot platform supports over which we lash the cooking platform. With this design, you can build a cooking fire under one or both tripods and suspend a pot over each. Of course the platform is superb for Dutch Oven use and ideal for foil cooking.
Looking good and feeling good at Playcard Environmental Education Center during Swampfest.
Materials needed for a Double Tripod Chippewa Kitchen
two 10-foot x 3-inch platform support spars (For a smaller Chippewa Kitchen, 8-foot spars work great.)
six 8-foot x 3-inch tripod leg spars
four 6-foot x 2-1/2-inch tripod braces
two 6-foot x 2-1/2 to 3-inch front tripod braces (to support the platform support spars)
twenty to forty 3 to 4-foot x 2-inch floor spars (depending on the size of the cooking surface required)
sixteen 15-foot x 1/4-inch manila lashing ropes for square lashings
two 20-foot x 1/4-inch manila lashing ropes for tripod lashings
binder twine for floor lashing
piece(s) of burlap, terry cloth, or canvas to cover cooking platform
Here’s a procedure to make a Double Tripod Chippewa Kitchen:
Build the tripods. Lay three 8-foot tripod legs side by side and lash them together with a tight tripod lashing. Make sure the butt ends are at the bottom and even.
Stand the tripod up by crossing the outside legs underneath the middle leg.
Repeat this process for the second tripod.
Labelled Chippewa Kitchen Spars (Click on the photo for a larger view.)
Lash on the tripod braces. Connect the two outside legs with one of the 6-foot front tripod braces. With tight square lashings, lash the brace so it is perpendicular to the ground and three feet high. Lash another 6-foot tripod brace to each outside leg and connect them to the middle leg with square lashings, about two feet and two and a half feet high respectfully.
Repeat this process for the second tripod, making sure the front tripod brace connecting the outside legs is again, three feet high.
Position the tripods. Place the tripods so the 6-foot tripod braces lashed to the outside legs (the stout ones that are three feet off the ground) are facing each other. These braces are the ones that will hold up the long platform support spars, which in turn will support the cooking platform. The distance between the two tripods should be close enough so the long platform support spars can extend over each brace by at least six inches.
Lash on the platform support spars. Place the long platform support spars parallel to each other on top of the three foot high tripod brace on each tripod. Space them apart so the shortest floor spar will extend over their edges by six inches on either side. Lash them in place with tight square lashings.
Lash on the floor spars. The cooking surface is made up of 3 to 4-foot x 2-inch floor spars, depending on how wide a cooking area will be required. These are lashed onto the parallel platform supports with a floor lashing using binder twine.
Prepare the cooking surface. Prior to adding 2 to 3 inches of mineral soil, and to keep he mineral soil from falling though spaces between the floor spars, spread pieces of burlap, terry cloth, or canvas over the platform.
Finally, cover the platform with a layer of mineral soil thick enough to protect the floor spars from the intense heat that will be generated from the coals during cooking.
Construction is logical and easy. Burlap is a practical layer between the platform floor spars and the mineral soil.
A Covered Double Tripod Chippewa Kitchen during an American Legion Open House
Adjusting knots and lashings after the first test crossing.
The well-known, time-tested, traditional Monkey Bridge is perhaps the most familiar of all Scout pioneering projects. It’s frequently featured at Scout Expos, Camporees, Scout Camps, and is often a central attraction at public gatherings where Scouting is represented.
The following instructions and guidelines are provided by Adolph Peschke, taken from the 1993 edition of the Pioneering Merit Badge Pamphlet:
Using a double A-frame to build a monkey bridge is a departure from the usual X-frame that supports the foot rope and hand ropes. This new method has two distinct advantages over the X- frame version. First, the double A-frame provides a wider base making it less likely to tip over. The second advantage is that the positions of the A-frames can be adjusted so the span between the hand ropes can be narrowed for better balance as you make the crossing.
Building the A-frames. The first step in building the monkey bridge is to build four A-frames using the 8-foot spars for the two legs, and 6-foot spars for the ledger. Lay out the first set of three spars (two legs and one ledger) on the ground in position for lashing. Before lashing, drive three stakes, as follows, to help you make all four A-frames the same size: Drive a stake at the top to mark where the leg spars cross. Then drive stakes to mark the positions of where the bottom ledger crosses the legs. This will also indicate how far the legs are spread apart. Now you can lash the four A-frames together, laying them out one at a time using the stakes. Remember that all three lashings on the A-frames are square lashings, even though the spars cross at less than 90˚ angle.
Schematic of A-frame alignment
Double A-frame. When you have four A-frames, you can lash two of them together to form a double A-frame. (see figure 140). Lay one A-frame on the ground and then put another on top of it so that the bottom ledgers overlap one-half their length (approximately 3 feet). The first step in lashing the A-frames together is to go up where the two legs cross (the X formed by one leg from each A-frame). Then with a good tight square lashing, lash the two legs together.
Note: The point where these two legs are lashed together is where the foot rope will rest. You can adjust the overlap of the two A-frames to adjust how high the foot rope will be off the ground. Also note where the tops of the A-frames are, because this is where the hand ropes will be. To complete the double A-frame, stand it up so the butt ends of all four legs rest solidly on level ground. Lash the two bottom ledgers together where they overlap with three strop lashings. Now repeat the entire process to build the second double A-frame.
Laying out the distance between A-frames and anchors
Site preparation. Before you can erect the double A-frames, you need to prepare the site. Begin by stretching a length of binder twine along the center line of where the monkey bridge is to be built. Working from the center, measure 10 feet toward each end to mark where the A-frames are to be placed. They should be 20 feet apart. Then mark out another 10′ from each A-frame to where the anchors are to be built.
Note: These dimensions are for building a bridge with a 20-foot span. This is the maximum span for a bridge using a 50-foot rope. The extra 30 feet of rope is needed to have 15 feet of rope at each end for the proper distance from the A-frames to the anchors (10 feet) and for the knots at the anchors (5 feet).
Build the anchors. The foot rope will be attached to anchors at both ends. Before erecting the double A-frames, build a 3-2-1 anchor, or a log and stake anchor, 10 feet from where the A-frames will be erected (see figure 141).
Rope grommet. After the anchors are built, attach a rope grommet with a ring or shackle in it. (You can make the rope grommet with a 10-foot length of 1/2-inch diameter polypropylene rope. Tie the ends together using a carrick bend, and permanently secure the ends with some strong twine).
Position the A-frames. Prepare to erect the monkey bridge by moving the A-frames into position no more than 20 feet apart. Lay them down on the binder twine that marks the center line of the bridge.
Hand and foot ropes. Now you can prepare the foot and hand ropes for the monkey bridge. Lay the foot rope in a straight line off to the side of where the A-frames are laying. Then lay the two hand ropes on the ground next to each other so they’re parallel to the foot rope and 42 inches away.
Stringer ropes. Now you can add the stringer ropes that will go from the foot rope to the hand ropes. Start by tying the center of an 8-foot long stringer rope (use 1/4-inch manila rope) at the center of the foot rope, using a clove hitch. The stringer rope is tied around the foot rope so that both ends are 4 feet long. Add two more stringer ropes on both sides of the center stringer rope (so there are five stringer ropes in all), tying them about 4 feet apart. Tie one end of each stringer rope to one of the hand ropes, again using a clove hitch. Then do the same with the other ends of the stringer ropes, attaching them to the other hand rope.
Assemble the bridge. You’re just about ready to assemble the bridge. First place a piece of heavy canvas (called a “saddle”) in the V formed by both double A-frames. This will protect the foot rope and allow it to slide a little in the V without interfering with the lashing rope.
Schematic of foot, hand ropes and anchors
Now get the crew together to erect the bridge. You will need a safety officer to watch for any problems that might occur, and a signal caller to tell the crew members what to do. You will need two Scouts to lift and hold each double A-frame in place, two more Scouts to lift the foot rope into the V of the double A-frames, and two more Scouts to lift the two hand ropes into place at the tops of the A-frames. Lift everything into place. Then, holding the A-frames steady, temporarily tie the hand and foot ropes into the rings of the grommets using a roundturn and two half hitches (see figure 142).
Tighten the foot rope. Now you can put a strain on the foot rope. It’s not necessary to use block and tackle since this will put too much strain on the lashings, anchors, and the foot rope itself when there is a load on the bridge.* Whatever strain three or four Scouts can put on the foot rope by pulling it by hand will be enough. As soon as the bridge is used a few times, there will be a sag in the rope. This is fine because it means that you are working with reduced strain on the foot rope as a safety measure.
Tighten the hand ropes. Next, tie the hand ropes to the top ends of the A-frames. First, loosen one end at a time from the anchors. Then, use a clove hitch to tie the hand rope to the top end of the leg of the double A-frame. As you’re tying these clove hitches, adjust the strain on the sections of the hand ropes between the double A-frames to match the sag of the foot rope. Also, adjust the length of the stringer ropes so there is even strain between the foot rope and both hand ropes. After the hand ropes are tied to the tops of the A-frames, move down and retie the ends of the hand ropes to the rings in the grommets using a roundturn and two half hitches.
Final testing. With caution, one crew member can get on the bridge as all lashings, anchors, and knots are observed by the safety officer and all other crew members. Make adjustments as required. Then secure the running ends of the hand ropes and foot rope with a piece of cord. Safe operation calls for only one Scout to be on the foot rope of the monkey bridge at a time.
LIST OF MATERIALS FOR DOUBLE A-FRAME MONKEY BRIDGE
eight 4-inch x 8-foot A-frame legs
four 3-inch x 6-foot ledgers
fourteen 1/4-inch x 15-foot lashing ropes for Square Lashings
one 1/2-inch or 3/4-inch x 50-foot rope
two 1/2-inch x 50-foot hand ropes
five 1/4-inch x 8-foot stringer ropes
six 1/4-inch x 10-foot lashing ropes for Strop Lashings
six pioneering stakes for each 3-2-1 anchor
eight pioneering stakes for each log-and-stake anchor
one 5-inch x 4-foot spar for log-and-stake anchor
two 1/2-inch x 10-foot polypropylene ropes for rope grommets
two pieces of scrap canvas for foot rope saddle
binder twine for anchor tieback straps
* It has been found that a rope tackle in the foot rope at each end (not a block and tackle) tightened by one Scout is an excellent procedure to maintain the optimum foot rope tension, and an easy-to-use remedy for too much sagging due to repeated, heavy use and over stretching. There are other configurations used to initially tighten and keep the hand and foot ropes at the optimum tension during use, depending on the weight the bridge must withstand and the amount of traffic it will bear.