The following text is by Adolph E. Peschke as presented in the 1998 printing of the 1993 edition of the Pioneering Merit Badge Pamphlet:
You might never be called upon to throw a line to someone in distress; however, it’s the Scouting way to be prepared. In addition, many pioneering activities call for coiling and throwing a line to get it across a creek or ditch, or up and over a high tree branch. How you make the coil is very important. To learn how to coil and throw a length of rope. select a 40-foot length of 1/4-inch manila rope. Make sure both ends are whipped.
Coiling the Rope To coil the rope, first secure one end of the line to your belt or loosely around your wrist.* If you are right-handed, coil the line into your left hand. If you are left-handed, coil the line in your right hand.
As you loop the rope over your hand, make each successive coil a little smaller that the one before. This is important to keep the coils from fouling as they pay out when thrown.
Preparing to Throw the Rope Now transfer approximately two-thirds of the coils from our non-throwing hand to your throwing hand. Next, drop one of the loops from your non-throwing hand to allow enough rope for a free swing between your hands. Hold your non-throwing hand out so that those coils will peel off smoothly.
Throwing the Rope To throw the rope, swing the coils in your throwing hand in an arc, much like you pitch a softball. After making two or three “warm-up” swings, release the rope. a little practice will help you determine where your release point should be to get the most distance.
As the rope is released, the weight of the rope will pull the coils from your non-throwing hand until the entire rope extends out in a straight line from where you’re standing.
*If for any reason you may need to get rid of the end of the rope without becoming entangled in it, before throwing, tie the end to fixed object or have a partner hold on to it.
Often times at a campsite, there are no picnic tables with benches, or array of thick, wooden discs from downed trees positioned around a fire site, or fallen tree trunks, or a large outcrop of smooth boulders. So, through the years, the answer to the query, “what will I sit on during a camping trip?” has given rise to many solutions. Some of these are: a square sheet of plastic, a 5 gallon bucket, an ice chest, a carry case, an upside down recycle bin, and of course a wide variety of folding and collapsible camp chairs and stools.
When it comes to actually fashioning a camp seat by making one from what you have on hand, there have been some creative ideas. One featured in Boys’ Life consists of a tarp attached in three places to the legs of a large tripod. But, actually building a real-working chair, by lashing together various-sized poles, can be tedious and time consuming. Also, the finished construction is frequently rickety and uncomfortable.
We know, B-P loved camp gadgets, and recently, I was asked to provide a design for a camp chair made with just ropes and poles—something that can be built in a relatively short period of time by one Scout. In the past, I’ve given thought to this kind of campsite improvement, but could never think of anything that would really work…until now. What I’ve come up with is surely not original, but for me, it’s new, and most of all, it works. As I type this, I’m sitting in it! It’s really a simple design. In actuality, it’s very similar to the self-standing garbage bag holder, but requires a more concerted approach. After all, it’s not for trash; its for supporting one’s body.
MATERIALS
three 32-inch sticks for the legs
three 24-inch sticks for the bottom braces
one 10-foot length of binder twine for the tripod lashing -or- one 10-foot lashing rope
six 6-foot lengths of binder twine for the square lashings -or- six 6-foot lashing ropes
one 15-foot length of 1/8 to 1/4-inch braided nylon cord for the seat
The sticks you use for this seat are vital to its stability. They have to be strong. It’s going to be rare to get natural wood on the camping trip that’s straight enough and strong enough to furnish these materials. This would be ideal, BUT, Leave No Trace and Outdoor Ethics dictate we don’t cut these sticks from living trees. If they can be harvested from downed trees, great! If Scout staves were, for some reason, to be cut in these lengths, I’d say use them. They’d be perfect. (Don’t go cutting up Scout staves!) Good broom sticks are 1-inch in diameter and they’re available by the box full. Cut those up. They can be used again and again for a variety of Scout Pioneering gadgets.
PROCEDURE
There are two main objectives when building this camp seat. One: the tripod legs must be spaced evenly from one another so the structure is well-balanced. Two: the lashings and how the webbing is attached to the legs must be tight enough to keep from slipping.
Prepare the sticks: Since it’s so important to have everything even, before lashing can begin, points where the sticks will meet should be marked out. If the materials will be used repeatedly, it will be practical to mark out a complete series of points on every stick so that each can be used interchangeably.
On the 24-inch sticks, mark out 2 inches, 4 inches, and 6 inches from each end.
On the 32-inch sticks, mark out 2 inches, 4 inches, and 6 inches on the bottoms for the braces, 20 inches up from the bottom for the tripod lashing, and 30 inches up from the bottom for the webbed seat.
Note: When using smooth poles, in order to keep everything from sliding, use a bastard cut wood rasp file to cut a slight roughed out indentation around the diameter of the sticks at the above points. This should be done before a Scout assembles his seat.
Lash together the tripod: With the 32-inch sticks parallel to one another, lash them together at the 20-inch mark with a tight tripod lashing. Racking turns are preferred, weaving the wraps in and out between the poles. See that the line bites into the sticks as much as possible where they have been roughed out. Spread the legs out making sure the middle leg, which will eventually be the front leg, is on top of the two outside legs.
Lash on the bottom braces: Turn the tripod upside down. With tight square lashings, lash the 24-inch braces to the legs, marrying them to legs at the corresponding markings: 2-inch to 2-inch, 4-inch to 4-inch, 6-inch to 6-inch. Doing so will assure the legs are spread equally apart into an equilateral triangle. Again, make sure the line bites into the sticks as much as possible where they have been roughed out.
Attach the framework for the mesh seat: Turn the tripod right side up. Attach one end of the 15-foot nylon cord to one leg at the 30-inch mark with a tight clove hitch. Leave enough tail in the short end and in it tie a small loop with a bowline. With another tight clove hitch, join the long end of the cord to the next leg at the 30-inch mark, pulling the cord taut between the legs. Form the half hitches of these clove hitches on the outside of the legs, and make sure the line is biting into the roughed out part of the sticks. Do the same with the third leg.
After a clove hitch has been applied to each leg, carry the end of the cord through the loop of the bowline. Pulling it taut, secure it to the loop with two half hitches like you would with a rope tackle. The cord now forms a triangle which will serve as the frame for weaving a seat.
Weave the seat: Pulling the cord taut as you go, attach it to the nearest part of the triangular frame with a clove hitch and then stretch it diagonally to the opposite leg of the triangle. Tie a clove hitch there and proceed to the next leg of the triangle, tie a clove hitch, and so on. When you have zig-zagged throughout the entire triangle, you will have enough line to tie additional clove hitches down the middle of the triangle where the line intersects with previous portions. Finish by tying a clove hitch to the middle of the first leg. Any excess line can be attached with additional half hitches to the nearest 32-inch stick.
Sit on your camp seat: The front of the seat is the leg of the tripod that is on top of the two others. Straddle this leg and sit down. If your chair has been formed symmetrically and lashed together tightly, and if the webbing was tied on tightly in the right places, you will now be perched very comfortably!
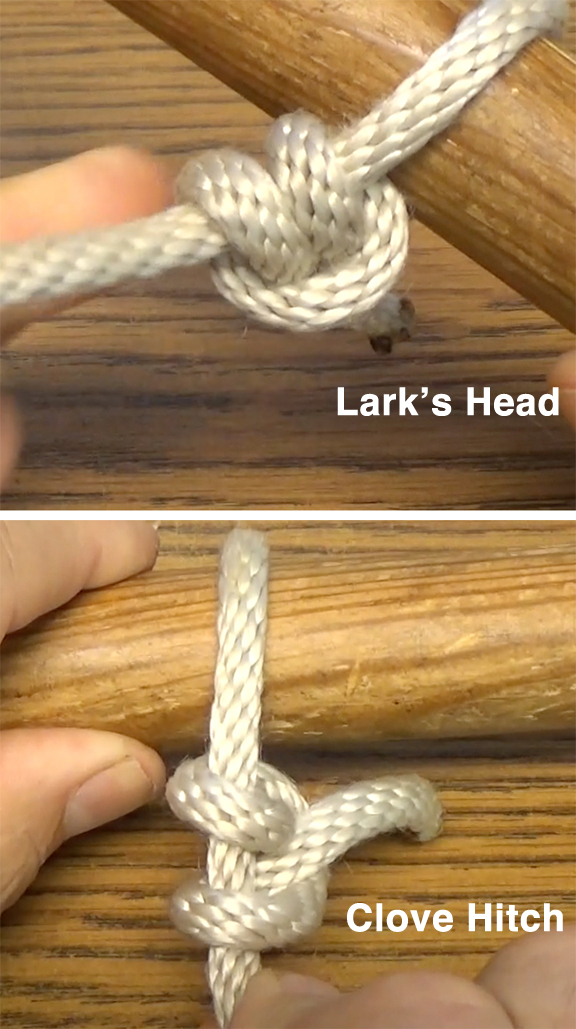
When tying the basic, oft-used, simple “two-half-hitches” (double-half-hitch), instead of applying a clove hitch around the standing part, there’s a thing about mistakingly tying a lark’s head. This accident rears its head time and again, and many Scouts (both youth and adult) somehow don’t recognize the difference. Fact remains, tying a lark’s head around the standing part (cow hitch) doesn’t provide the same holding effect or friction as forming a clove hitch. Mostly, it does the trick, BUT, it’s not the same and shouldn’t be considered as such.
A clove hitch is formed by tying two half hitches in the same direction. The lark’s head is made up of two half hitches tied in opposite directions (see above video).
This becomes a “bigger” issue when tying a taut-line hitch. If the half hitches aren’t tied in the same fashion (if the running end isn’t spiraling around the standing part in the same direction), instead of a rolling hitch around the standing part, what you get is a lark’s head along with an extra round turn. This provides less friction. It will not grab the guyline as well, and hence is less effective.
In addition to the campcraft jobs it does so well, the lark’s head is useful in Pioneering too. Besides coming into play to hang all kinds of stuff, it’s how we start off the Filipino diagonal lashing.
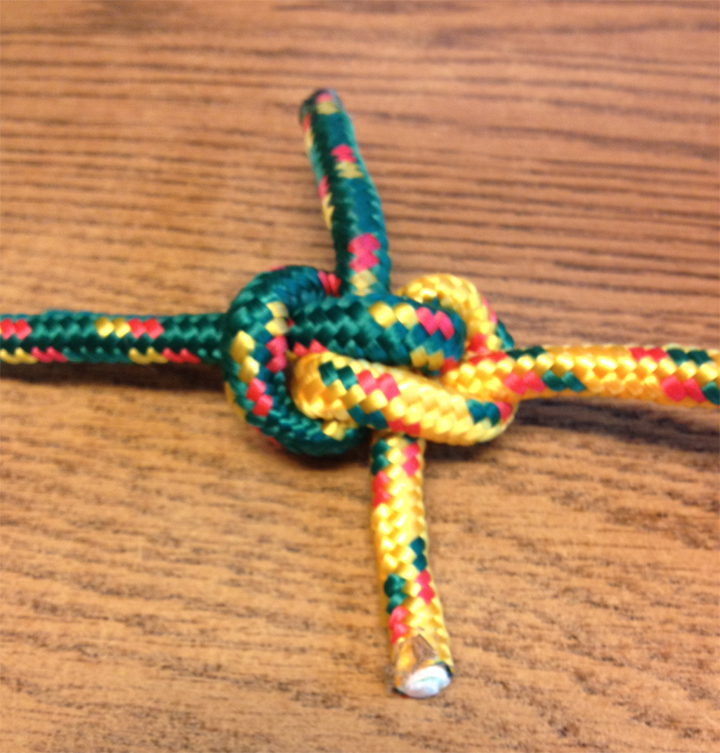
The Zeppelin bend is such a secure joining knot, it’s reputed to have been used by the US Navy used it to moor airships (zeppelins). It’s easy to tie, will not fail, and most significantly, it’s easy to untie. Its reliability is shared by other bends, but unlike the water knot which is ideal for joining straps, the zeppelin bend won’t jam even after a heavy strain. Despite its appeal as an almost ideal bend, this knot is not widely known.
Pioneering Use
Excellent for joining two flexible lines that will be placed under a heavy pull:
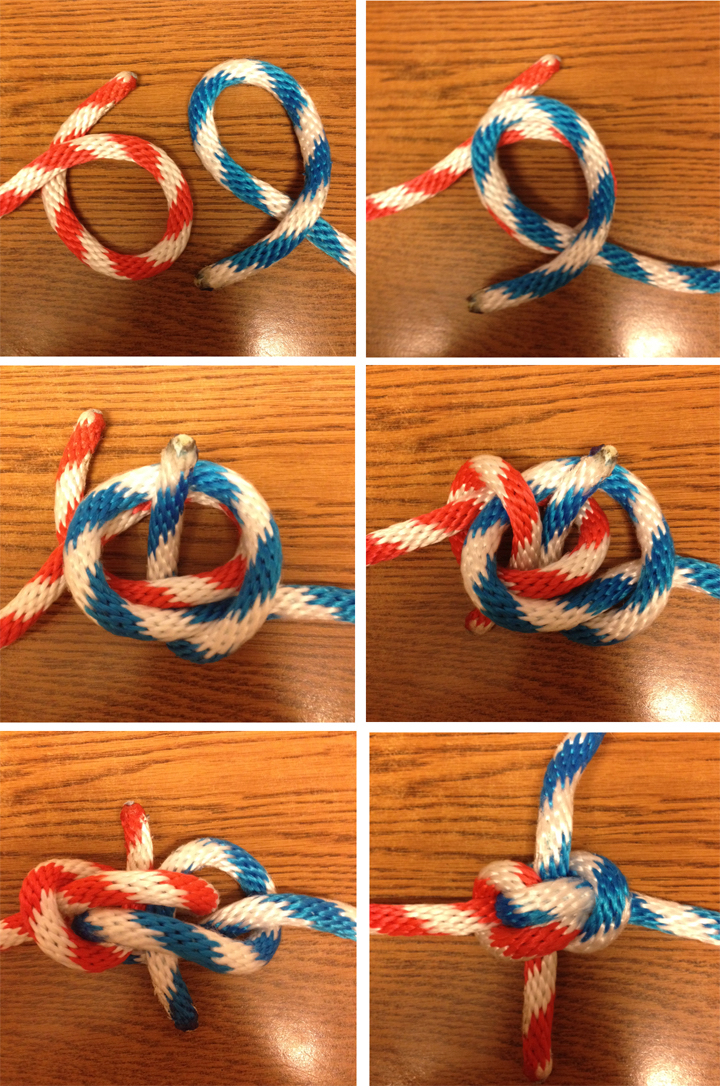
With the running end of the left line, form an underhand loop with the running end extending from the top (looks like a ‘6’).
With the running end of the right line, form an overhand loop with running end extending from the bottom (looks like a ‘9’).
Laying the left and right side loops next to one another, it looks like a ‘6’ and a ‘9’.
Place the right hand loop on top of the left. Notice the running end of both lines are positioned on the outside of this configuration.
Carry the running end of first one loop, and then the other, over, around and then through the “tunnel” created by both loops, so the running ends extend out on opposite sides.
Dress the knot by pulling on the running end and the standing part of each line.

 Coiling the Rope To coil the rope, first secure one end of the line to your belt or loosely around your wrist.* If you are right-handed, coil the line into your left hand. If you are left-handed, coil the line in your right hand.
 Preparing to Throw the Rope Now transfer approximately two-thirds of the coils from our non-throwing hand to your throwing hand. Next, drop one of the loops from your non-throwing hand to allow enough rope for a free swing between your hands. Hold your non-throwing hand out so that those coils will peel off smoothly.


 applying a clove hitch around the standing part, there’s a thing about mistakingly tying a lark’s head. This accident rears its head time and again, and many Scouts (both youth and adult) somehow don’t recognize the difference. Fact remains, tying a lark’s head around the standing part (cow hitch) doesn’t provide the same holding effect or friction as forming a clove hitch. Mostly, it does the trick, BUT, it’s not the same and shouldn’t be considered as such.
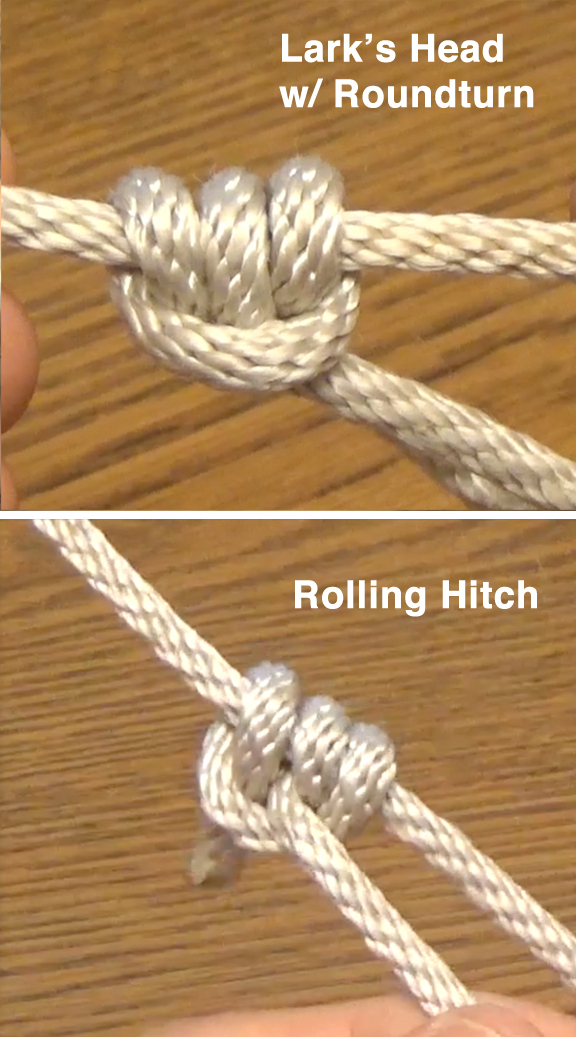 A clove hitch is formed by tying two half hitches in the same direction. The lark’s head is made up of two half hitches tied in opposite directions (see above video).