12 6″-diameter wooden discs, four of them painted with the numeral “5,” four with “10,” and four with “20”
1 6″-diameter log, 20″ long with a large eye hook on one end and a flat, even surface on the other
4 single pulleys
4 40′ lengths of 1/4″ braided nylon cord for the pulleys
4 3′ lengths of 1/8″ nylon cord to attach pulleys to the corner uprights
8 15′ x 1/4″ manila lashing ropes for lashing the lateral support spars to the corner uprights
Set the parameters. Lay the four lateral spars on the ground in a square where you want to position the Atomic Pile. Overlap the ends about 4″ so there will be room to lash them to the corner uprights. Drive a small stake into the ground on the inside of where the ends intersect. This is where the holes for the corner spars need to be dug.
Prepare the corner spars. Using a post hole digger, dig the holes about two feet into the ground at the spots marked by the four small stakes. Make sure the holes are the same depth so the tips of the spars come up to the same height. Before actually placing the corner uprights into their holes, attach the pulley to each with the 40′ cord reeved through. Tie the inside end of each cord to eye hook of the log using a Roundturn With Two Half Hitches.
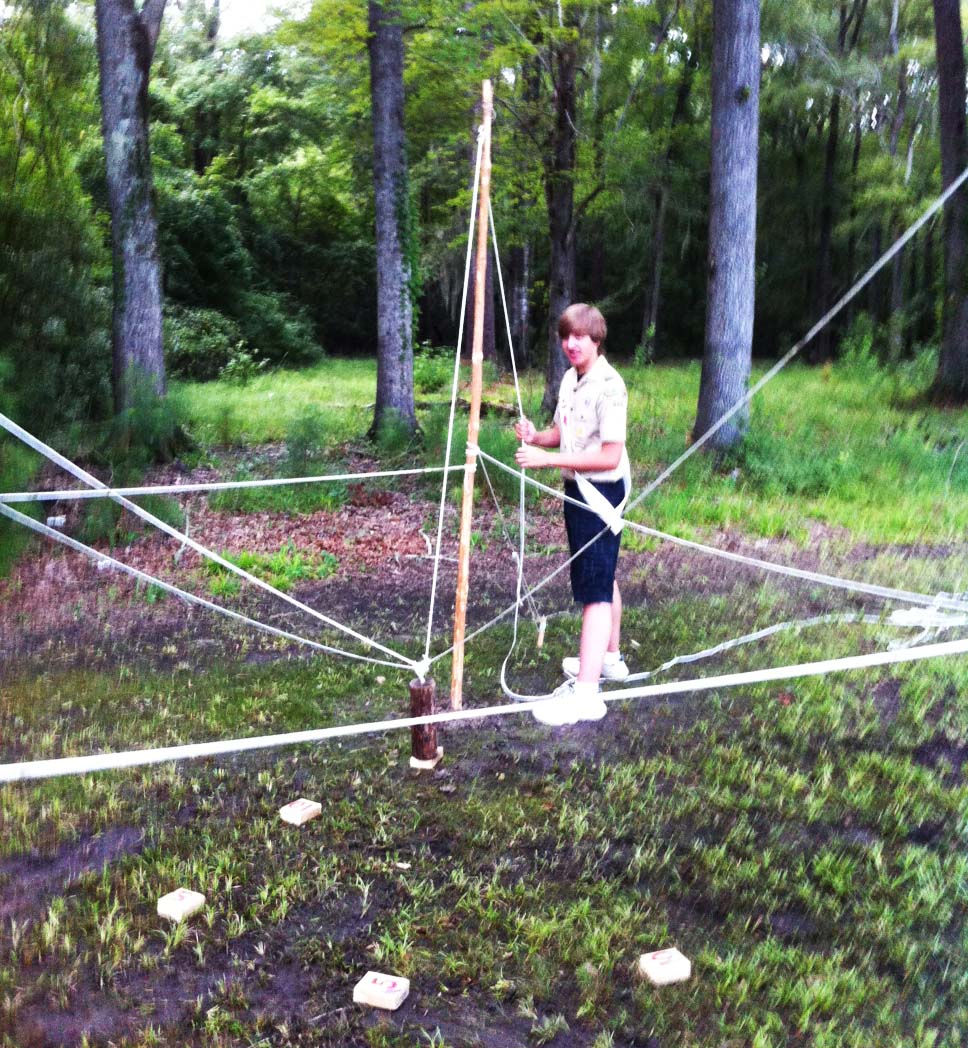
Attach the “boundary poles.” After placing each upright into its hole, with the pulleys facing the center of the square, and firmly tamping them in for solid support, tightly lash on the four lateral support spars about belly high.
Team Building Opportunity. The challenge referred to as Crossing the Alligator Pit is an activity that requires 100% cooperation and teamwork. The Scout on the A-Frame “walker” is totally reliant on his fellow Scouts to keep him aloft and facilitate his forward progress. The whole time that he’s bringing into play his balance along with his leg, shoulder and arm muscles, it’s the members of his patrol that not only greatly increase the effect of his movements, but also keep him from spilling over.
Crossing the Alligator Pit can initially be tackled using what we can term “group leadership,” where several members of the patrol all contribute their opinions on how to best get the “walker” moving and not falling over. As the successful crew experiences the necessity of coordinating the handling of the guylines with the movements of the Scout on the “walker,” invariably one Scout will need to assume the role of calling the shots and keeping everyone on their toes.
The farther they went, the more skillful they became!
Scout Spirit! This was best exampled during a District Camporee devoted to Junior Leader Training. Scouts from Troop 822 out of Mount Vernon, SC poured themselves into the activity and not only mastered the challenge, but provided spectators with some fun and excitement as well. They approached the task of building their A-Frame with enthusiasm. Finishing in good form, they wasted no time in standing up the structure and holding it in position with their guylines. As soon as their rider climbed on board, it became obvious: it was the top two lines that required the most unfaltering attention to keep the A-Frame vertical. The Scout on the A-Frame was exuberant as he discovered how to swing the walker forward one leg at a time. The patrol then totally got the hang of how to use the bottom guylines to add that real oomph to the “walker” propelling it forward. As they smoothly traversed the fifteen feet of the “alligator pit,” their leader reminded us of a coxswain, rhythmically yelling out, “Pull!” to the crew manning the oars in a boat race. “One, two, THREE!…one two, THREE!…one two, THREE!” On each “THREE!” the rider swung one leg of the “walker” forward, as the Scout manning that leg’s forward guyline simultaneously heaved on his rope, while the others remained alert to help guide and steady the A-Frame. Their “walker” actually walked in rhythm and it was quite a spectacle!
Getting Tired, but Still Happy, and None the Worse for Wear
They kept on going!Crossing the Alligator Pit is more challenging than the majority of other interpatrol competitions, demanding a full measure of concentration and cooperation. With a well-lashed A-Frame and a rider who gets the knack of balancing his weight and swinging the legs of the “walker,” a patrol that can keep their structure upright will eventually be able to successfully cover the fifteen foot distance. Fifteen feet is fifteen feet and decently doable, especially on flat terrain. A hundred and fifty feet up a hill is a horse of a different color, and that’s what this patrol from Troop 822 challenged themselves to do. They kept going across the field up a hill towards the dining hall, and they didn’t stop until they reached the top! When they finally stopped, it was already getting dark outside. Their persistence, and teamwork was nothing short of amazing! These Scouts went far, and it makes sense that with all their determination, they’ll continue to go far in whatever direction they set out for themselves.
The Atomic Pile provides an excellent opportunity for team building while also effectively honing individual leadership skills. Additionally, it can provide an opportunity to test what can be termed “group leadership,” which will manifest to a greater or lesser degree the ability of a group to lead itself when there is no one assigned the leadership role.
The following Atomic Pile structure is only one simple version, designed for short-term use. It works very well during a troop meeting. When featured for extended use, like at a camporee or public gathering, a more solidly-built construction is in order.
The log is steadied on top of a corner square.
Suggested Materials
four 8 to 10-foot x 2-inch poles for corner uprights
twelve 4-inch diameter wooden discs -or- 4-inch squares of lumber, four of them painted with the numeral “5,” four with “10,” and four with “20”
one 4-inch diameter log, 15 inches long with a large eye hook on one side and a flat, even surface on the other
four small single pulleys
four 40-foot lengths of 1/4-inch braided nylon cord for the pulleys
four 25-foot lengths of 1/4-inch braided nylon cord for the boundary lines and guylines
four 3-foot lengths of 1/8-inch nylon cord to attach pulleys to the corner uprights
four 30-inch pioneering stakes to stabilize the corner uprights
eight 10-15-foot x 1/4-inch manila lashing ropes for connecting the pioneering stakes to the uprights
four smaller stakes for the guylines, to help steady the corner uprights
Atomic Drop Components
BUILDING THE STRUCTURE
Putting up an Atomic Pile activity is well within the capability of most patrols, and by dividing the tasks, can be completed in under 30 minutes. However, building the Atomic Pile is not as key to team building and leadership development as is actually using the structure.
How will the corner uprights stay erect? It will be impractical to keep the corner uprights in a rigid vertical position with three guylines like a flagpole. So, you’ve got three choices to hold them up:
Use a post hole digger to sink the uprights into the ground deep enough to firmly support them.
Drive in a pioneering stake and then lash the upright to the stake to hold it up.
Do both 1 and 2 (often recommended).
Raise the corner uprights. In the flat place the Atomic Pile will be situated, lay the 10-foot poles out in a 10′ x 10′ square. Just outside the 90° angle formed by the poles, either dig a hole deep enough to support the first upright, or firmly drive in a pioneering stake straight into the ground.
Boundary Cords / GuyLines
Before standing up the pole, using a 3-foot cord, attach a pulley about an inch from the tip with a prusik. Wrap the cord as many times as needed so the pulley hangs down a couple of inches. Using a 40-foot cord, reeve one end through the pulley and then tie that end to the eye hook of the 4-inch-diameter log with a roundturn with two half hitches. Place the log in the center of the square.
When you’re ready, place the butt end of the pole into the hole and tamp it down firmly, or lash the butt end tightly to the pioneering stake with two round lashings. Of course, depending on how rigid the pole is standing, as needed, do both.
Repeat the process for the three other corner uprights.
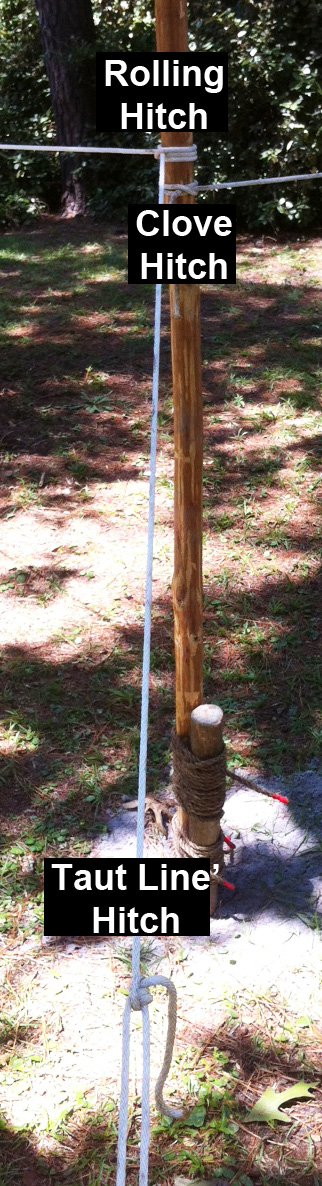
Tie on the boundary lines. About 4 feet up from the ground, with a clove hitch, tie one end of a 25-foot cord to a corner upright. Walk the cord to the next pole in the square and with a rolling hitch, tie it on so the cord is parallel to the ground, keeping the line taut. The running end of the cord should extend out about 15 feet from where the rolling hitch was tied. This will serve as a guyline for that corner pole.
Repeat the process with the other three 25-foot cords, starting with a clove hitch tied right next to the rolling hitch.
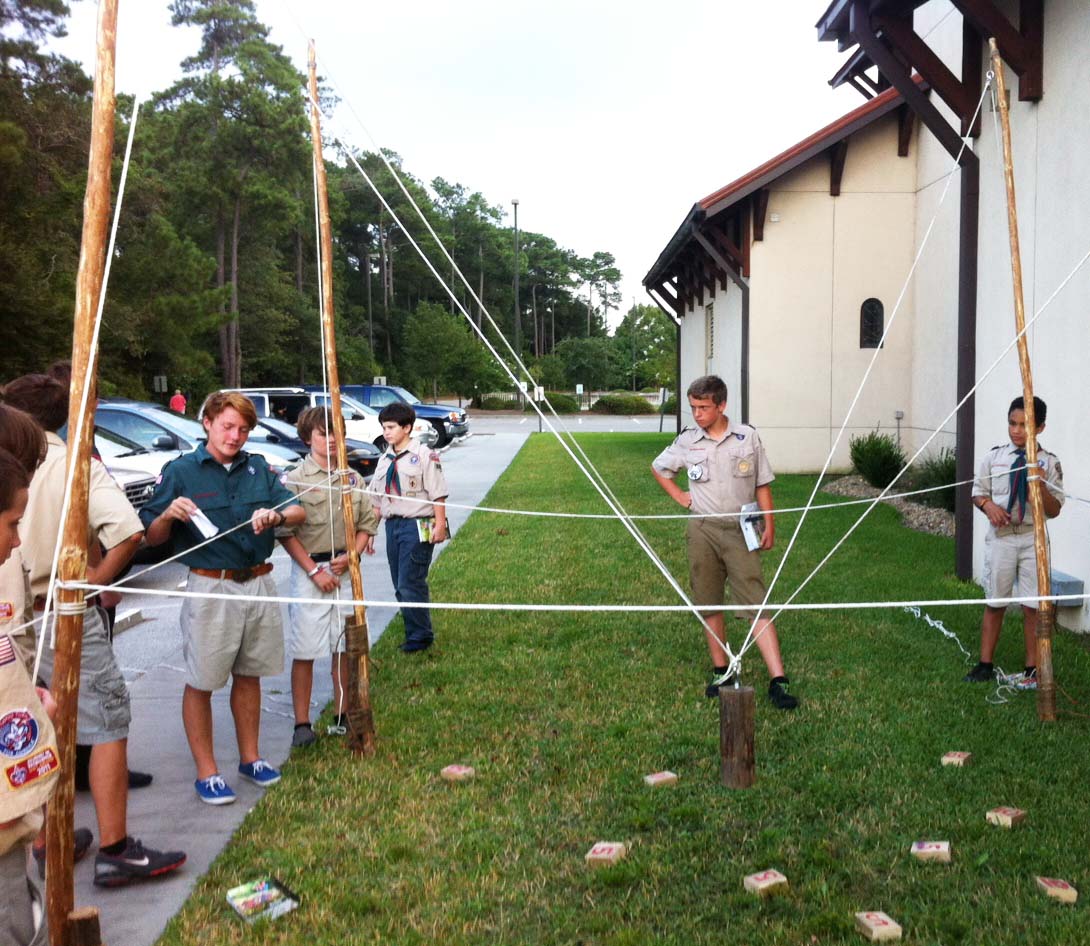
Set up for a Troop Meeting and Played with during Pre-opening Gathering Period
Secure the guylines. Firmly hammer in a smaller stake 45° out from each corner upright, about 8 feet away. Attach the length of cord extending from the rolling hitch to the stake with a taut-line hitch. Pull it tight. This will add a little extra support.
The only thing left to do is position the 4 inch discs or blocks inside the 10′ x 10′ square. The four 20s can be placed near the corners, the 5s can be placed near the center, and the 10s between the center and the corners.
Scouts face away from the “Atomic Pile” and rely on the leader’s directives.
Challenges. An Atomic Pile presents a variety of alternatives in the way of activities, and even spectators are afforded their own form of entertainment observing the progress and prowess of those at the pulley ropes. This is especially pronounced when patrol teams compete against one another.
Within a preset time limit, using a heads on approach, groups of four can be challenged to balance the log for five seconds on as many discs (or blocks) as they can. This simple challenge can be self-led, that is, without a fifth Scout issuing commands, or can be conducted with an assigned leader who does not handle a pulley rope.
Instead of the quantity of discs, scores can be achieved in accordance with the point value painted on each disc.
Scouts man each pulley rope, but instead of facing the square, each must turn their back to the discs. Naturally, in order to maneuver the log from this position, they must rely on an assigned leader to direct their actions.
Incorporating the Atomic Pile into the meeting.
The Atomic Pile can be utilized by groups of Scouts during the gathering period preceding the opening ceremony.
During the meeting, individual patrols can be assigned a period where they engage in the activity by themselves, either to hone their leadership skills or practice for an interpatrol competition.
As an interpatrol activity, patrols can enter their teams to compete against one another in any of the challenges listed above.
From left to right: Corner Rope Handler, 2 Observers, Signal Caller
This activity is so named because it’s supposed to simulate the manipulation of radioactive graphite discs in an atomic pile. Like all good team building challenges, it requires concentration, cooperation, and strict attention to the Scout who’s calling the signals.
The object of the challenge is to place and balance the log on top of wooden “cookies” (discs). The log is maneuvered by pulling in or paying out line from four ropes, each of which are threaded through a pulley and controlled by an individual Scout. The discs can vary in height, color, position or can be numbered, all to correspond with how many points they’re worth.
An additional test of skill can be introduced by challenging the Scouts handling the ropes to turn around so their backs are facing the log. In this way, they can’t see the position of the log and placement of the wooden “cookies,” and hence must rely only on the verbal commands of the signal caller.
What we’re doing here is challenging each patrol to build a device that will set off and “catch” a cocked rat trap (the snapper) placed 15 feet away.
The lashings have to be tight and well-spaced.
This simple interpatrol challenge is fine for team building and simultaneously a whole lotta fun! The only lashings required are round lashings, but applying a sensible approach to spacing them effectively is also necessary. As with all pioneering projects, in order to pull them off the whole crew’s got to pull together. So it is with the simple process of racing to join the Scout staves together, and then setting about angling the long “fishing pole” so the sinkers will hover just right over the cocked rat trap.
Activities That are FUN!
Procedure.Using two tight Round Lashings to join each of the staves together, each patrol forms a long “fishing pole,” and attaches a cord with a weight tied on to the end. Using this device to pick up their snapper, there are two objectives here: one is to catch the snapper as quickly as possible, the other is to work together and successfully complete the task as smoothly as possible. Basically, three rules apply: no patrol member is permitted to cross a line between their work area and the cocked rat traps 15 feet away, the only thing allowed to touch the snapper is the weight at the end of their “fishing pole,” and all materials must be used.
Angling to Catch the Snapper
four 5-foot Scout staves
six 6-foot lashing ropes
one 3-foot light cord
a weight (fishing sinker or some heavy metal washers)
rat trap(s)
Left: Setting out the Rat Traps / Right: Catching the Snapper