During the building process, an area adjacent to the Hourglass Tower saw a lot of action for whipping rope and sharpening pioneering stakes. During the jamboree, it was set up for rope making, for hitching and lashing instruction, and as a display of camp gadgets.
CAMP GADGETS AT THE JAMBOREE: Four useful camp gadgets were set up as displays—a wash station, clothes drying rack, tool rack, and Chippewa kitchen.
From Left to right: Wash Station, Tool Rack, Clothes Drying Rack, Chippewa KitchenScouts check out the Chippewa Kitchen and Camp Clothes Drying Rack in the Camp Gadget Display Area
ROPE MAKING AT THE JAMBOREE: There were always Scouts in the rope making area where they were afforded an opportunity to make a short length of rope as a souvenir. To finish off their project, they also learned the West Country Whipping.
Scouts make rope and learn the Mark II Square Lashing.
LEARNING THE MARK II SQUARE LASHING AT THE JAMBOREE: As in the Single A-Frame Bridge Building area, Scouts were introduced to the quicker, easier-to-learn, and more efficient Japanese Mark II Square Lashing, but here they learned on a lashing rack. Naturally as in past jamborees, all the structures in the pioneering area were lashed with this form of Square Lashing.
Before the Pioneering Area catapults were all completed and positioned in readiness for the thousands of jamboree participants who would be hiking up to Garden Ground Mountain, a little change of pace occurred which translated into a memorable moment. One morning during the building process, some soldiers passing though our area were attracted to the “giant” catapult with the heavy wooden counter weights, double throwing arm, and trebuchet-style swing extension. They were tempted to give it a try and what followed was a scene featuring modern day warriors coupled with ancient weaponry. (Click on the photo for a larger view.)
–
In addition to the “giant” catapult, three other catapult designs were featured up on Garden Ground Mountain in the pioneering area. Eventually, they were positioned on the far side of Peschke Field, facing a clear expanse of ground which was sectioned off to serve as a shooting area.
Periodically, to the amusement and awe of onlookers and those passing by, the 10′ Double A-Frame Trebuchet with a 200 pound counter weight would launch a large monkey fist in a high arc far down the length of the firing range.
Scouts load the smaller, counter-weighted catapult and launch their shot by pulling together to snap up the arm.The Trebuchet at Jambo-Palooza
The most excitement from the jamboree catapults was generated during Sunday’s Jambo-palooza festivities. A specially-built 8′ trebuchet was prepared, transported from Garden Ground, and set up at the stadium in Summit Center where it fired water balloons into throngs of Scouts gathered down range waiting to get doused. And, when it was apparent that a T-shirt was to be launched, the ensuing scrambling to catch it or grab it was over the top! (Click on the photo for a larger view.)
Three signal towers (14′ Double Ladder, Hourglass, and Stilt Tower) were presented in what was referred to as “Tower Town” in the pioneering area up on Garden Ground Mountain during the 2013 national jamboree. Building and hoisting these towers affords a rich experience in Scout engineering.
Across from these displays, on the other side of Peschke FIeld, were two towers designed and presented just for climbing. Some find it frustrating to adhere to the present BSA height restrictions, however, Scouts and Venturers still had fun on these lower structures. Plainly stated, a wide range of pioneering experience and enjoyment has always stemmed from and revolved around a variety of projects that are close to the ground.
Photo Diagram 1
Two small pioneering crews were directed to build traditional square towers that Scouts and Venturers could climb on.
Small, Sturdy, Square Tower
1) 4′ x 4′ Square Tower with a platform 5-1/2′ high. One group chose 8-foot spars for the legs, 4-foot spars for ledgers, transoms, spreaders, floor slats and handrails, and 5-foot spars for the X-braces and diagonal supports. (See Photo Diagram 1 and click on the image for a larger view.) In essence, the little tower was simply two trestles with a top handrail connected on each side by three spreaders. For easy access on and off, a rope ladder was tied to a middle spreader. Finally, the finished tower was guyed down from the top of each leg.
The completed structure was very sturdy. During the entire jamboree, it saw plenty of action and needed only a minimum of tightening.
Photo Diagram 2Venture Crew Members enjoy Garden Ground Mountain from atop the free-standing Four-Tripod-Tower
2) 5-1/2′ x 5-1/2′ Square Tower with a platform 4-1/2′ high. The other group decided on a simple tower design which turned out to be a freestanding marvel, primarily comprised of four inverted tripods. The long middle spar of each tripod served as a tower leg, and the two shorter, outer spars served as 1/2 of an X-brace, connecting from the Tripod Lashing to two adjacent tower legs. Very solid! (See Photo Diagram 2.)
When completed, the tower stood so squarely, and was so aesthetic-looking, the director decided to add a couple of flags which were lashed to the two rear legs. The 5-1/2′ floor slats were each square lashed onto the platform support spars, which also contributed to the soundness of the overall structure. A simple ladder rung stairway was added for easy access.
From left to right: 14′ Double Ladder Signal Tower, Hourglass Tower, Stilt Tower, AT&T “Signal” Tower, 4′ x 4′ x 5-1/2′ Climbing Tower, 5-1/2′ x 5-1/2′ x 4-1/2′ Climbing Tower
Six towers were featured in Peschke Field. Four were for display and two were for climbing. Follow the links for photos and information about each:
After a supply of bamboo was used for the gateway to Peschke Field up on Garden Ground Mountain, a team of Pioneering staff received the inspiration to use most of what was left over to comically copy one of AT&T’s nearby cell towers.
The AT&T Cell Tower made out of Bamboo in the Pioneering Area of the 2013 National Scout Jamboree
The 30-foot clever creation received a good deal of acclaim as Scouts and Scouters observed the structure and came to the obvious conclusion that the bamboo tower was a tongue-in-cheek reproduction of the highly technical real thing.
A central aspect of pioneering is to ingeniously and skillfully make do with what one has and use it to the best possible advantage, sometimes out of necessity, sometimes for utility, and sometimes for fun.
Stilt Tower Display in the Pioneering Area on Garden Ground MountainPioneering Staff Member Surveys the Progress around Peschke Field
Of the four display towers featured in Peschke Field at the 2013 National Jamboree, the Stilt Tower was the second to be constructed, hoisted, and anchored. It gets it’s name because it stands on only two legs, and hence it’s dependence on four essential guylines to hold it up.
The tower presented somewhat of a building challenge to the crew assigned to undertake the task. They had never built one before, and all they were given was a drawing and a sketchy list of materials.
The Stilt Tower exhibit turned out to be both good-looking and novel. For a procedure and instructions refer to Pioneering Made Easy: Stilt Tower.
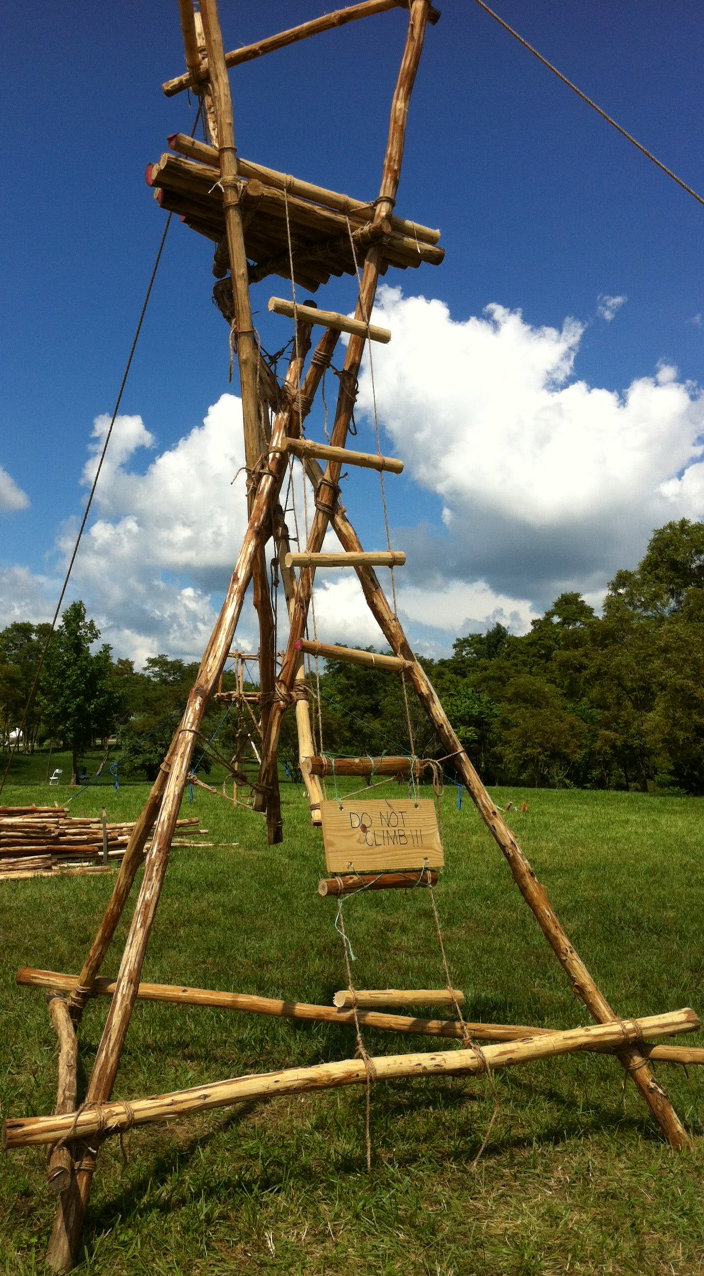
Hourglass a.k.a. Pyramid Tower, erected next to the Camp Gadget / Skills Instruction area.
Hourglass Tower Display: Rope Ladder Side
The Hourglass Tower in the 2013 National Jamboree Pioneering Area was set up as one of four tower displays.
“The Hourglass Tower is something of a classic for Scout pioneering. John Sweet’s excellent book Scout Pioneering describes it, and since then many Scout troops have built one.” (Read: Erecting an Hourglass Tower in Ropes and Poles.)
As an interesting side note: by employing rope tackles in each of the lines marrying the two tripods, effectively tightening the connections was very easy to accomplish.
This Hourglass tower was built as an impressive display in a troop’s campsite at summer camp.
For those familiar with the traditional Double A-Frame Monkey Bridge design, a couple of noticeable modifications will be apparent from the outset. (Click on the photos for larger views.) Scout Engineering is a fluid undertaking, and frequently variations are necessary. Just as frequently an alteration or change can be deemed a desirable improvement. In the case of this double A-frame design, the consensus of opinion is these modifications are really neat, and I’m sure Adolph Peschke would concur.
Instead of separate shorter ledgers for each pair of adjoining A-frames, connect four legs with one longer ledger. The length can actually be the same as that of the legs, e.g. four 8-foot legs and one 8-foot ledger at the bottom, or for a larger structure, 10 or 12-foot legs and ledger. (A spar longer than the legs does yield more flexibility when lashing together the four legs.)
Ladder rungs! Lashing a couple of cross pieces between the legs of the left A-frame cancels the need to climb on board the bridge using the foot and hand ropes! Same thing of the other side. Crossers use the rungs and have a safe and easy way to get on and off the bridge, AND eliminate the often awkward balancing act on the ropes between the A-frames and the anchors. There’s an added advantage too: no more excess stress and strain on the ropes near the anchors.
Crossing the Monkey Bridge in the Pioneering Area of the 2013 National Jamboree
Left to Right: Crossing Single A-Frame Bridge / Building Single A-Frame Bridge / Crossing Prestressed Triple Walkway Bridge / Crossing Double A-Frame Monkey Bridge
The bridges featured in the pioneering area of the 2013 National Jamboree were a modified Double A-Frame Monkey Bridge, a specially designed pre-stressed triple walkway bridge, and two Single A-Frame Bridges that Scouts could put together from a couple of kits we supplied.
Single A-Frame Bridge Building. The kits we supplied for the construction of a Single A-Frame Bridge afforded crews an opportunity to build their own simple crossing bridge. Each group’s success was gauged by how they all could use it to cross the ditch and then all stand on it and pose for a group photo. So the activity wouldn’t be too time consuming, the walkway subassemblies were pre-made. Click here for photos of the crews.
Modified Double A-Frame Monkey Bridge. By far, the bridge that received the most play was the monkey bridge. There’s just something about making your way on a foot rope that appeals to young folks, and frequently there was a line of Scouts waiting to make the crossing. This bridge illustrates a nice approach to the double A-frame construction. Click here for photos and information about the modified design.
Prestressed Triple Walkway Bridge. The most sophisticated and by far most substantial bridge erected up on Garden Ground Mountain on the occasion of the 2013 National Jamboree was this well-designed prestressed bridge. Without getting technical about compressive forces and tension and stress mechanics, suffice it to say the bridge was impressively well-built and strong. Click here for information and photos.
The Crew on their Pre-stressed Triple Walkway Bridge
After the spars were skinned and the initial supply of ropes were cut and whipped, there were about three days to build the pioneering area and batten down the hatches in readiness for the first troops to take the hike up to Garden Ground. There were thirty projects and structures to build and fifty pioneering area staffers to do the work, so the staff was split into construction crews and assigned various tasks.
Here are some photos revealing a bit of the work entailed in the overall building process. All thirty projects and structures can be seen and reviewed by following the links on the jamboree pioneering area: main page. The entire jamboree project area layout can be seen here.
Building the Double A-Frame Monkey Bridge and Pre-stressed Triple Walkway Bridge
Building a couple of Catapults and the Walkways for the Single A-Frame Bridge Kits
Building one of the Derricks, the Swing Boat, and lashing together the top subassembly for the Carousel
Lashing together an Hourglass and two Small Climbing Towers
Creating the AT&T “Signal” Tower and constructing the Climbing Area
Building a Rope Ladder, Chippewa Kitchen, and Battering Ram
What hasn’t been described or captured in photographs is the initial and ongoing process to gather and prepare mallet heads and handles for the Mallet Making Station. The demand for more and more materials was so great, each morning, mallet handle foraging expeditions were in full swing!


 In addition to the “giant” catapult,