
Here are two videos that will reveal something of what went on in the Pioneering Area up on Garden Ground Mountain at the Summit. MUCH better when viewed in Full screen!
Month: August 2013
Pioneering Program Curriculum III: Square Knot & Roundturn With Two Half Hitches
This is the third post in a series that will eventually comprise an activity-based, unit pioneering program curriculum.
SUPPORTING VIDEOS: How to Always Tie a Square Knot Right / How to Tie a Roundturn With Two Half Hitches
III A. In the BSA, the square knot is commonly referred to as a joining knot and tying it is a requirement to earn the Scout rank. However, the square knot (reef knot) is first and foremost a binding knot. For our purposes, its primary use will be to complete a Mark II Square Lashing.
III B. A roundturn with two half hitches is one of the basic knots that is very reliable for a number of uses in pioneering work. It is easy to tie and untie and does not reduce the strength of the rope due to sharp turns when under a hard pull.
OBJECTIVES
- Scouts will show they understand the square knot is used as a binding knot and will demonstrate they can always tie it (instead of a granny knot) by relying solely on the appearance of the first overhand knot. Refer to Foolproof Way to ALWAYS Tie a Square Knot Right.
- Scouts will demonstrate how a roundturn can be used to temporarily hold the strain on a rope.
- Scouts will demonstrate they can tie two half hitches around the standing part of a rope and draw them up tight against a roundturn.
MATERIALS
- 3-foot length of 3/16 or 1/4-inch braided nylon or polyester cord for each Scout
- Length of 1/2-inch nylon or polyester cord and a vertical pole or tree, to serve as a large visual aid
- Sturdy horizontal pole, lashed between two trees or anchored uprights about 3-1/2 feet off the ground
- One 15-foot x 1/4-inch manila lashing rope for every two Scouts
PROCEDURE A

- Utilizing the 1/2-inch cord and vertical pole or tree, the instructor demonstrates how a square knot is used to secure a line or rope directly around an object.
- While tying an overhand knot (half knot) around the pole, the instructor explains how it’s always possible to know how to tie the second overhand knot just by looking at the first. This can be illustrated by positioning the two running ends so they are perpendicular to the standing part wrapped around the pole, (see Illustration 1) It’s pointed out that one running end is on the bottom and the other is on the top. When bringing the ends together to tie the second overhand knot, the end on the bottom should stay on the bottom and the end on top should stay on the top, and then the second overhand knot can be tied to form the square knot correctly 100% of the time. This is demonstrated by the instructor!
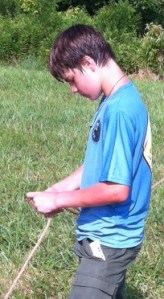
- Using their 3-foot cord, Scouts tie an overhand knot around their thigh, and then position the two ends so they lie at right angles to the part wrapped around their thigh. They then practice carrying the bottom and top ends together to form a square knot.
- Scouts bring their 3-foot cords to the horizontal pole(s) and each ties an overhand knot around the pole. When all the overhand knots are in place, they back away and change places with another Scout. The “new” overhand knot is interpreted, and relying only on its appearance, Scouts complete the square knot.

5. Alternating the position of the running ends of overhand knots tied around the horizontal pole, races are run between individuals to determine that the ability to rely only on the appearance of the initial overhand knot has been mastered. Reviews are conducted as necessary.

PROCEDURE B
1. The instructor wraps the 1/2-inch cord around the horizontal pole forming a roundturn. He explains that a roundturn goes around the pole twice, and when maintaining a grip on the running end, a good deal of stress can be held because of the friction around the pole created by the roundturn.

2. The instructor ties a half hitch around the standing part of the rope and cinches it up to the roundturn on the pole.
3. The instructor ties a second half hitch around the standing part and cinches that up to the first. He explains that these two half hitches have formed a clove hitch around the standing part and the knot is often called two half hitches. He further explains that when two half hitches are tied like this after a roundturn, the knot is called a roundturn with two half hitches and, as will be seen later, is often used on guylines and anchor points when building a pioneering structure.

4. The class is divided into twos. The first Scout holds the end of the 15-foot rope and stands about 12 feet away from the horizontal pole. The second Scout goes to the pole and with the other end of the rope applies a roundturn, while the first gives the rope some tension with a slight, steady pull. When the roundturn is completed, the second Scout lets go of the standing part and with one hand grabbing the running end, he holds the strain still applied by the first Scout. He then adds two half hitches. When the roundturn with two half hitches is tied, the second Scout lets go of the rope entirely. The two Scouts switch so that everyone in the class can demonstrate they are comfortable tying the knot.
INTERPATROL ACTIVITY: Flagpole Race
Pioneering Program Curriculum II: Half Hitches and Round Lashing
This is the second post in a series that will eventually comprise an activity-based, unit pioneering program curriculum.
SUPPORTING VIDEOS: How to Tie and Apply Half Hitches and the Clove Hitch / How to Tie a Round Lashing

II. In Pioneering, half hitches are everywhere! Two of them next to each other is a clove hitch, and that’s something we use time and time again. As John Thurman declares, “If only we can get Scouts to learn that if you make one half hitch and another half hitch and bring them together they make a clove hitch, what a lot of time the Movement would save in the amount of fiddling and fumbling that goes on when a clove hitch is the order of the day.”
OBJECTIVES
- Scouts will demonstrate they can tie half hitches around a horizontal pole, proceeding from both the right and the left.
- Scouts will demonstrate they can tie a round lashing by starting and ending the lashing with two half hitches.
- Scouts will lash together two staves to make a longer pole by using two properly positioned round lashings.

MATERIALS
- Suspended horizontal hitching post or similar setup, to accommodate the entire class
- Two or more 5-foot Scout Staves for every Scout (the more the better)
- Four 6 to 10-foot x 1/4-inch manila lashing ropes for every Scout (the more the better)
- 6-foot x 1-1/2-inch diameter spar set up as a crossbar with a 6-foot length of 1/2-inch nylon or polyester cord, attached in the middle, to serve as a large visual aid
PROCEDURE A
- Starting at the center of the 6-foot spar, the instructor slowly ties a half hitch for all to see, proceeding from the left and initially carrying the running end over the top of the spar.
- The half hitch is untied and slowly tied again for all to see. This is repeated as necessary while, in like manner, the class ties their own half hitch around the horizontal hitching post.
- When each Scout can tie the half hitch, the instructor slowly demonstrates the tying of two half hitches in succession. (No mention needs to be made that this is a clove hitch.)
- When all Scouts can accomplish this, three and four half hitches are tied in succession. Scouts give it a go.
- Starting again at the center, steps 1-4 are repeated on the other side, this time proceeding from the right and initially carrying the running end over the top of the spar.


PROCEDURE B
- Using two Scout Staves and a lashing rope, the instructor demonstrates how, by holding in one hand the two staves and the long end of the rope as the standing part, he can tie two half hitches around both staves working with the running end. This forms a clove hitch which will start off the round lashing. It will be easy to see that since the long end of the rope will be used for the wrappings, to start the lashing, the half hitches will be applied moving towards the nearest end of one of the staves.
- Scouts apply the technique, tying the clove hitch around two staves in the manner shown.
- The instructor demonstrates wrapping the longer end tightly and neatly around both staves, leaving enough rope to finish the lashing with two half hitches.
- Scouts practice lashing two staves together with two round lashings. The space where the two poles are joined, gets two tight round lashings—one on either side of the overlap and right near the ends of each pole. (See photo to the left.)
- Scouts combine into one group and, using all the materials on hand, join all the staves tightly together into one very long pole, with round lashings.
INTERPATROL ACTIVITY: Catch the Snapper
Scout Meeting Challenge: Atomic Pile
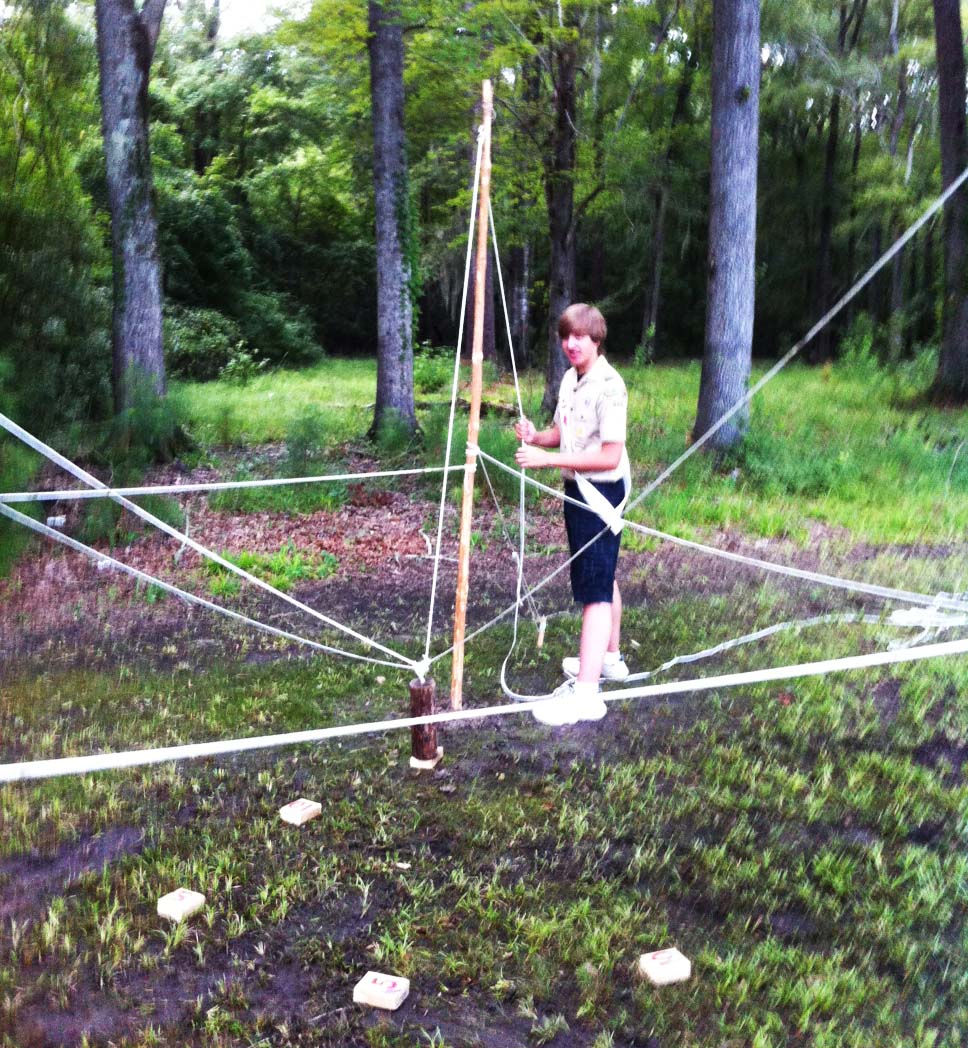
The Atomic Pile provides an excellent opportunity for team building while also effectively honing individual leadership skills. Additionally, it can provide an opportunity to test what can be termed “group leadership,” which will manifest to a greater or lesser degree the ability of a group to lead itself when there is no one assigned the leadership role.
The following Atomic Pile structure is only one simple version, designed for short-term use. It works very well during a troop meeting. When featured for extended use, like at a camporee or public gathering, a more solidly-built construction is in order.
Suggested Materials
- four 8 to 10-foot x 2-inch poles for corner uprights
- twelve 4-inch diameter wooden discs -or- 4-inch squares of lumber, four of them painted with the numeral “5,” four with “10,” and four with “20”
- one 4-inch diameter log, 15 inches long with a large eye hook on one side and a flat, even surface on the other
- four small single pulleys
- four 40-foot lengths of 1/4-inch braided nylon cord for the pulleys
- four 25-foot lengths of 1/4-inch braided nylon cord for the boundary lines and guylines
- four 3-foot lengths of 1/8-inch nylon cord to attach pulleys to the corner uprights
- four 30-inch pioneering stakes to stabilize the corner uprights
- eight 10-15-foot x 1/4-inch manila lashing ropes for connecting the pioneering stakes to the uprights
- four smaller stakes for the guylines, to help steady the corner uprights

BUILDING THE STRUCTURE
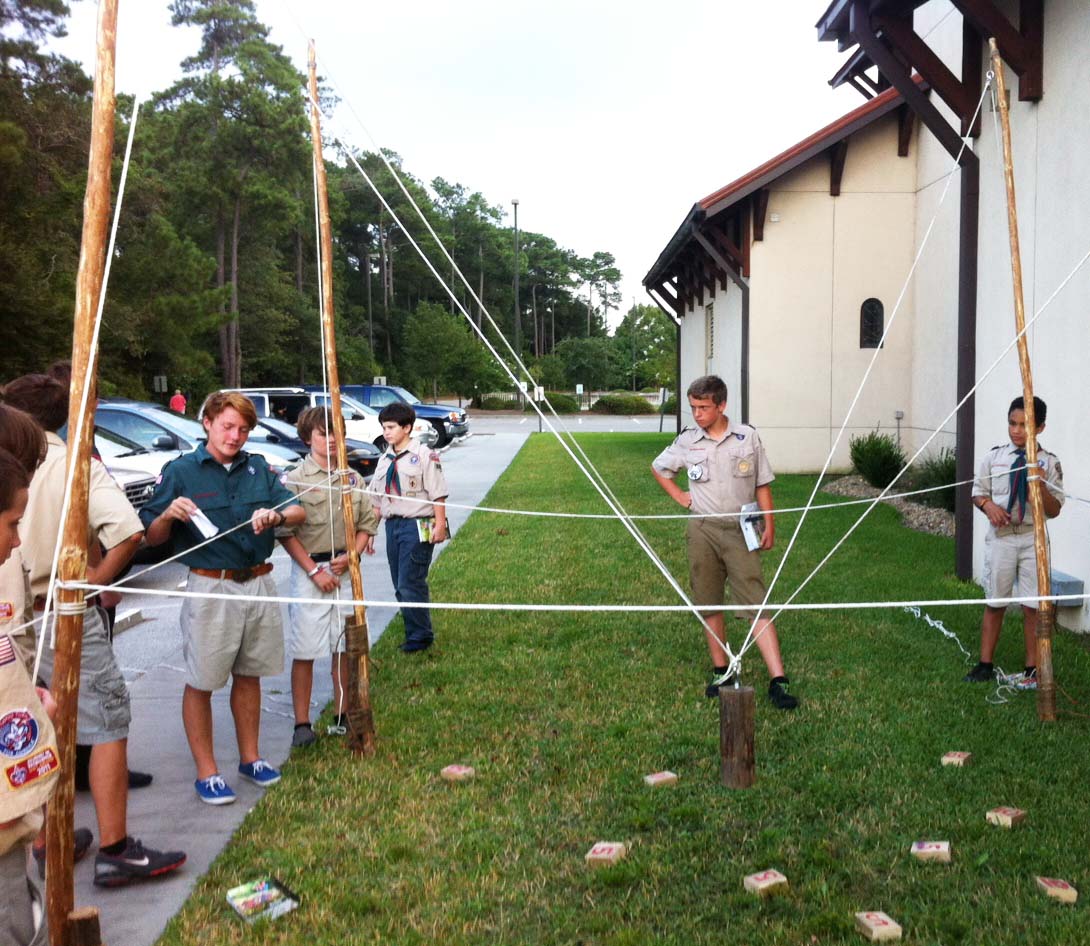
Putting up an Atomic Pile activity is well within the capability of most patrols, and by dividing the tasks, can be completed in under 30 minutes. However, building the Atomic Pile is not as key to team building and leadership development as is actually using the structure.
How will the corner uprights stay erect? It will be impractical to keep the corner uprights in a rigid vertical position with three guylines like a flagpole. So, you’ve got three choices to hold them up:
- Use a post hole digger to sink the uprights into the ground deep enough to firmly support them.
- Drive in a pioneering stake and then lash the upright to the stake to hold it up.
- Do both 1 and 2 (often recommended).
Raise the corner uprights. In the flat place the Atomic Pile will be situated, lay the 10-foot poles out in a 10′ x 10′ square. Just outside the 90° angle formed by the poles, either dig a hole deep enough to support the first upright, or firmly drive in a pioneering stake straight into the ground.
Before standing up the pole, using a 3-foot cord, attach a pulley about an inch from the tip with a prusik. Wrap the cord as many times as needed so the pulley hangs down a couple of inches. Using a 40-foot cord, reeve one end through the pulley and then tie that end to the eye hook of the 4-inch-diameter log with a roundturn with two half hitches. Place the log in the center of the square.
When you’re ready, place the butt end of the pole into the hole and tamp it down firmly, or lash the butt end tightly to the pioneering stake with two round lashings. Of course, depending on how rigid the pole is standing, as needed, do both.
Repeat the process for the three other corner uprights.
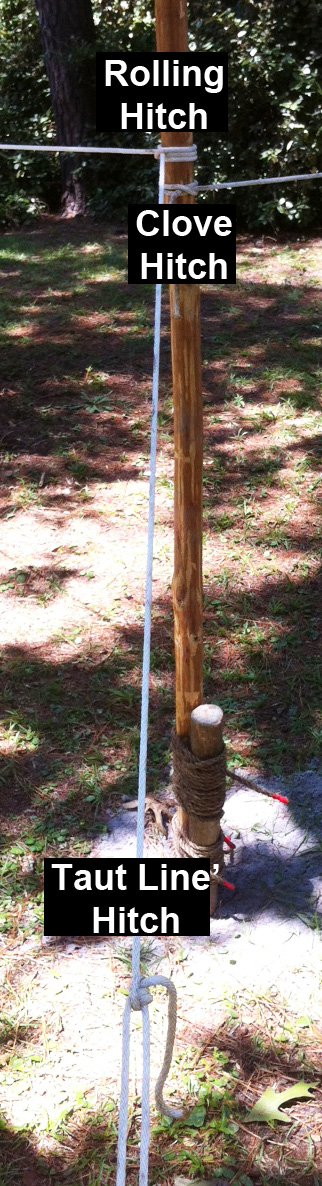
Tie on the boundary lines. About 4 feet up from the ground, with a clove hitch, tie one end of a 25-foot cord to a corner upright. Walk the cord to the next pole in the square and with a rolling hitch, tie it on so the cord is parallel to the ground, keeping the line taut. The running end of the cord should extend out about 15 feet from where the rolling hitch was tied. This will serve as a guyline for that corner pole.
Repeat the process with the other three 25-foot cords, starting with a clove hitch tied right next to the rolling hitch.
Secure the guylines. Firmly hammer in a smaller stake 45° out from each corner upright, about 8 feet away. Attach the length of cord extending from the rolling hitch to the stake with a taut-line hitch. Pull it tight. This will add a little extra support.
The only thing left to do is position the 4 inch discs or blocks inside the 10′ x 10′ square. The four 20s can be placed near the corners, the 5s can be placed near the center, and the 10s between the center and the corners.
Challenges. An Atomic Pile presents a variety of alternatives in the way of activities, and even spectators are afforded their own form of entertainment observing the progress and prowess of those at the pulley ropes. This is especially pronounced when patrol teams compete against one another.
- Within a preset time limit, using a heads on approach, groups of four can be challenged to balance the log for five seconds on as many discs (or blocks) as they can. This simple challenge can be self-led, that is, without a fifth Scout issuing commands, or can be conducted with an assigned leader who does not handle a pulley rope.
- Instead of the quantity of discs, scores can be achieved in accordance with the point value painted on each disc.
- Scouts man each pulley rope, but instead of facing the square, each must turn their back to the discs. Naturally, in order to maneuver the log from this position, they must rely on an assigned leader to direct their actions.
Incorporating the Atomic Pile into the meeting.
- The Atomic Pile can be utilized by groups of Scouts during the gathering period preceding the opening ceremony.
- During the meeting, individual patrols can be assigned a period where they engage in the activity by themselves, either to hone their leadership skills or practice for an interpatrol competition.
- As an interpatrol activity, patrols can enter their teams to compete against one another in any of the challenges listed above.
Pioneering Program Curriculum I: Knot-Tying Terms and Open-Ended Half Hitches
This is the first post in a series that will eventually comprise an activity-based, unit pioneering program curriculum.
I. There are numerous terms pertaining to knots and working with rope, but the four presented here, along with some simple “moves” requiring a minimum amount of dexterity, will be useful when learning and applying some of the basics that follow.
OBJECTIVES
- Through hands on experience, Scouts will become familiar with and demonstrate the following knot-tying terminology: running end, standing part, overhand loop, underhand loop.
- Using the materials provided, Scouts will also demonstrate they can tie Half Hitches over an open-ended pole.
MATERIALS
- Suspended horizontal hitching post or similar setup, to accommodate the entire class
- Enough vertical hitching posts (or uprights with a 15-foot attached length of 3/16 or 1/4-inch nylon cord) so there is at least one for every two Scouts
- 6-foot x 1-1/2-inch diameter spar set up as a crossbar with a 6-foot length of 1/2 inch nylon or polyester cord, attached in the middle, to serve as a large visual aid
PROCEDURE A
- With each Scout standing in front of a dangling cord, using the 1/2-inch cord as an illustration, the instructor explains where the running end, and standing part are. Scouts are given an opportunity to point to the corresponding part on their respective cords.
- The instructor explains what an overhand loop is, illustrating the “right-hand-twist.” Scouts review the maneuver and form the loop with their respective cords.
- The instructor explains what an underhand loop is and illustrates the “left-hand-grab.” Scouts review the maneuver and form the loop with their respective cords.
- The instructor calls out each of the above terms in mixed orders and Scouts, race to point to the correct part of the cord, or form the loops in response.


PROCEDURE B
- With Scouts gathering around a vertical hitching post, the instructor demonstrates how, by making an underhand loop, a half hitch can be placed around an open-ended pole. He then demonstrates that many half hitches can be placed around the pole, one on top of the other.
- Pairs of Scouts, each at a vertical hitching post, try to lay half hitches over the top of the pole. Scouts coach one another and further instruction is provided as needed.
- Races are conducted to see how many half hitches can be laid over a pole in 20 seconds.
The Swing Boat at the Jamboree


Situated adjacent to the catapults, like a giant, rope-propelled see-saw, the swing boat up on Garden Ground Mountain repeatedly attracted Scouts and Venturers. The pull rope on each side allowed the riders to raise one another up and back as high as they wanted, and by rhythmically pulling on and releasing the rope, they could control their height and speed, back and forth.

The Carousel at the Jamboree

The carousel has been a mainstay for the past several jamborees. It was located at the entrance to Peschke Field just beyond the Indian Village, and was one of the most popular attractions in the pioneering area. Because it was so much fun, there was often a line of Scouts and Venturers waiting their turn to get on board. Notice the transformation of the carousel grounds after days of use and lots of rain. (Click on the photos for full page views.)

PIONEERING AREA: ACTIVITY STATIONS & GAMES
JAMBOREE PIONEERING AREA: MAIN PAGE
Battering Ram at the Jamboree


Along with the AT&T Spoof “Signal” Tower, another exceedingly creative pioneering project provided a fun challenge for groups of Scouts and Venturers. The structure was designed and built completely out of wood—axles, wheels, the works—all lashed together. Originally, it was going to be a Flintstone-mobile, but was transformed instead into a frolicking battering ram. Our chain saw sculptor carved a large green fist (like that of the Hulk) for the business end of the swinging pole, which became an enduring source of levity for the adult staffers involved in the project.
Though the finished project was heavy, the wooden wheels enabled crews to roll it around on the grass and move it into position to batter through an improvised swinging gate, (and later to batter down an assembly of wooden blocks).

The teamworking challenge each group faced stemmed primarily from the necessity to roll the cumbersome construction into position, which required a good deal of pulling, pushing, and maneuvering. Once in position, the crew was able to swing the big fist into the obstruction and, without fail, delightfully crash through!
Tic-Tac-Toe at the Jamboree
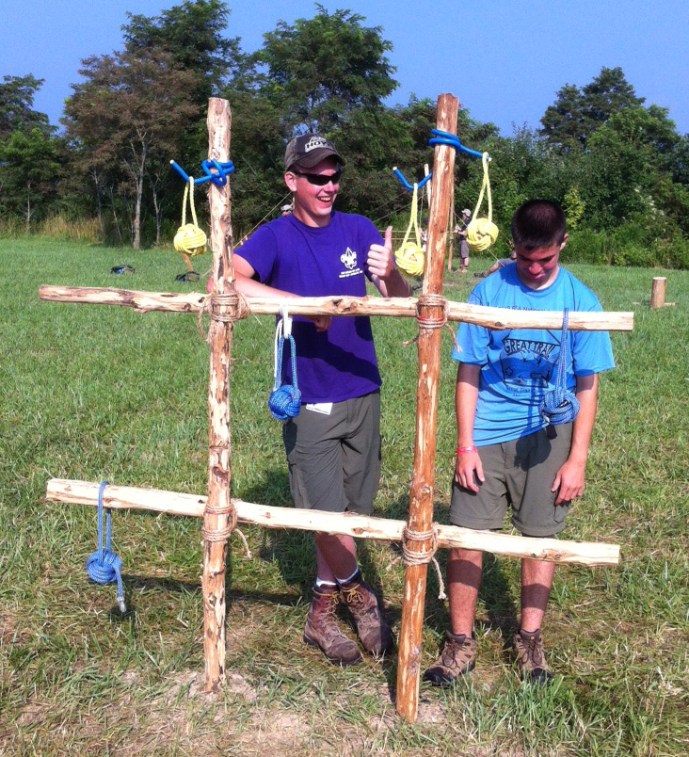

Just like the game where X’s and O’s are drawn on a piece of paper, this game is played by tossing large, weighted monkey fists through 2′ x 2′ areas formed in a vertical Tic-Tac-Toe board built by lashing together four 6′ spars. Scouts stand back 25′ and one at a time aim their colored monkey fist at whatever square they choose. If the shot goes through a square, that monkey fist is hung on the board at the corresponding square. And of course, three across wins.
Mallet Making at the Jamboree
Those Scouts and Venturers visiting Garden Ground Mountain could make a mallet, perfectly-sized for driving in large tent and dining fly stakes and strong enough to even handle small pioneering stakes.
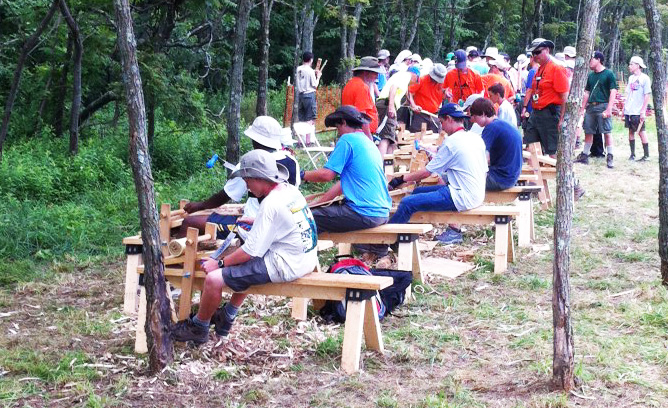
The process consisted of:
- selecting a mallet head and handle
- boring a hole in the head
- shaving the handle
- preparing the handle (tenon) to fit into the mallet head

Mallet making was by far the most crowded and popular of all the pioneering area stations at the 2013 jamboree. So much so that it’s been suggested next jamboree, there should be provision for Scouts to take a number. Then they wouldn’t have to crowd around and wait in line, but instead could be free to visit other activities and displays. When it was their turn, their number would be called out using a bullhorn.
PIONEERING AREA: ACTIVITY STATIONS & GAMES
JAMBOREE PIONEERING AREA: MAIN PAGE
Rope Climbing at the Jamboree


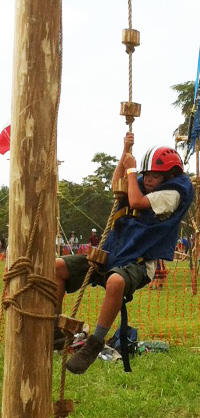
The Rope Climbing Area in Peschke Field featured three varied rope-climbing challenges for Garden Ground Mountain visitors. Scouts and Venturers could:
1) Climb a rope by learning to adjust the position of prusik knots, using them as hand and footholds as they climbed higher.
2) Climb a rope with the aid of wide, wooden discs spaced up the rope’s length.
3) Climb up a rope ladder on wooden rungs attached with marlin spike hitches.
Rope-Toss-Log-Lift-Challenge at the Jamboree
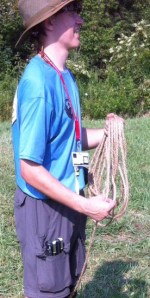
Those visiting the Pioneering Area on Garden Ground Mountain had an opportunity to find out how well and how fast they could lift a log off the ground by coiling a rope and tossing it over a crossbar, tying a Timber Hitch around a log on the other side, tying a Clove Hitch around a stake in the ground, and finally lifting the log by tying a Sheepshank.
The Rope-Toss-Log-Lift Challenge is a good test of rope-handling and some basic knot-tying skills, and it can be even more fun when competing on an individual basis or as a threesome.
Click HERE for further information and procedure.

Cabin-Building Station: Derricks at the Jamboree
When building their log cabins, how did the old pioneers lift and position those very heavy logs? Derricks. Those visiting Garden Ground Mountain had a chance to check them out. A Gin Pole could be placed at a fixed point at each corner, a Boom Derrick could be positioned on two sides, and a large Swing Derrick with an extra long arm could be set up to reach all points of the construction.
The Pioneering Area’s Cabin Building Station with the three of these derricks was situated right next to the signal tower exhibits. (See the overview and layout of Peschke Field.)

Trying their hands at using these special derricks, like the old time pioneers, Scouts and Venturers could get a feel for lifting and positioning logs to assemble a log structure.


PIONEERING AREA: ACTIVITY STATIONS & GAMES
JAMBOREE PIONEERING AREA: MAIN PAGE
Pioneering Area: Activity Stations & Games

Peschke Field featured a wide range of interactive pioneering structures and projects. In addition to bridges, towers, catapults and the camp gadget/skills area, Scouts and Venturers could experience the following Pioneering Games and Activity Stations:
CHALLENGING FUN

Like all good team building challenges, the “Atomic Pile” requires concentration, cooperation, and strict attention to the Scout in the position to call the signals. The activity is great for developing effective leadership skills. Click HERE
 Cabin Building Station: Derricks at the Jamboree
Trying their hands at using a swing derrick, boom derrick, and gin pole, like the old time pioneers, Scouts and Venturers could get a feel for lifting and positioning logs to assemble a log structure. Click HERE

How fast can you lift a log off the ground by coiling a rope and tossing it over a crossbar, tying a timber hitch around a log on the other side, tying a clove hitch around a stake in the ground, and finally lifting the log by tying a sheepshank? Click HERE

The Rope Climbing Area in Peschke Field featured three varied climbing challenges for Garden Ground Mountain visitors. Scouts and Venturers could learn how to adjust a prusik knot, use wooden discs, or climb a high rope ladder. Click HERE

Mallet making, where Scouts and Venturers could make a mallet, perfectly-sized for driving in large tent and dining fly stakes, was by far the most crowded and popular of all the pioneering area stations at the 2013 jamboree. Click HERE
JUST PLAIN FUN

Just like the game where X’s and O’s are drawn on a piece of paper, this game is played by tossing large, weighted monkey fists through 2′ x 2′ areas formed in a vertical Tic-Tac-Toe board built by lashing together four 6′ spars. Click HERE

A lot of pushing and pulling was required in the Battering Ram Station, but once in position, the crews were able to swing the big fist into the obstruction and, without fail, delightfully crash through! Click HERE

The carousel has been a mainstay for the past several jamborees. Because it was so much fun to ride, there was often a line of Scouts and Venturers waiting their turn to get on board. Click HERE

The pull rope on each side allowed the riders to raise themselves up and back as high as they wanted, and by rhythmically pulling on and releasing the rope, they could control their speed, back and forth. Click HERE
–
“Atomic Pile” Activity at the Jamboree


This activity is so named because it’s supposed to simulate the manipulation of radioactive graphite discs in an atomic pile. Like all good team building challenges, it requires concentration, cooperation, and strict attention to the Scout who’s calling the signals.
The object of the challenge is to place and balance the log on top of wooden “cookies” (discs). The log is maneuvered by pulling in or paying out line from four ropes, each of which are threaded through a pulley and controlled by an individual Scout. The discs can vary in height, color, position or can be numbered, all to correspond with how many points they’re worth.
An additional test of skill can be introduced by challenging the Scouts handling the ropes to turn around so their backs are facing the log. In this way, they can’t see the position of the log and placement of the wooden “cookies,” and hence must rely only on the verbal commands of the signal caller.

PIONEERING AREA: ACTIVITY STATIONS & GAMES
