Battering Ram at the Jamboree

Positioning the Battering Ram to Knock Open the Gate
Builders Display Big Green Fist
Builders Proudly Display Big Green Fist

Along with the AT&T Spoof “Signal” Tower, another exceedingly creative pioneering project provided a fun challenge for groups of Scouts and Venturers. The structure was designed and built completely out of wood—axles, wheels, the works—all lashed together. Originally, it was going to be a Flintstone-mobile, but was transformed instead into a frolicking battering ram. Our chain saw sculptor carved a large green fist (like that of the Hulk) for the business end of the swinging pole, which became an enduring source of levity for the adult staffers involved in the project.

Though the finished project was heavy, the wooden wheels enabled crews to roll it around on the grass and move it into position to batter through an improvised swinging gate, (and later to batter down an assembly of wooden blocks).

Pushing Battering Ram into Position / Pulling Battering Ram into Position

The teamworking challenge each group faced stemmed primarily from the necessity to roll the cumbersome construction into position, which required a good deal of pulling, pushing, and maneuvering.  Once in position, the crew was able to swing the big fist into the obstruction and, without fail, delightfully crash through!

PIONEERING AREA: ACTIVITY STATIONS & GAMES

JAMBOREE PIONEERING AREA: MAIN PAGE

Tic-Tac-Toe at the Jamboree

Yellow wins! Two Scouts pose after their tic-tac-toe game.
Yellow wins! Two Scouts strike a pose after their game of tic-tac-toe.
Playing Tic-Tac-Toe
Playing Tic-Tac-Toe

Just like the game where X’s and O’s are drawn on a piece of paper, this game is played by tossing large, weighted monkey fists through 2′ x 2′ areas formed in a vertical Tic-Tac-Toe board built by lashing together four 6′ spars. Scouts stand back 25′ and one at a time aim their colored monkey fist at whatever square they choose. If the shot goes through a square, that monkey fist is hung on the board at the corresponding square. And of course, three across wins.

PIONEERING AREA: ACTIVITY STATIONS & GAMES

JAMBOREE PIONEERING AREA: MAIN PAGE

Mallet Making at the Jamboree

Those Scouts and Venturers visiting Garden Ground Mountain could make a mallet, perfectly-sized for driving in large tent and dining fly stakes and strong enough to even handle small pioneering stakes.

Making Their Very Own Customized Wooden Mallet

The process consisted of:

  • selecting a mallet head and handle
  • boring a hole in the head
  • shaving the handle
  • preparing the handle (tenon) to fit into the mallet head
Fitting the Handle into the Head and Showing off Their Mallets
Fitting the Tenon of the  Handle into the Head and Showing off Their Mallets

Mallet making was by far the most crowded and popular of all the pioneering area stations at the 2013 jamboree. So much so that it’s been suggested next jamboree, there should be provision for Scouts to take a number. Then they wouldn’t have to crowd around and wait in line, but instead could be free to visit other activities and displays. When it was their turn, their number would be called out using a bullhorn.

PIONEERING AREA: ACTIVITY STATIONS & GAMES

JAMBOREE PIONEERING AREA: MAIN PAGE


Rope Climbing at the Jamboree

The Rope Climbing Area in Peschke Field
Climbing with Prusik Knots
Using Discs to Climb
Climbing with the Aid of Wooden  Discs

The Rope Climbing Area in Peschke Field featured three varied rope-climbing challenges for Garden Ground Mountain visitors. Scouts and Venturers could:

1) Climb a rope by learning to adjust the position of prusik knots, using them as hand and footholds as they climbed higher.

2) Climb a rope with the aid of wide, wooden discs spaced up the rope’s length.

3) Climb up a rope ladder on wooden rungs attached with marlin spike hitches.

PIONEERING AREA: ACTIVITY STATIONS & GAMES

JAMBOREE PIONEERING AREA: MAIN PAGE

Rope-Toss-Log-Lift-Challenge at the Jamboree

Getting Ready For the Toss
Tying that Sheep Shank

Those visiting the Pioneering Area on Garden Ground Mountain had an opportunity to find out how well and how fast they could lift a log off the ground by coiling a rope and tossing it over a crossbar, tying a Timber Hitch around a log on the other side, tying a Clove Hitch around a stake in the ground, and finally lifting the log by tying a Sheepshank.

The Rope-Toss-Log-Lift Challenge is  a good test of rope-handling and some basic knot-tying skills, and it can be even more fun when competing on an individual basis or as a threesome.

Click HERE for further information and procedure.

Click the Image for complete instructions and guidelines.

PIONEERING AREA: ACTIVITY STATIONS & GAMES

JAMBOREE PIONEERING AREA: MAIN PAGE

Cabin-Building Station: Derricks at the Jamboree

Derrick Control
Helping Control the Swing Derrick

When building their log cabins, how did the old pioneers lift and position those very heavy logs? Derricks. Those visiting Garden Ground Mountain had a chance to check them out. A Gin Pole could be placed at a fixed point at each corner, a Boom Derrick could be positioned on two sides, and a large Swing Derrick with an extra long arm could be set up to reach all points of the construction.

The Pioneering Area’s Cabin Building Station with the three of these derricks was situated right next to the signal tower exhibits. (See the overview and layout of Peschke Field.)

Derricks from left to right: Gin Pole / Boom Derrick / Swing Derrick
Derricks from left to right: Boom Derrick / Gin Pole / Swing Derrick

Trying their hands at using these special derricks, like the old time pioneers, Scouts and Venturers could get a feel for lifting and positioning logs to assemble a log structure.

A Boom Derrick could be placed at each corner of the log cabin construction site.
Swing Derricks could move a log up, down, to the right, and to the left.

PIONEERING AREA: ACTIVITY STATIONS & GAMES

JAMBOREE PIONEERING AREA: MAIN PAGE

SaveSave

Pioneering Area: Activity Stations & Games

Peschke Field featured a wide range of interactive pioneering structures and projects. In addition to bridges, towers, catapults and the camp gadget/skills area, Scouts and Venturers could experience the following Pioneering Games and Activity Stations:

CHALLENGING FUN

Link to: Atomic PileAtomic Pile

Like all good team building challenges, the “Atomic Pile” requires concentration, cooperation, and strict attention to the Scout in the position to call the signals. The activity is great for developing effective leadership skills. Click HERE


Cabin Building Station: Derricks at the Jamboree

Trying their hands at using a swing derrick, boom derrick, and gin pole, like the old time pioneers, Scouts and Venturers could get a feel for lifting and positioning logs to assemble a log structure. Click HERE 


Rope-Toss-Log-Lift Challenge

How fast can you lift a log off the ground by coiling a rope and tossing it over a crossbar, tying a timber hitch around a log on the other side, tying a clove hitch around a stake in the ground, and finally lifting the log by tying a sheepshank? Click HERE
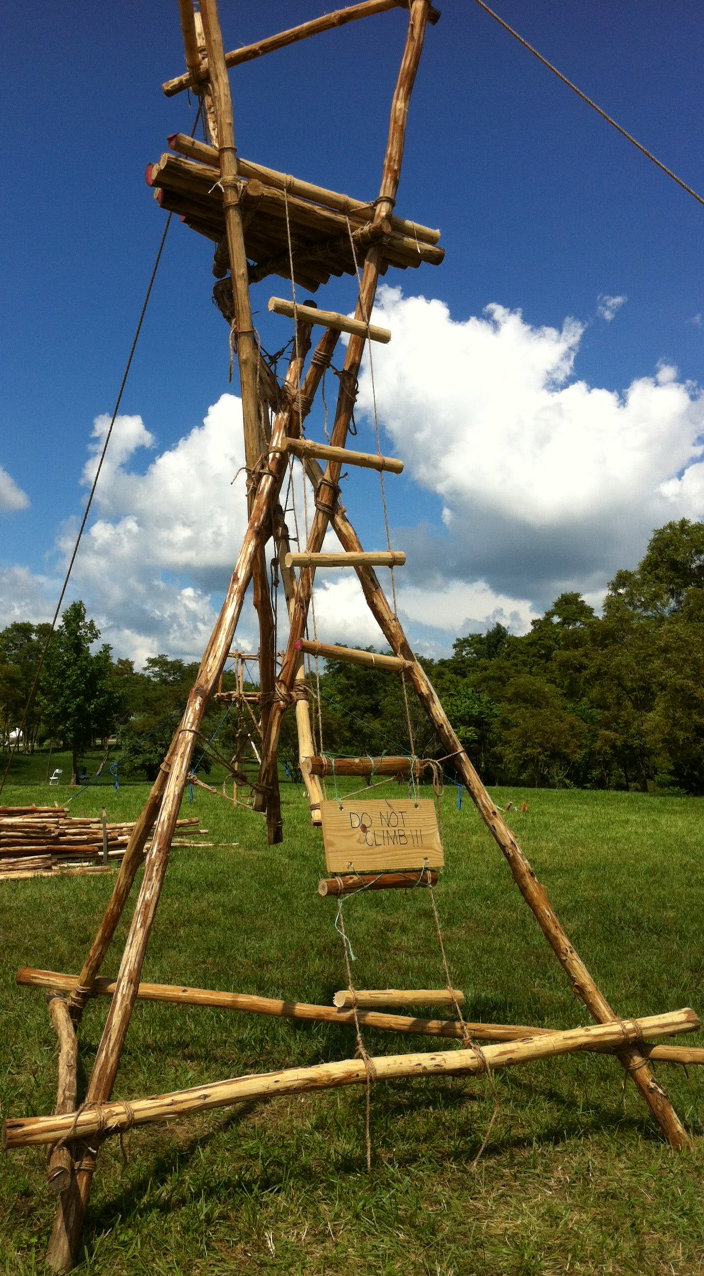
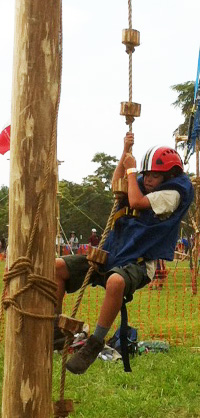

Rope Climbing

The Rope Climbing Area in Peschke Field featured three varied climbing challenges for Garden Ground Mountain visitors. Scouts and Venturers could learn how to adjust a prusik knot, use wooden discs, or climb a high rope ladder. Click HERE
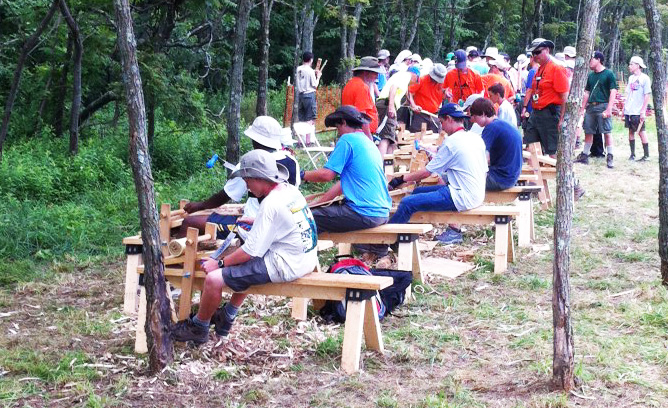

Mallet Making

Mallet making, where Scouts and Venturers could make a mallet, perfectly-sized for driving in large tent and dining fly stakes, was by far the most crowded and popular of all the pioneering area stations at the 2013 jamboree. Click HERE


JUST PLAIN FUN

Tic-Tac-Toe

Just like the game where X’s and O’s are drawn on a piece of paper, this game is played by tossing large, weighted monkey fists through 2′ x 2′ areas formed in a vertical Tic-Tac-Toe board built by lashing together four 6′ spars. Click HERE


Battering Ram

A lot of pushing and pulling was required in the Battering Ram Station, but once in position, the crews were able to swing the big fist into the obstruction and, without fail, delightfully crash through! Click HERE


Carousel

The carousel has been a mainstay for the past several jamborees. Because it was so much fun to ride, there was often a line of Scouts and Venturers waiting their turn to get on board. Click HERE


Swing Boat

The pull rope on each side allowed the riders to raise themselves up and back as high as they wanted, and by rhythmically pulling on and releasing the rope, they could control their speed, back and forth. Click HERE

JAMBOREE PIONEERING AREA: MAIN PAGE

“Atomic Pile” Activity at the Jamboree

Atomic Pile Team Building Challenge
From left to right: Corner Rope Handler, 2 Observers, Signal Caller

This activity is so named because it’s supposed to simulate the manipulation of radioactive graphite discs in an atomic pile. Like all good team building challenges, it requires concentration, cooperation, and strict attention to the Scout who’s calling the signals.

The object of the challenge is to place and balance the log on top of wooden “cookies” (discs). The log is maneuvered by pulling in or paying out line from four ropes, each of which are threaded through a pulley and controlled by an individual Scout. The discs can vary in height, color, position or can be numbered, all to correspond with how many points they’re worth.

An additional test of skill can be introduced by challenging the Scouts handling the ropes to turn around so their backs are facing the log. In this way, they can’t see the position of the log and placement of the wooden “cookies,” and hence must rely only on the verbal commands of the signal caller.

Backs are turned!
Backs are turned!

PIONEERING AREA: ACTIVITY STATIONS & GAMES

JAMBOREE PIONEERING AREA: MAIN PAGE

ATOMIC PILE CONSTRUCTION

Jamboree Pioneering Area: Camp Gadgets, Rope Making & Instruction

This Area Saw Plenty of Action

During the building process, an area adjacent to the Hourglass Tower saw a lot of action for whipping rope and sharpening pioneering stakes. During the jamboree, it was set up for rope making, for hitching and lashing instruction, and as a display of camp gadgets.

CAMP GADGETS AT THE JAMBOREE: Four useful camp gadgets were set up as displays—a wash station, clothes drying rack, tool rack, and Chippewa kitchen.

From Left to right: Wash Station, Tool Rack, Clothes Drying Rack, Chippewa Kitchen
Scouts check out the Chippewa Kitchen and Camp Clothes Drying Rack
Scouts check out the Chippewa Kitchen and Camp Clothes Drying Rack in the Camp Gadget Display Area

ROPE MAKING AT THE JAMBOREE: There were always Scouts in the rope making area where they were afforded an opportunity to make a short length of rope as a souvenir. To finish off their project, they also learned the West Country Whipping.

Scouts make rope and learn the Mark II Square Lashing.

LEARNING THE MARK II SQUARE LASHING AT THE JAMBOREE: As in the Single A-Frame Bridge Building area, Scouts were introduced to the quicker, easier-to-learn, and more efficient Japanese Mark II Square Lashing, but here they learned on a lashing rack. Naturally as in past jamborees, all the structures in the pioneering area were lashed with this form of Square Lashing.

JAMBOREE PIONEERING AREA: MAIN PAGE

Catapults at the Jamboree

Soldiers play with Large Catapult
Soldiers play with the “giant” Catapult

Before the Pioneering Area catapults were all completed and positioned in readiness for the thousands of jamboree participants who would be hiking up to Garden Ground Mountain, a little change of pace occurred which translated into a memorable moment. One morning during the building process, some soldiers passing though our area were attracted to the “giant” catapult with the heavy wooden counter weights, double throwing arm, and trebuchet-style swing extension. They were tempted to give it a try and what followed was a scene featuring modern day warriors coupled with ancient weaponry. (Click on the photo for a larger view.)

In addition to the “giant” catapult, three other catapult designs were featured up on Garden Ground Mountain in the pioneering area. Eventually, they were positioned on the far side of Peschke Field, facing a clear expanse of ground which was sectioned off to serve as a shooting area.

Periodically, to the amusement and awe of onlookers and those passing by, the 10′ Double A-Frame Trebuchet with a 200 pound counter weight would launch a large monkey fist in a high arc far down the length of the firing range.

Scouts load the smaller, counter-weighted catapult and launch their shot by pulling together to snap the arm up.
Scouts load the smaller, counter-weighted catapult and launch their shot by pulling together to snap up the arm.
A Trebuchet at Jambo-Palooza
The Trebuchet at Jambo-Palooza

The most excitement from the jamboree catapults was generated during Sunday’s Jambo-palooza festivities. A specially-built 8′ trebuchet was prepared, transported from Garden Ground, and set up at the stadium in Summit Center where it fired water balloons into throngs of Scouts gathered down range waiting to get doused. And, when it was apparent that a T-shirt was to be launched, the ensuing scrambling to catch it or grab it was over the top! (Click on the photo for a larger view.)

JAMBOREE PIONEERING AREA: MAIN PAGE

Three Featured Catapult Designs


Climbing Towers at the Jamboree

3 Display Towers
3 Display Towers
Small Tower, Large FUN!
Small Towers, Large FUN!

Three signal towers (14′ Double Ladder, Hourglass, and Stilt Tower) were presented in what was referred to as “Tower Town” in the pioneering area up on Garden Ground Mountain during the 2013 national jamboree. Building and hoisting these towers affords a rich experience in Scout engineering.

Across from these displays, on the other side of Peschke FIeld, were two towers designed and presented just for climbing. Some find it frustrating to adhere to the present BSA height restrictions, however, Scouts and Venturers still had fun on these lower structures. Plainly stated, a wide range of pioneering experience and enjoyment has always stemmed from and revolved around a variety of projects that are close to the ground.

4x4 Climbing Tower
Photo Diagram 1

Two small pioneering crews were directed to build traditional square towers that Scouts and Venturers could climb on.

Small, Sturdy, Square Tower

1) 4′ x 4′ Square Tower with a platform 5-1/2′ high. One group chose 8-foot spars for the legs, 4-foot spars for ledgers, transoms, spreaders, floor slats and handrails, and 5-foot spars for the X-braces and diagonal supports. (See Photo Diagram 1 and click on the image for a larger view.) In essence, the little tower was simply two trestles with a top handrail connected on each side by three spreaders. For easy access on and off, a rope ladder was tied to a middle spreader. Finally, the finished tower was guyed down from the top of each leg.

The completed structure was very sturdy. During the entire jamboree, it saw plenty of action and needed only a minimum of tightening.

Four Tripod Tower
Photo Diagram 2
Venture Crew Members enjoy Garden Ground Mountain from atop the Four Tripod Tower
Venture Crew Members enjoy Garden Ground Mountain from atop the free-standing Four-Tripod-Tower

2) 5-1/2′ x 5-1/2′ Square Tower with a platform 4-1/2′ high. The other group decided on a simple tower design which turned out to be a freestanding marvel, primarily comprised of four inverted tripods. The long middle spar of each tripod served as a tower leg, and the two shorter, outer spars served as 1/2 of an X-brace, connecting from the Tripod Lashing to two adjacent tower legs. Very solid!  (See Photo Diagram 2.)

When completed, the tower stood so squarely, and was so aesthetic-looking, the director decided to add a couple of flags which were lashed to the two rear legs. The 5-1/2′ floor slats were each square lashed onto the platform support spars, which also contributed to the soundness of the overall structure. A simple ladder rung stairway was added for easy access.

Peschke Field's Two Climbing Towers
Peschke Field’s Two Climbing Towers

PIONEERING AREA: TOWERS

JAMBOREE PIONEERING AREA: MAIN PAGE

Jamboree Pioneering Area: Towers

From left to right: 14' Double Ladder Signal Tower, Hourglass Tower, Stilt Tower, AT&T "Signal" Tower, 4'X4'x6' Climbing Tower, 6'x6'x5' Climbing Tower
From left to right: 14′ Double Ladder Signal Tower, Hourglass Tower, Stilt Tower, AT&T “Signal” Tower, 4′ x 4′ x 5-1/2′ Climbing Tower,  5-1/2′ x 5-1/2′ x 4-1/2′ Climbing Tower

Six towers were featured in Peschke Field. Four were for display and two were for climbing. Follow the links for photos and information about each:

Official Photo of the AT&T "Spoof" Tower
Official Photo of the AT&T “Spoof” Tower

14′ Double Ladder Signal Tower

Hourglass Tower

Stilt Tower

AT&T Spoof “Signal” Tower

2 Climbing Towers

JAMBOREE PIONEERING AREA: MAIN PAGE

AT&T Spoof “Signal” Tower at the Jamboree

After a supply of bamboo was used for the gateway to Peschke Field up on Garden Ground Mountain, a team of Pioneering staff received the inspiration to use most of what was left over to comically copy one of AT&T’s nearby cell towers.

The AT&T Cell Tower made out of Bamboo in the Pioneering Area of the 2013 National Jamboree
The AT&T Cell Tower made out of Bamboo in the Pioneering Area of the 2013 National Scout Jamboree

The 30-foot clever creation received a good deal of acclaim as Scouts and Scouters observed the structure and came to the obvious conclusion that the bamboo tower was a tongue-in-cheek reproduction of the highly technical real thing.

A central aspect of pioneering is to ingeniously and skillfully make do with what one has and use it to the best possible advantage, sometimes out of necessity, sometimes for utility, and sometimes for fun. 

PIONEERING AREA: TOWERS

JAMBOREE PIONEERING AREA: MAIN PAGE

The Stilt Tower at the Jamboree

STilt Tower Display in the Pioneering Area on Garden Ground Mountain
Stilt Tower Display in the Pioneering Area on Garden Ground Mountain
Pioneering Staff Member Surveys the Progress around Peschke Field

Of the four display towers featured in Peschke Field at the 2013 National Jamboree, the Stilt Tower was the second to be constructed, hoisted, and anchored. It gets it’s name because it stands on only two legs, and hence it’s dependence on four essential guylines to hold it up.

The tower presented somewhat of a building challenge to the crew assigned to undertake the task. They had never built one before, and all they were given was a drawing and a sketchy list of materials.

The Stilt Tower exhibit turned out to be both good-looking and novel. For a procedure and instructions refer to Pioneering Made Easy: Stilt Tower.

PIONEERING AREA: TOWERS

JAMBOREE PIONEERING AREA: MAIN PAGE

Hourglass Tower at the Jamboree and at Camp

Hourglass a.k.a. Pyramid Tower, erected next to the Camp Gadget / Skills Instruction area.
Hourglass Tower Display
Hourglass Tower Display: Rope Ladder Side

The Hourglass Tower in the 2013 National Jamboree Pioneering Area was set up as one of four tower displays.

“The Hourglass Tower is something of a classic for Scout pioneering. John Sweet’s excellent book Scout Pioneering describes it, and since then many Scout troops have built one.” (Read: Erecting an Hourglass Tower in Ropes and Poles.)

“The tower is constructed from two large pyramids interlocked together.” (Read: Hourglass Tower in Poneering Made Easy.)

As an interesting side note: by employing rope tackles in each of the lines marrying the two tripods, effectively tightening the connections was very easy to accomplish.

This Hourglass tower was built as an impressive display in a troop’s campsite at summer camp.

PIONEERING AREA: TOWERS

JAMBOREE PIONEERING AREA: MAIN PAGE