One of the essential mandates in the BSA’s Outdoor Code is: BE CAREFUL WITH FIRE.
In addition to being the height of simplicity, this Single Fire Bucket Holder makes an invaluable contribution towards safety around the fire circle. Since it’s always a safe bet to have a supply of water right near our cooking and campfires, why not add some convenience and accessibility in our campsites, especially because when fire buckets are on the ground, they’re frequently knocked over, inadvertently kicked, and even stepped in!
The design for this easy camp gadget is very straightforward. The diagonal support brace forming a triangle is what makes it work, and without it, the notched stick could never securely support the bucket.
Here are the suggested materials:

The procedure is simple.
A Swing Boat is a fairground ride in which pairs of riders pull ropes to swing back and forth. At the national jamboree, it’s one of the pioneering area’s favorite features. Click here for more information. This is a smaller, more boy-sized version, but still lots of fun and plenty big enough.
ALL LASHINGS MUST BE VERY TIGHT! (This is an appropriate occasion to start the Japanese Mark II Square Lashing with a clove hitch in the middle of the rope around the upright, under the crossing spar, before proceeding with the wraps.)

Build the A-frames. Using 20-foot ropes, lash two identical A-frames. The tops of the shear lashings needs to be approximately 3 feet below the tips of the 12-foot legs. (In lieu of shear lashings you might want to join the legs at the top with looser square lashings applied with the legs held at 90º after which the legs can be brought into the desired position to add the ledgers, but in doing so, make sure there won’t be too much strain applied to the top rope and the spars.) The 10-foot ledgers need to be approximately 1.5 feet above the butts of the legs. Lash on an additional 6-foot cross spar for extra support on each A-frame.
Join the A-frames together. Stand up the A-frames and holding them in place, use the remaining 12-foot spars to join them together. Lash these on as low as possible so they don’t interfere with the action of the swing.
The following steps can be carried out using an 8 to 10-foot folding step ladder or by laying the structure on its side. Either way, strong crew members will be needed to hold the spars in place.
Add the Center Spar. With a TIGHT square lashing, lash the stout 10-foot center spar to the inside of one leg of each A-frame, about 1 foot from each end where the tops intersect. This will provide a good, inward lean to the A-frames. (If you are using rope grommets with steel rings, attach them to the center spar with a prusik, about 6 inches from the legs of each A-frame.)

Lash on the top support spars. Join the tops of the A frames by tightly lashing a 10-foot spar on the legs of each A-frame, about 6 inches from the tips. (It’s a good idea to start these lashings with a constrictor knot to minimize slippage during use.)
Attach the pull rope spar and pull ropes. At right angles, lash a 10-foot spar across the center for the pull ropes. About 6 inches from the ends, tightly tie a 15-foot pull rope to each end using a roundturn with two half hitches.
Attach the swing. Attach a swing rope to each end of the prepared plank with a scaffold hitch. Using a roundturn with two half hitches, tie the ends of each swing rope securely to their corresponding ring -or- directly to the center spar about 6 inches from the legs of each A-frame.
Add the guylines. Using a roundturn with two half hitches or rolling hitch, attach a 36-foot x 3/8-inch guyline to the top of each leg. (If, the structure has been on its side, it’s time to stand it completely up.)

Prepare the anchors. Drive in pioneering stakes for four 1-1 anchors extending 20 feet out from the legs at 45º. Attach the corresponding guyline to each using a rope tackle. Also, drive in a stake about 6 inches in at each of the four corners so they will intersect with the A-frame ledgers. Lash each stake to the corresponding ledger with a square lashing.
Make adjustments. Level out the plank to the desired height and adjust the swing ropes so the swing hangs evenly.
Materials
Santee Lodge 116, Order of the Arrow hosted this year’s Dixie Fellowship at Camp Coker. With the input of the Dixie Design Team comprised of Pioneering Crews from Chicora, Iswa and Attakwa Chapters, Arrowmen erected a 24 foot six flag, banner gateway flying the American flag, the Order of the Arrow flag, the World Scout Crest flag, and the state flags of NC, SC, and GA. These six flags surrounded a 10’ banner welcoming everyone to the Dixie Fellowship! The OA Pioneering Crews also built a 12’ Swing Boat and 10’ Atomic Pile for intermittent fun during the Fellowship.


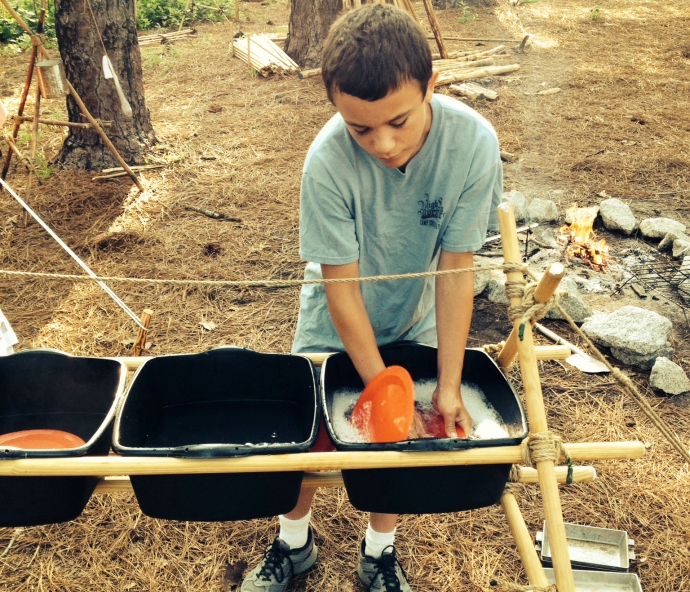
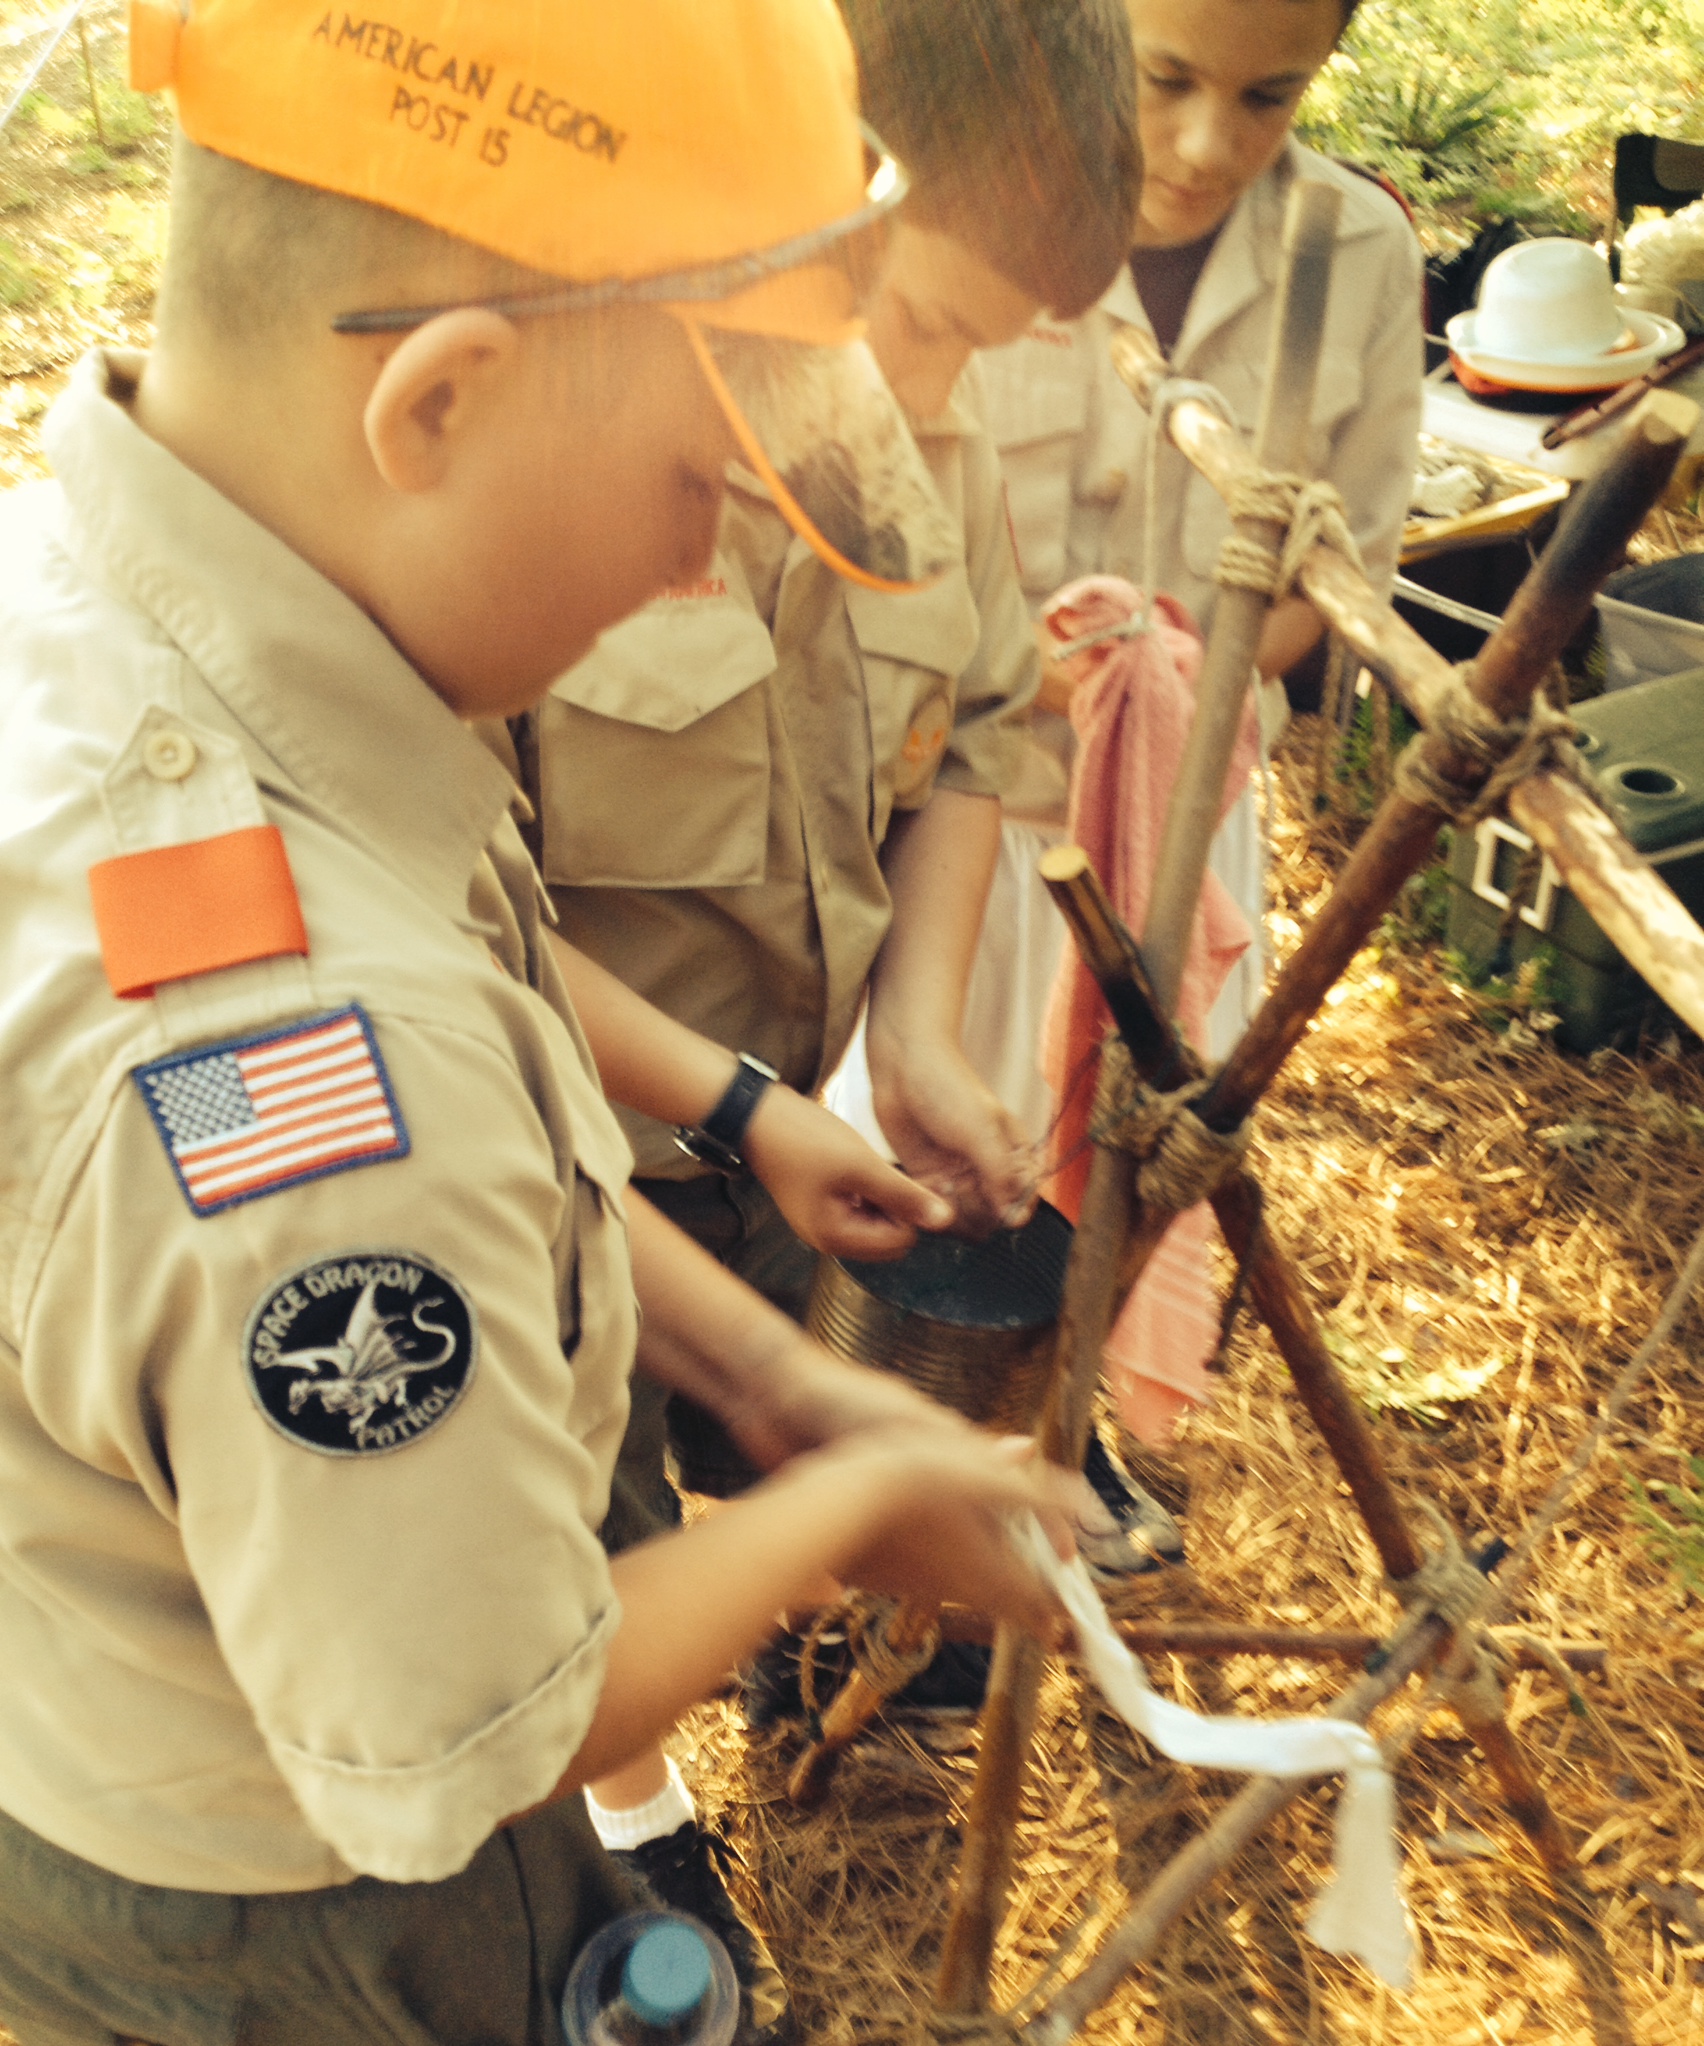
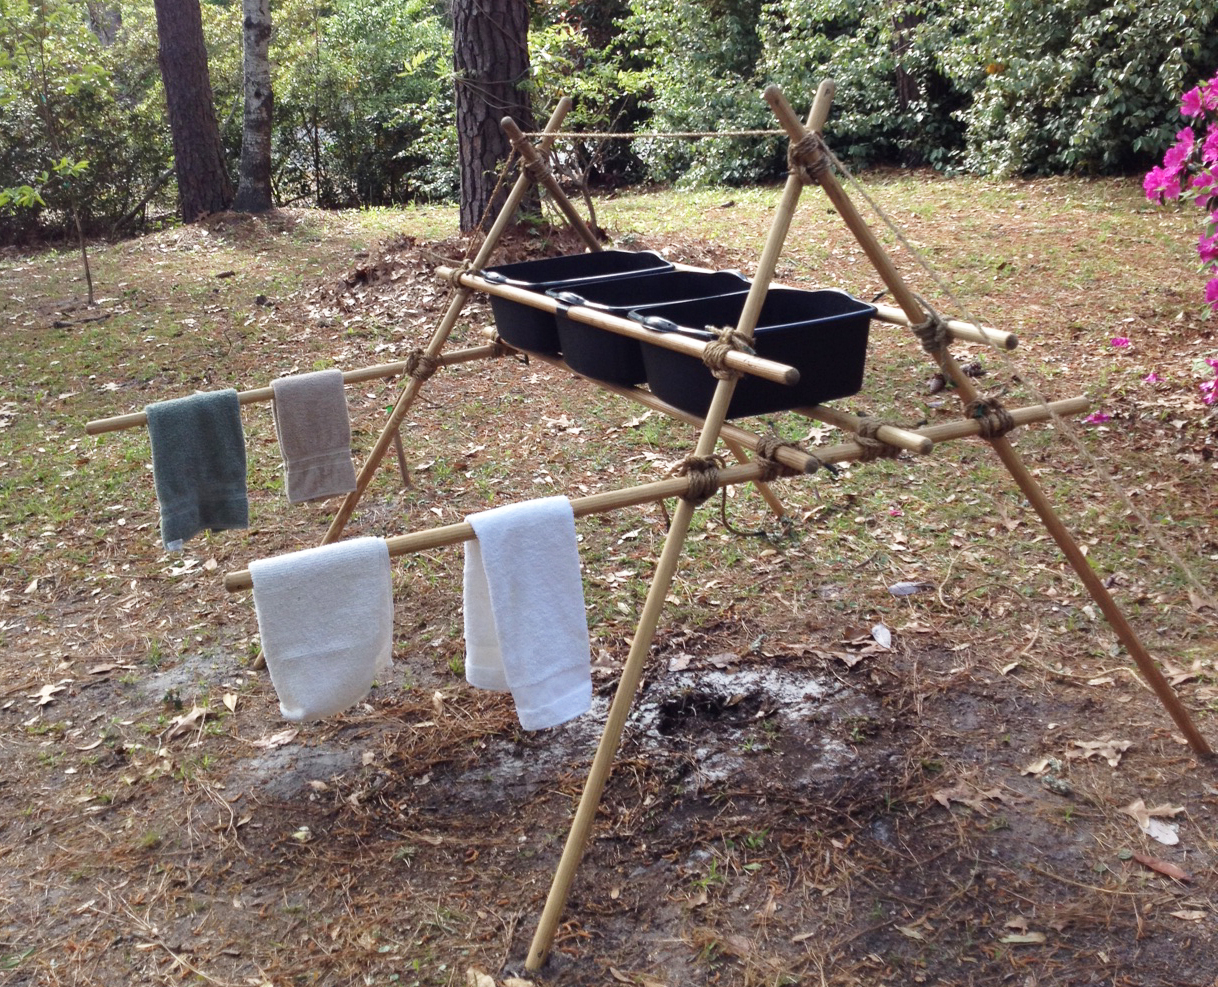
Background and History. Washing mealtime utensils on a camping trip can range from using paper plates (no washing) to “Philmont-style” (lick ’em clean and sanitize in boiling water). Through the years, Scouting has come up with a variety of “dish washing assembly line” configurations. For a wide range of field applications, the three container approach has proven itself tried and true.
Here’s the method featured in the current edition of the Scouts BSA Handbook:
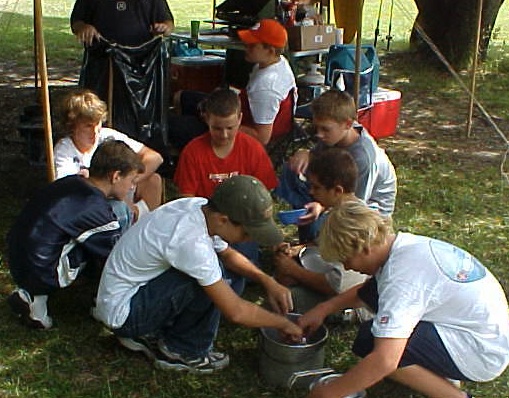
On many overnight camping and backpacking trips, this approach has been adapted, sometimes combining the second and third containers into one 8 quart pot. In all cases, the initial step is to clean or scrape off as much excess food as possible into a designated receptacle, before placing anything into the 1st container. Most often the final step, is to let all washed items air dry on a plastic sheet. Even when wash basins are used on front-country, “car-camping” trips, the whole production frequently takes place right on the ground. This is always the case when there are no picnic tables, limited table space, or when tables are being used for other things. Improving the campsite, making it more comfortable, making kitchen tasks more convenient, being resourceful and using one’s ingenuity is what creating camp gadgets are all about. That’s why the Scout Stave Dish Washing Rack was devised.
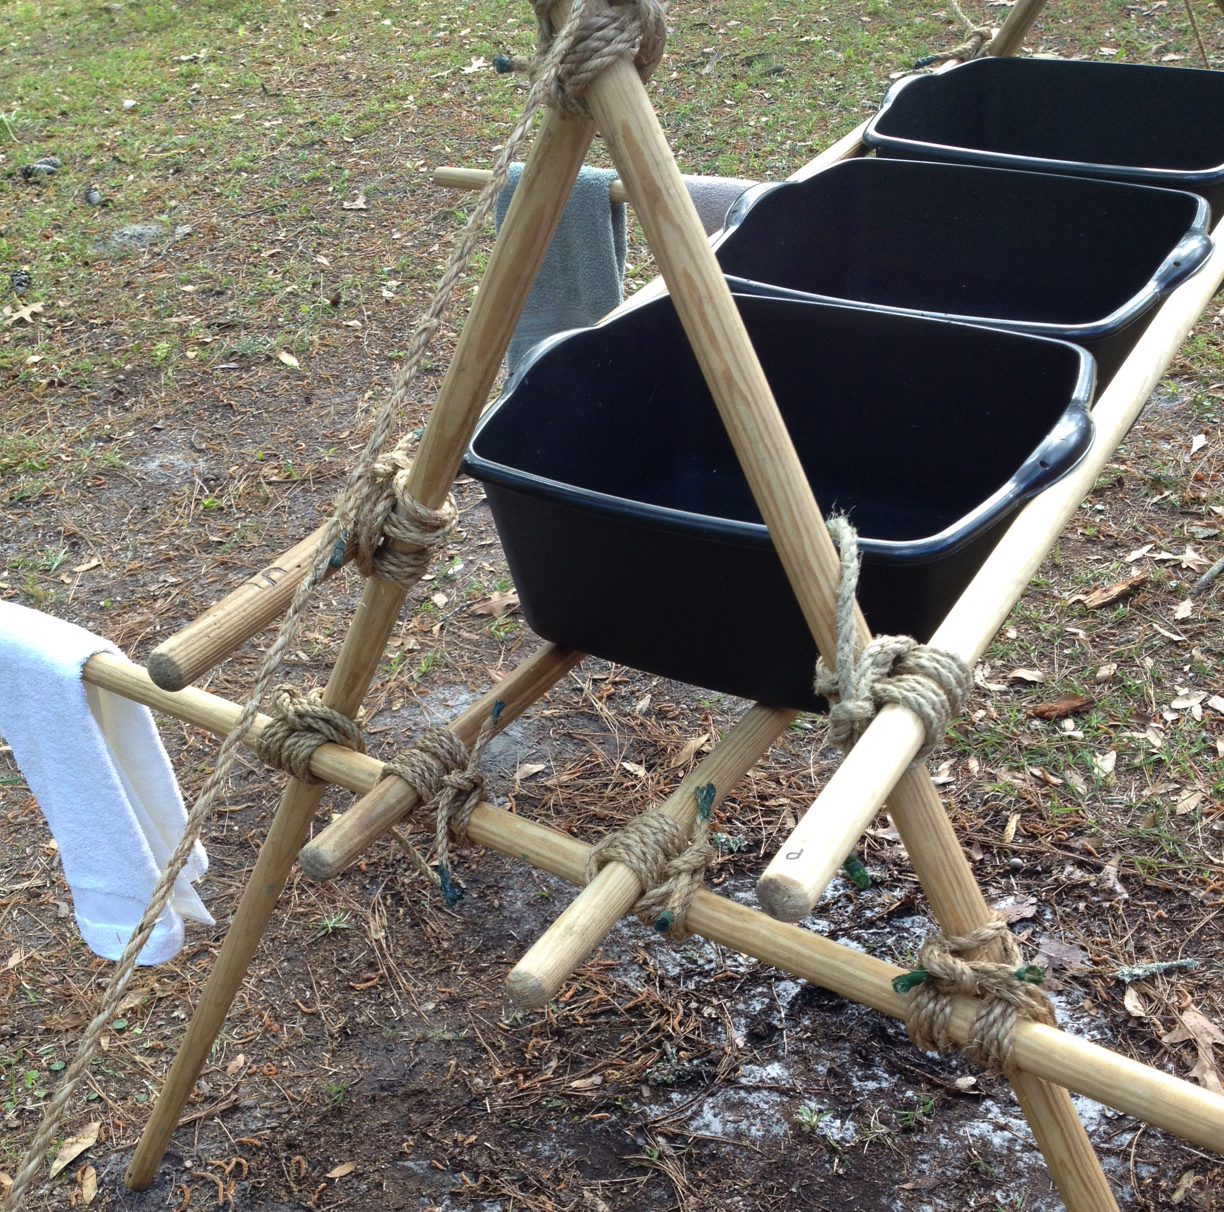
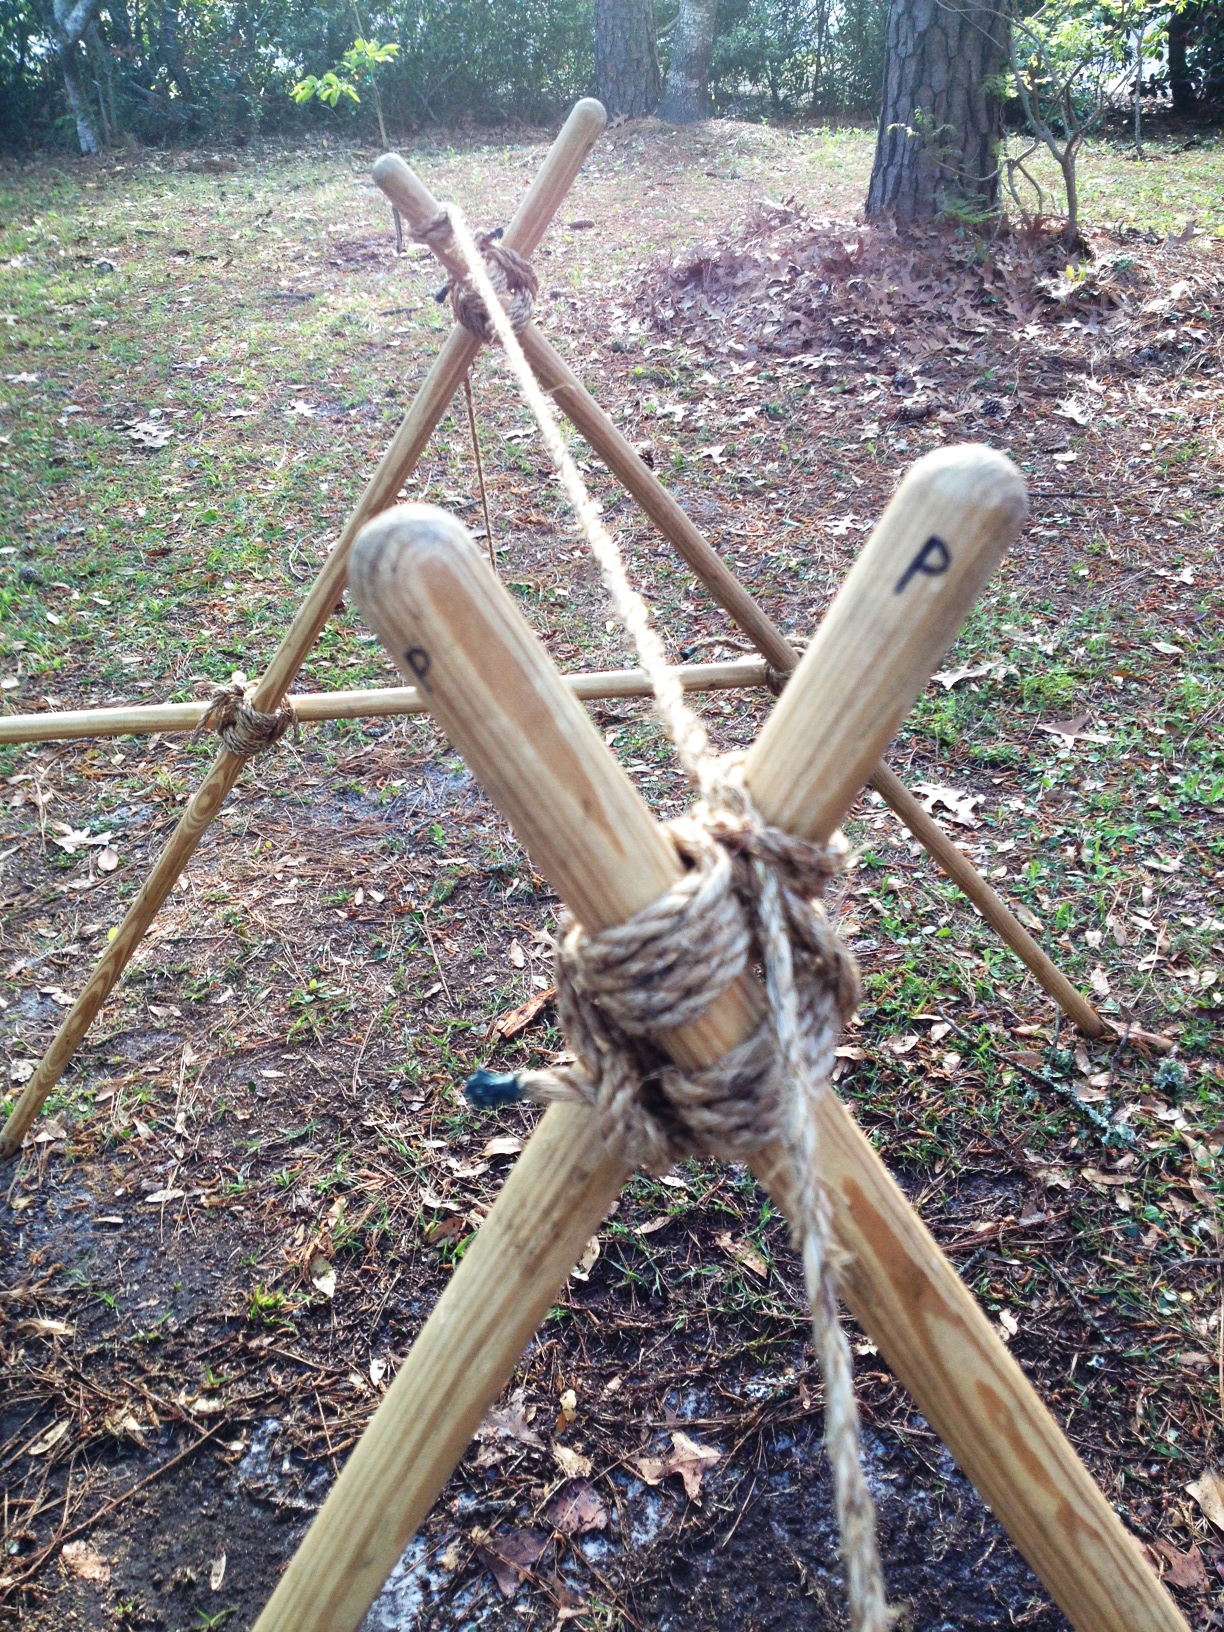
Two challenges. 1) Drawings for dish washing rack designs are common. But, until you make one and try it with full containers of water, it’s difficult to realize what the main challenge really is—to keep the containers from crashing down because they’re too heavy! Depending on the containers used, an average wash basin won’t have enough of a lip to hold it in place or is just too flimsy to keep it’s shape when filled with water. That’s why lashing together a framework alone usually won’t suffice. Therefore, in addition to the framework, this design includes a bottom platform made up of two Scout Staves for the basins to rest upon, which solves the weight issue. 2) The next challenge is one that’s common to many a pioneering structure, be it large or small. How do we keep the rack itself from falling over? We overcome this basic concern by bringing into play the same stability solution used in making a simple camp table. It’s exactly the same concept that keeps a Double A-Frame Monkey Bridge erect. Like the table, we connect two upright A-frames with a rope, and using the same rope, we anchor them securely in place on either side. Here’s what you’ll need:

Make the A-frames. Because the rack will be holding around nine gallons of water, approximately 72 pounds, the lashings for this project need to be especially tight. An easy way to assure you’ll have well-lashed A-frames is to first square lash the tops at 90º and then the ledger to one leg, also at 90º. This will create some strain on the lashings when the other leg and the other end of the ledger are lashed together, yielding a nice tight A-frame. (Careful it’s not too tight, and of course you can always start with a shear lashing at the top.) With these Sterilite wash basins, lash the ledger in place about 28 inches from the top of the legs. Since all we’re using are Scout Staves, in this design one side of the ledger will purposely extend out much farther than the other on each A-frame—a place to hang some towels (or whatever).
Connect and stand up the A-frames. Tightly lash two staves to the outside of the legs of each A-frame, about 20 inches from the top. The front and back edges of the wash basins will rest on these staves. Hammer in two stakes about 12 feet apart where you want the rack to be located, and position the connected A-frames between. Halve the 20-foot lashing rope and approximating the midpoint between the A-frames, secure the rope to the top of one leg with a clove hitch, and pulling the rope to the other A-frame, repeat the process on the top of a leg on the other side. Tie the ends of the rope to the stakes on either side, securing the ends tightly with tautl-line hitches. (If preferred use roundturns with two half hitches.)
Add the two-stave basin supports. The A-frame ledgers will now serve to do something more than keep the A-frames’ legs from shifting. They’ll now also support the two remaining staves that assure the basins stay put! Lash these two staves parallel to one another on top of the ledgers, on either side of the rack.
Place the basins on the rack. Once you check to see all the lashings are tight, and the central rope is secure and stabilizing the structure, then you’re ready to bring on the basins. Position them side by side and fill them about 3/4 of the way up.
Scouting America’s Scout Shop’s Scout Hiking Staff is still the best deal on the market for Scout Staves. Order them through your council service center.
The concept for this gateway originated from the bamboo version placed at one end of Peschke Field at the 2013 national jamboree. Just like the name describes, this gateway flies a banner in the middle surrounded on each side by three flags. Each side is in the shape of a standing triangular prism. If the legs of each prism were far enough apart, symmetrical, and proficiently lashed, the structure could easily be self-standing. However in this instance, we’re using long, thin, yellow pine spars with unequal diameters and with an array of curves. So for stability, the gateway definitely needs to be guyed down at the front and back (outside) legs of each side!

To sport a ten foot banner and fly six 3 x 5-foot flags, a gateway like this conceivably can span as little as 20 to 24 feet. The dimensions of the above gateway are purposely larger, employing 8-foot spars to connect the legs, separated by two 14-foot center spars, so the width is closer to 30 feet. Since this project:
most of the spars can be thinner, lighter-weight pine. (Bamboo would be much better!) Naturally, the two triangular prisms should be bottom-heavy, so lash thicker, heavier connector spars at the bases of each side.
Here’s a list of materials:
One key to building this gateway is to connect the middle and front leg of each prism shape with three leg connector spars, while both legs are lying flat on the ground. Once connected, the connector spars for the rear legs can be attached to the front and middle legs, after which the rear legs themselves can be held in position and lashed.

Another key to constructing the gateway is marking the positions on each leg, measuring up from the butt ends, where the connector spars will be lashed. The intent is to assure they’re evenly-spaced, parallel to one another and perpendicular to the legs.
After the center spars are lashed to the right and left middle legs, and when all the rings and halyards for the flags and banner are tied in the proper positions, the structure is hoisted from the back using the four guylines attached to the outside legs of both prisms (with rolling hitches or roundturns with two half hitches), and three hauling ropes attached to the top center spar with draw hitches. Refer to:“Hoisting the Tower”

The final step before securing the guylines to 1-1 anchors with rope tackles is to rotate each prism so that the front and back legs (outside) of each are positioned out at an equal distance from the middle legs.

Because they impressed the staff and participants at the previous year’s event, the Scouter heading up the program for the following Council-wide Scout Expo invited the Order of the Arrow to set up several pioneering-related exhibits. Naturally, on the list was a request for a monkey bridge, but additionally the pioneering team was asked to come up with some team building stations and a Scout skills challenge.
For team building they provided the materials and supervision for “Crossing the Alligator Pit,” and also erected an Atomic Pile. For Scout skills they set up a simple Rope-Toss-Log-Lift challenge.
As a bonus they put up a Swing Boat which served as a test run for their annual conclave which was less than a month away.
Each of these four lashings can be used to join two spars together to make an extension. With each there are no frapping turns. The manner in which these lashings need to be applied results in the spars being in a position where they are already tightly touching. Taking frapping turns between the parallel spars would only weaken the connection.
The objective is to combine the spars together to make a longer length that is as rigid as possible. So, connecting two spars in this fashion definitely requires a good overlap between them. Obviously, it also requires two lashings, each tied tightly well near the ends of each spar where they overlap.

Round Lashing. The first and most commonly used lashing for extending the length of a spar can be referred to as the traditional round lashing. The usual way this lashing is tied is with a clove hitch around both spars followed by eight to ten tight wraps that are flush together, and then ending with another clove hitch around both spars.
In his book Pioneering Principles, John Thurman refers to this round lashing as a “Sheer Lashing Mark II” (sheer spelled with two e’s). Same lashing and it’s interesting that he’s fond of starting the lashing with a timber hitch around both spars for added rigidity, and then finishing with a clove hitch after taking at least eight tight turns. When the poles are smooth, the traditional round lashing can be made more secure by adding additional half hitches to the clove hitches.
VIEW VIDEO: West Country Round Lashing
West Country Round Lashing. As Adolph Peschke says, this method of joining two spars with a series of tight half knots and ending with a square knot is very strong and effective. When extending the length of two heavier spars or when constructing a very long pole, the West Country Shear Lashing is an excellent choice. Follow this link to Lashing INFORMATION and scroll down for further information and a West Country Shear Lashing diagram.
Note: This lashing should rightfully be called a West Country Round Lashing, in that (like all round lashings) it has no frapping turns and is used to form a rigid connection between two parallel poles. By contrast, shear lashings are used to form a flexible joint needed when constructing shear legs.
Strop Lashing. When a quick job is desired with light spars, a simple strop lashing will often suffice. Find the middle of the length of binder twine or lashing rope and tightly wrap both ends simultaneously in opposite directions around the poles finishing with a square knot. Follow this link to Lashing INFORMATION and scroll all the way to the bottom for further information.

Half Hitch Round Lashing. A fourth form of round lashing is made by tying a series of interlocking half hitches around both spars. Like the West Country “Round” Lashing, which tightens and secures each of the wraps with a half knot while working both ends of the rope simultaneously, this method accomplishes the same thing by applying a tight half hitch to each wrap. The final lashing features what resembles a two-strand French Braid twisted diagonally around both spars!

This is the seventh post in a series that will eventually comprise an activity-based, unit pioneering program curriculum.
SUPPORTING VIDEOS: How to Tie a Butterfly Knot / How to Tie a Rope Tackle
VII. The rope tackle is a major player when there’s a need to add guylines to stabilize a pioneering structure, or to increase the torque on a monkey bridge’s hand and foot ropes. Whenever there’s a need for tightening and securing a load-bearing line, this combination of knot-tying prowess and basic engineering principles is both practical and effective. Applying a rope tackle will be called for on numerous occasions and has been found to have a wide range of uses.

OBJECTIVES
MATERIALS
PROCEDURE A

With their fixed loop in place, each Scout passes their cord’s running end through the weight, then through the fixed loop forming a rope tackle.
PROCEDURE B

This is the eighth post in a series that will eventually comprise an activity-based, unit pioneering program curriculum.
VIII. For a wide range of pioneering structures, proper anchoring is crucial for both stability and safety. When nature doesn’t furnish natural anchors as in trees or boulders in just the right location, it becomes necessary to build your own. Of the two most prevalent approaches to building a very strong anchor, the 3-2-1 Anchor is the most simple. Also, depending on the amount of strain the lines must withstand, this form of anchoring can be constructed in a variety of configurations.
MATERIALS
PROCEDURE A
With the supervision of the instructor:

Scouts take turns driving three pioneering stakes 18 inches into the ground in a row at a 20° angle using a large wooden mallet.
PROCEDURE B
PROCEDURE C

Why troop meeting pioneering activities? Because a race or challenge revolving around pioneering skills is involving and fun, and requires cooperation and teamwork. Choosing a successful activity is a sure-fire proposition—there are a host of pioneering-related Scout meeting challenges that are tried and true and ready to do. Just make sure the Scouts are ready to put the skills into action before implementing the activity.
What are pioneering skills? They’re definitely more than just knowing the ropes.
What makes it fun? One thing about pioneering—it’s primarily a twofold process. First something’s built, then something’s used (enjoyed). So, when pioneering skills are a central focus of the interpatrol event, the element of fun ultimately enters the picture as the challenge’s culmination! For example, Everyone on the Tripod is a wonderful interpatrol competition. If the challenge was for each patrol merely to race and build a tripod, the activity would be a dud. It’s that final act where everyone gets to climb on board resulting in the inevitable smiling and cheers of success that make it fun! Simple concept, right? By the same token, the real fun is not building an H-Frame Trestle to make a chariot, it’s racing it; it’s not joining Scout Staves together to make a long fishing pole, it’s catching the rat trap; it’s not constructing a Scout Stave Launcher, it’s seeing how far and accurately it can launch projectiles.
Link to: Pioneering and Team Building
CLICK ON PHOTOS FOR LARGER IMAGE
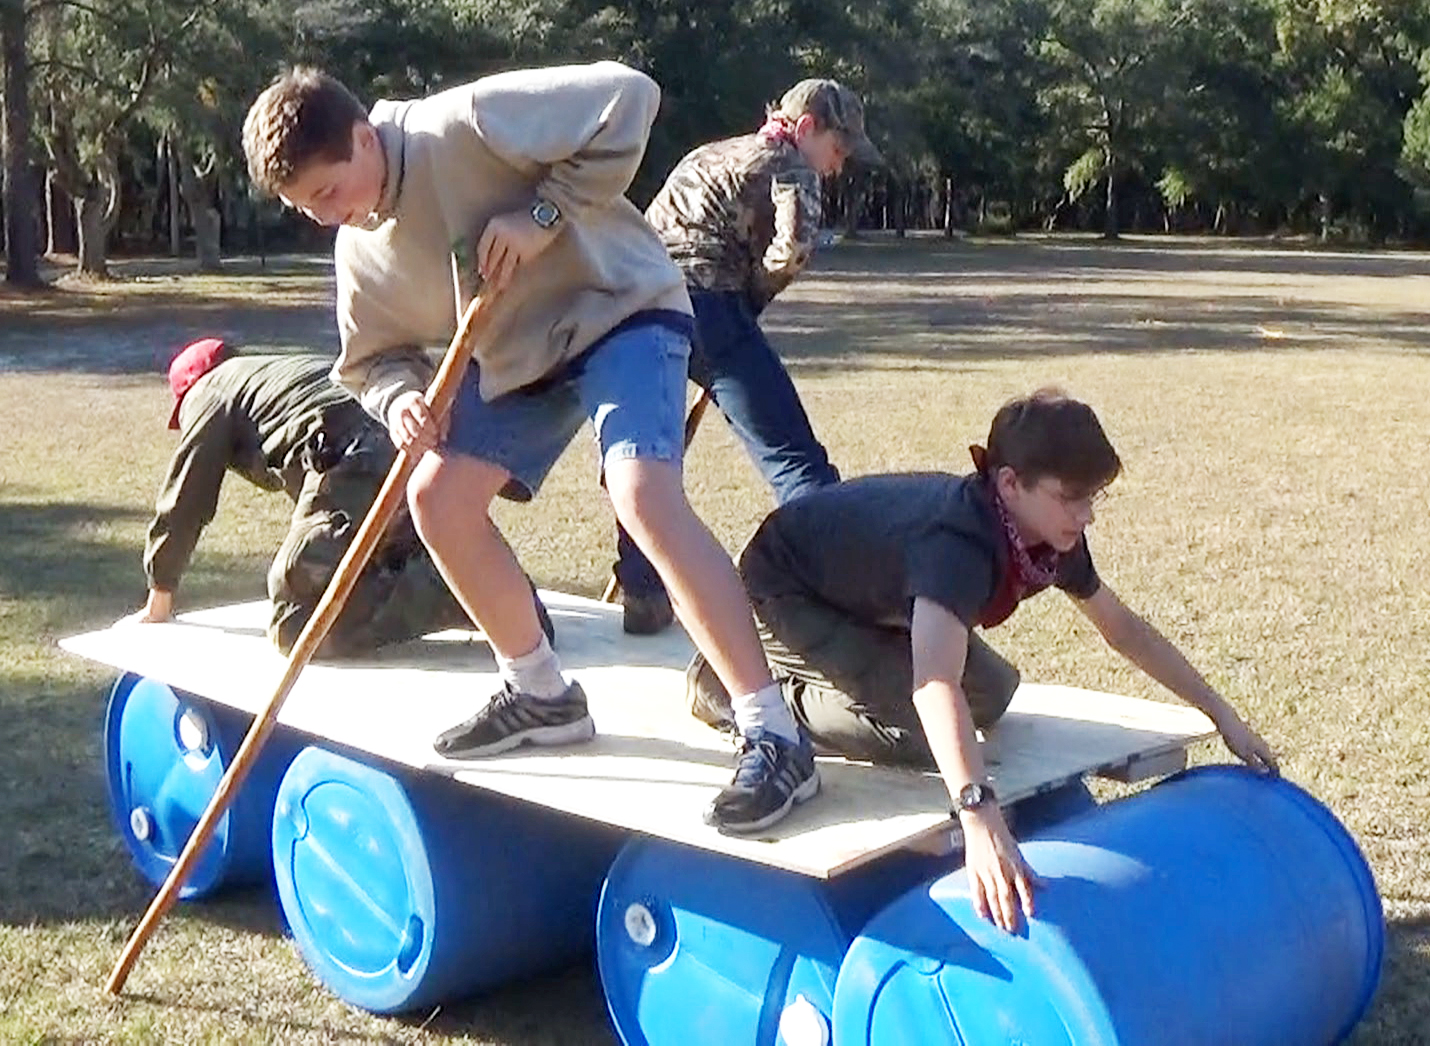
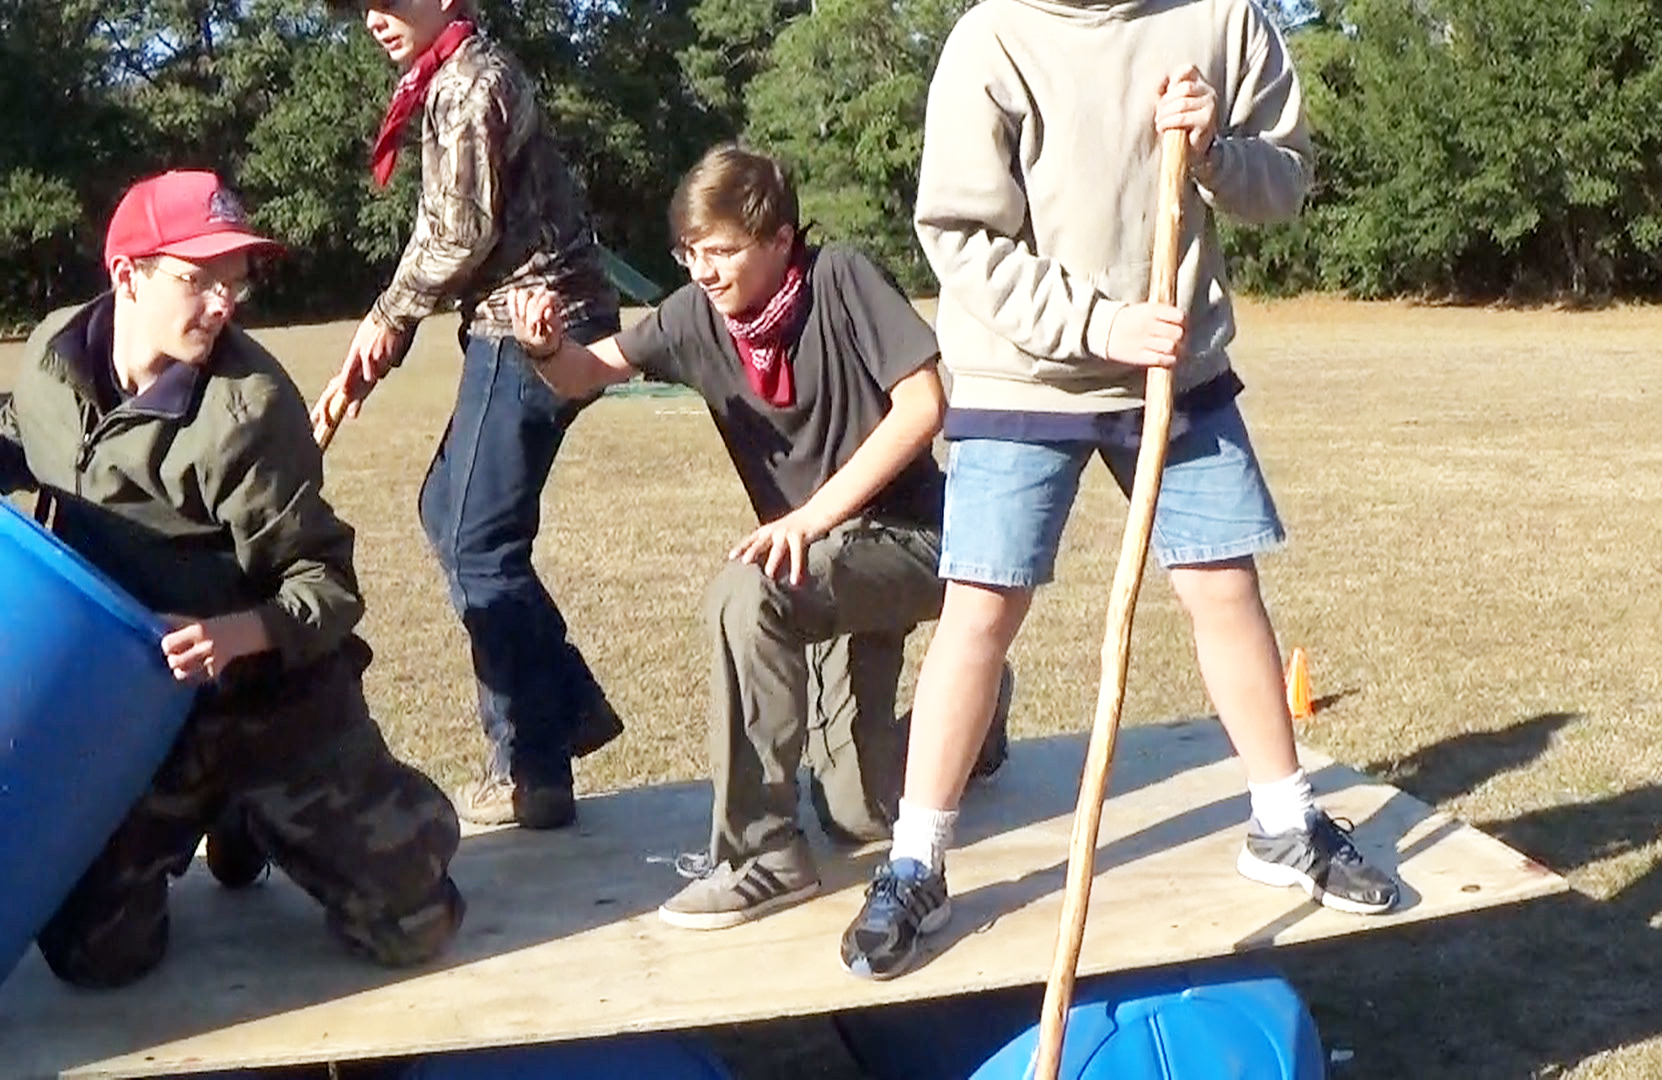


Team Building Opportunity. The challenge referred to as Crossing the Alligator Pit is an activity that requires 100% cooperation and teamwork. The Scout on the A-Frame “walker” is totally reliant on his fellow Scouts to keep him aloft and facilitate his forward progress. The whole time that he’s bringing into play his balance along with his leg, shoulder and arm muscles, it’s the members of his patrol that not only greatly increase the effect of his movements, but also keep him from spilling over.
Crossing the Alligator Pit can initially be tackled using what we can term “group leadership,” where several members of the patrol all contribute their opinions on how to best get the “walker” moving and not falling over. As the successful crew experiences the necessity of coordinating the handling of the guylines with the movements of the Scout on the “walker,” invariably one Scout will need to assume the role of calling the shots and keeping everyone on their toes.

Scout Spirit! This was best exampled during a District Camporee devoted to Junior Leader Training. Scouts from Troop 822 out of Mount Vernon, SC poured themselves into the activity and not only mastered the challenge, but provided spectators with some fun and excitement as well. They approached the task of building their A-Frame with enthusiasm. Finishing in good form, they wasted no time in standing up the structure and holding it in position with their guylines. As soon as their rider climbed on board, it became obvious: it was the top two lines that required the most unfaltering attention to keep the A-Frame vertical. The Scout on the A-Frame was exuberant as he discovered how to swing the walker forward one leg at a time. The patrol then totally got the hang of how to use the bottom guylines to add that real oomph to the “walker” propelling it forward. As they smoothly traversed the fifteen feet of the “alligator pit,” their leader reminded us of a coxswain, rhythmically yelling out, “Pull!” to the crew manning the oars in a boat race. “One, two, THREE!…one two, THREE!…one two, THREE!” On each “THREE!” the rider swung one leg of the “walker” forward, as the Scout manning that leg’s forward guyline simultaneously heaved on his rope, while the others remained alert to help guide and steady the A-Frame. Their “walker” actually walked in rhythm and it was quite a spectacle!

They kept on going! Crossing the Alligator Pit is more challenging than the majority of other interpatrol competitions, demanding a full measure of concentration and cooperation. With a well-lashed A-Frame and a rider who gets the knack of balancing his weight and swinging the legs of the “walker,” a patrol that can keep their structure upright will eventually be able to successfully cover the fifteen foot distance. Fifteen feet is fifteen feet and decently doable, especially on flat terrain. A hundred and fifty feet up a hill is a horse of a different color, and that’s what this patrol from Troop 822 challenged themselves to do. They kept going across the field up a hill towards the dining hall, and they didn’t stop until they reached the top! When they finally stopped, it was already getting dark outside. Their persistence, and teamwork was nothing short of amazing! These Scouts went far, and it makes sense that with all their determination, they’ll continue to go far in whatever direction they set out for themselves.