Scout Swing

12' Scout Swing Seeing Action at a Public Scout Expo
12′ Scout Swing Seeing Action at a Public Scout Expo

The design for this swing is not complicated, though it does present some logistical challenges. The main thing is, a working swing is going to get lots of play. Therefore, lashings need to be super tight, and the eight sturdy pioneering stakes that serve as anchors need to be driven solidly into the ground, perpendicular to and touching the six spars connecting the legs.

List of Materials

  • six 3-1/2-inch x 12-foot spars for the legs
  • one 4-inch x 12-foot spar for the crossbar
  • six 3-inch x 6-foot connecting spars
  • eight 3-foot pioneering stakes
  • two 2-inch x 8-inch x 2-foot prepared swing seats
  • four 20-foot x 1/2-inch swing ropes
  • four steel rings
  • four 6-foot x 5/8-inch ropes for Prusiks
  • twenty 15-foot x 1/4-inch manila lashing ropes
  • six 20-foot x 1/4-inch manila lashing ropes
  • two single pulleys reeved with 20 feet of rope, with a small loop of rope tied to the top
  • one eight-foot ladder

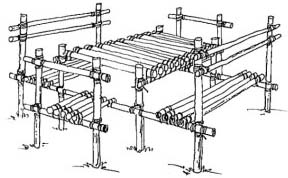
Though one might think this structure is built by making two simple tripods to support the crossbar, it’s MUCH better to make two A-frames, standing up vertically, supported by a third spar lashed to one leg of each A-frame, slanting down to the ground. The obvious reason is to give the crossbar maximum stability where it rests at the juncture of the two legs of each vertical A-frame.

Prepared Swing Seats

Rig the swing seats. Attach two 20 foot swing ropes to the two swing seats, using a scaffold hitch rigged with a bowline. In order to accommodate the swing rope with the scaffold hitch, the swing seats should be prepared with impressions cut on each side, 2 inches long and 1/2 inch deep, beginning 1-1/2 inches from each end.

Link to: Larger View
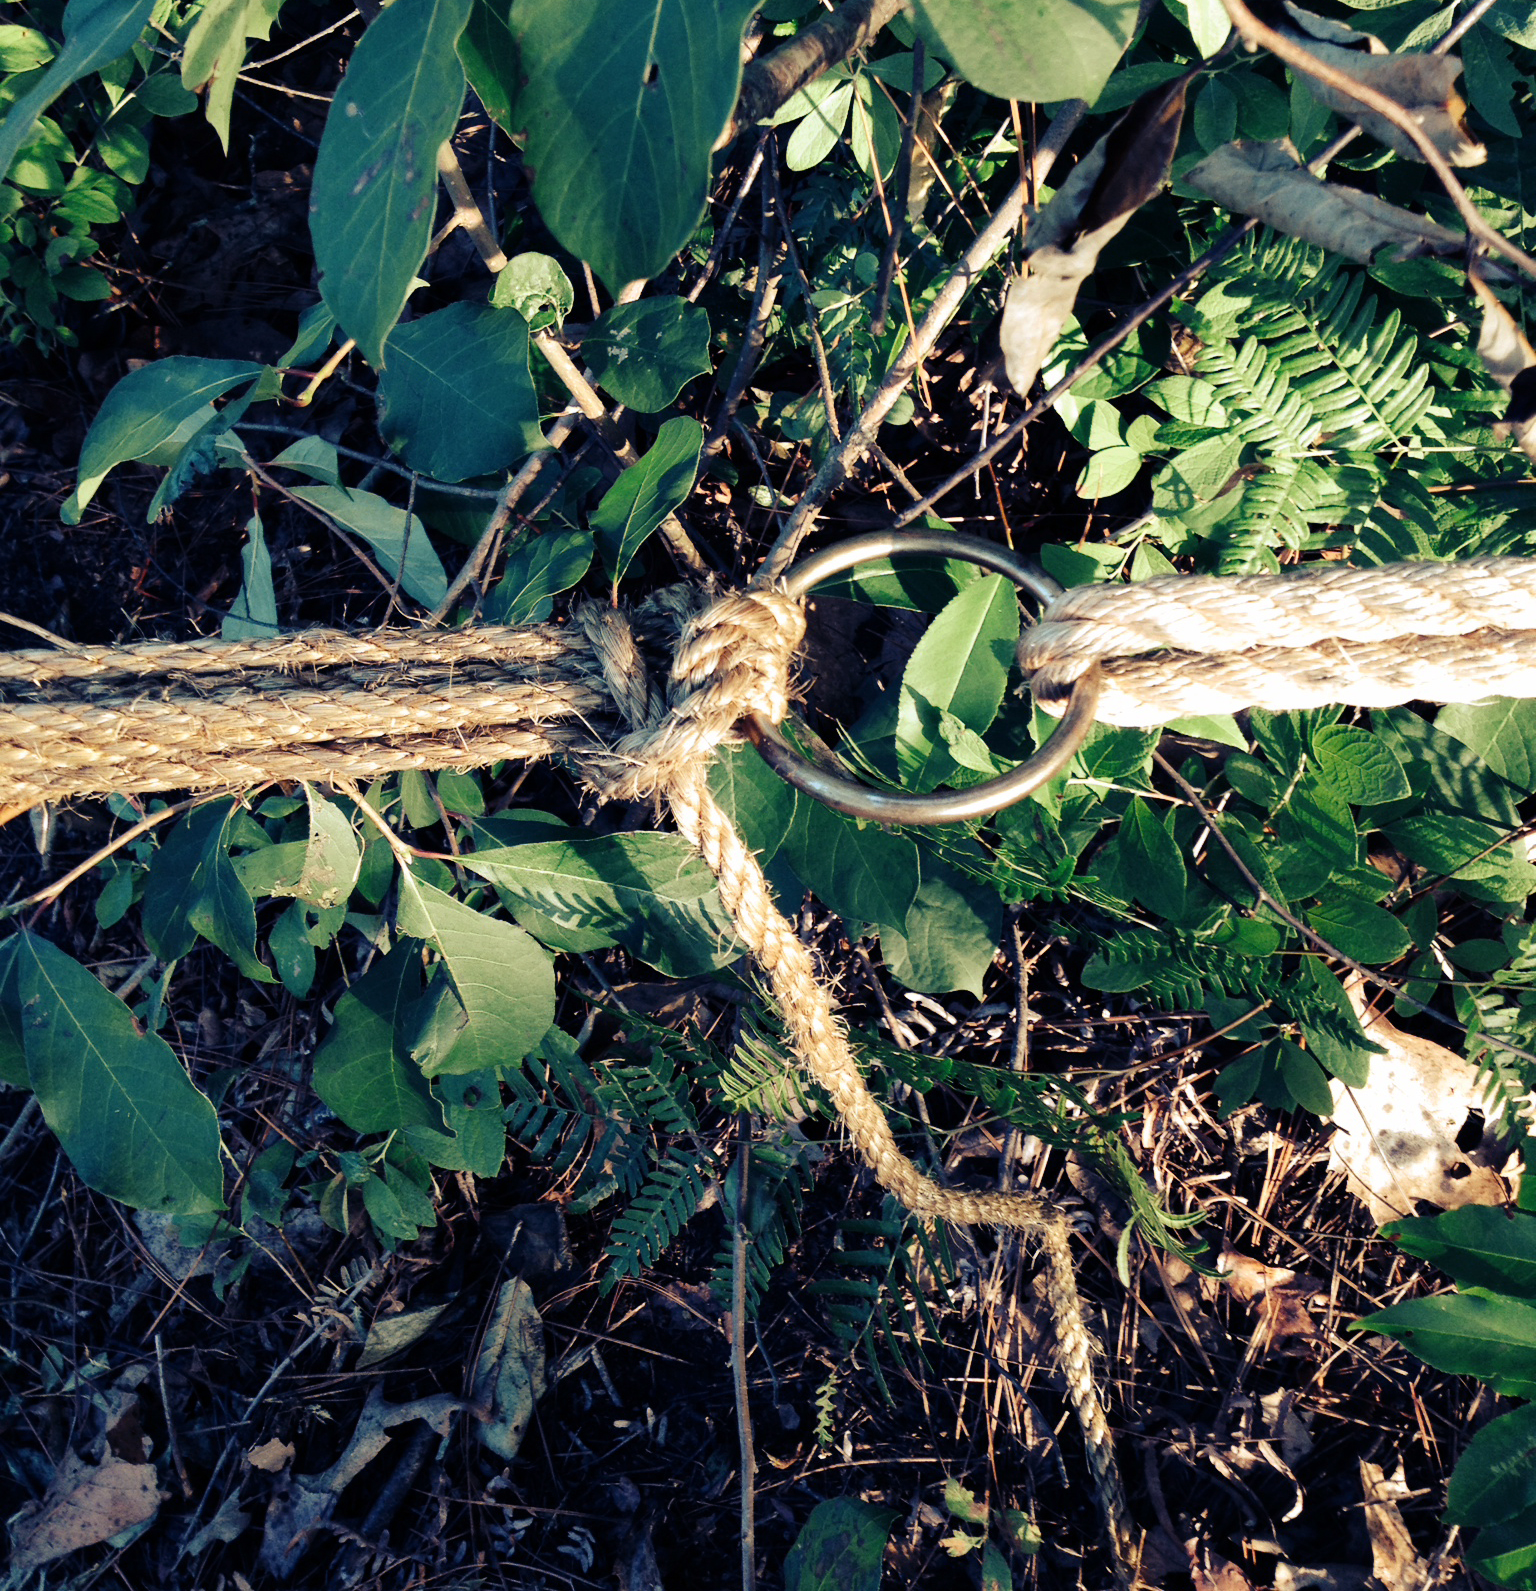
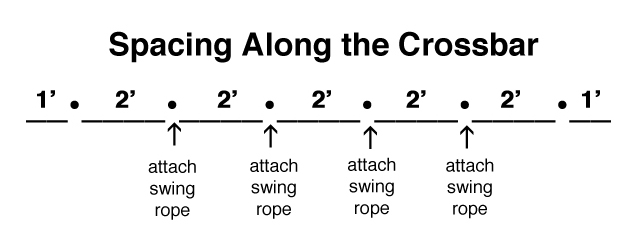
Attach the rings to the crossbar. Using the 6-foot ropes, tie the steel rings to the crossbar with prusiks at intervals as per the measurements reflected in the diagram.

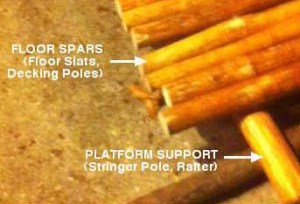
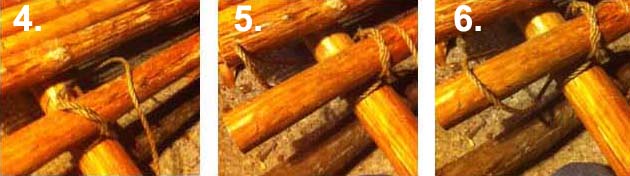
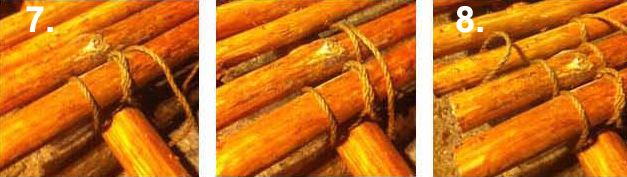
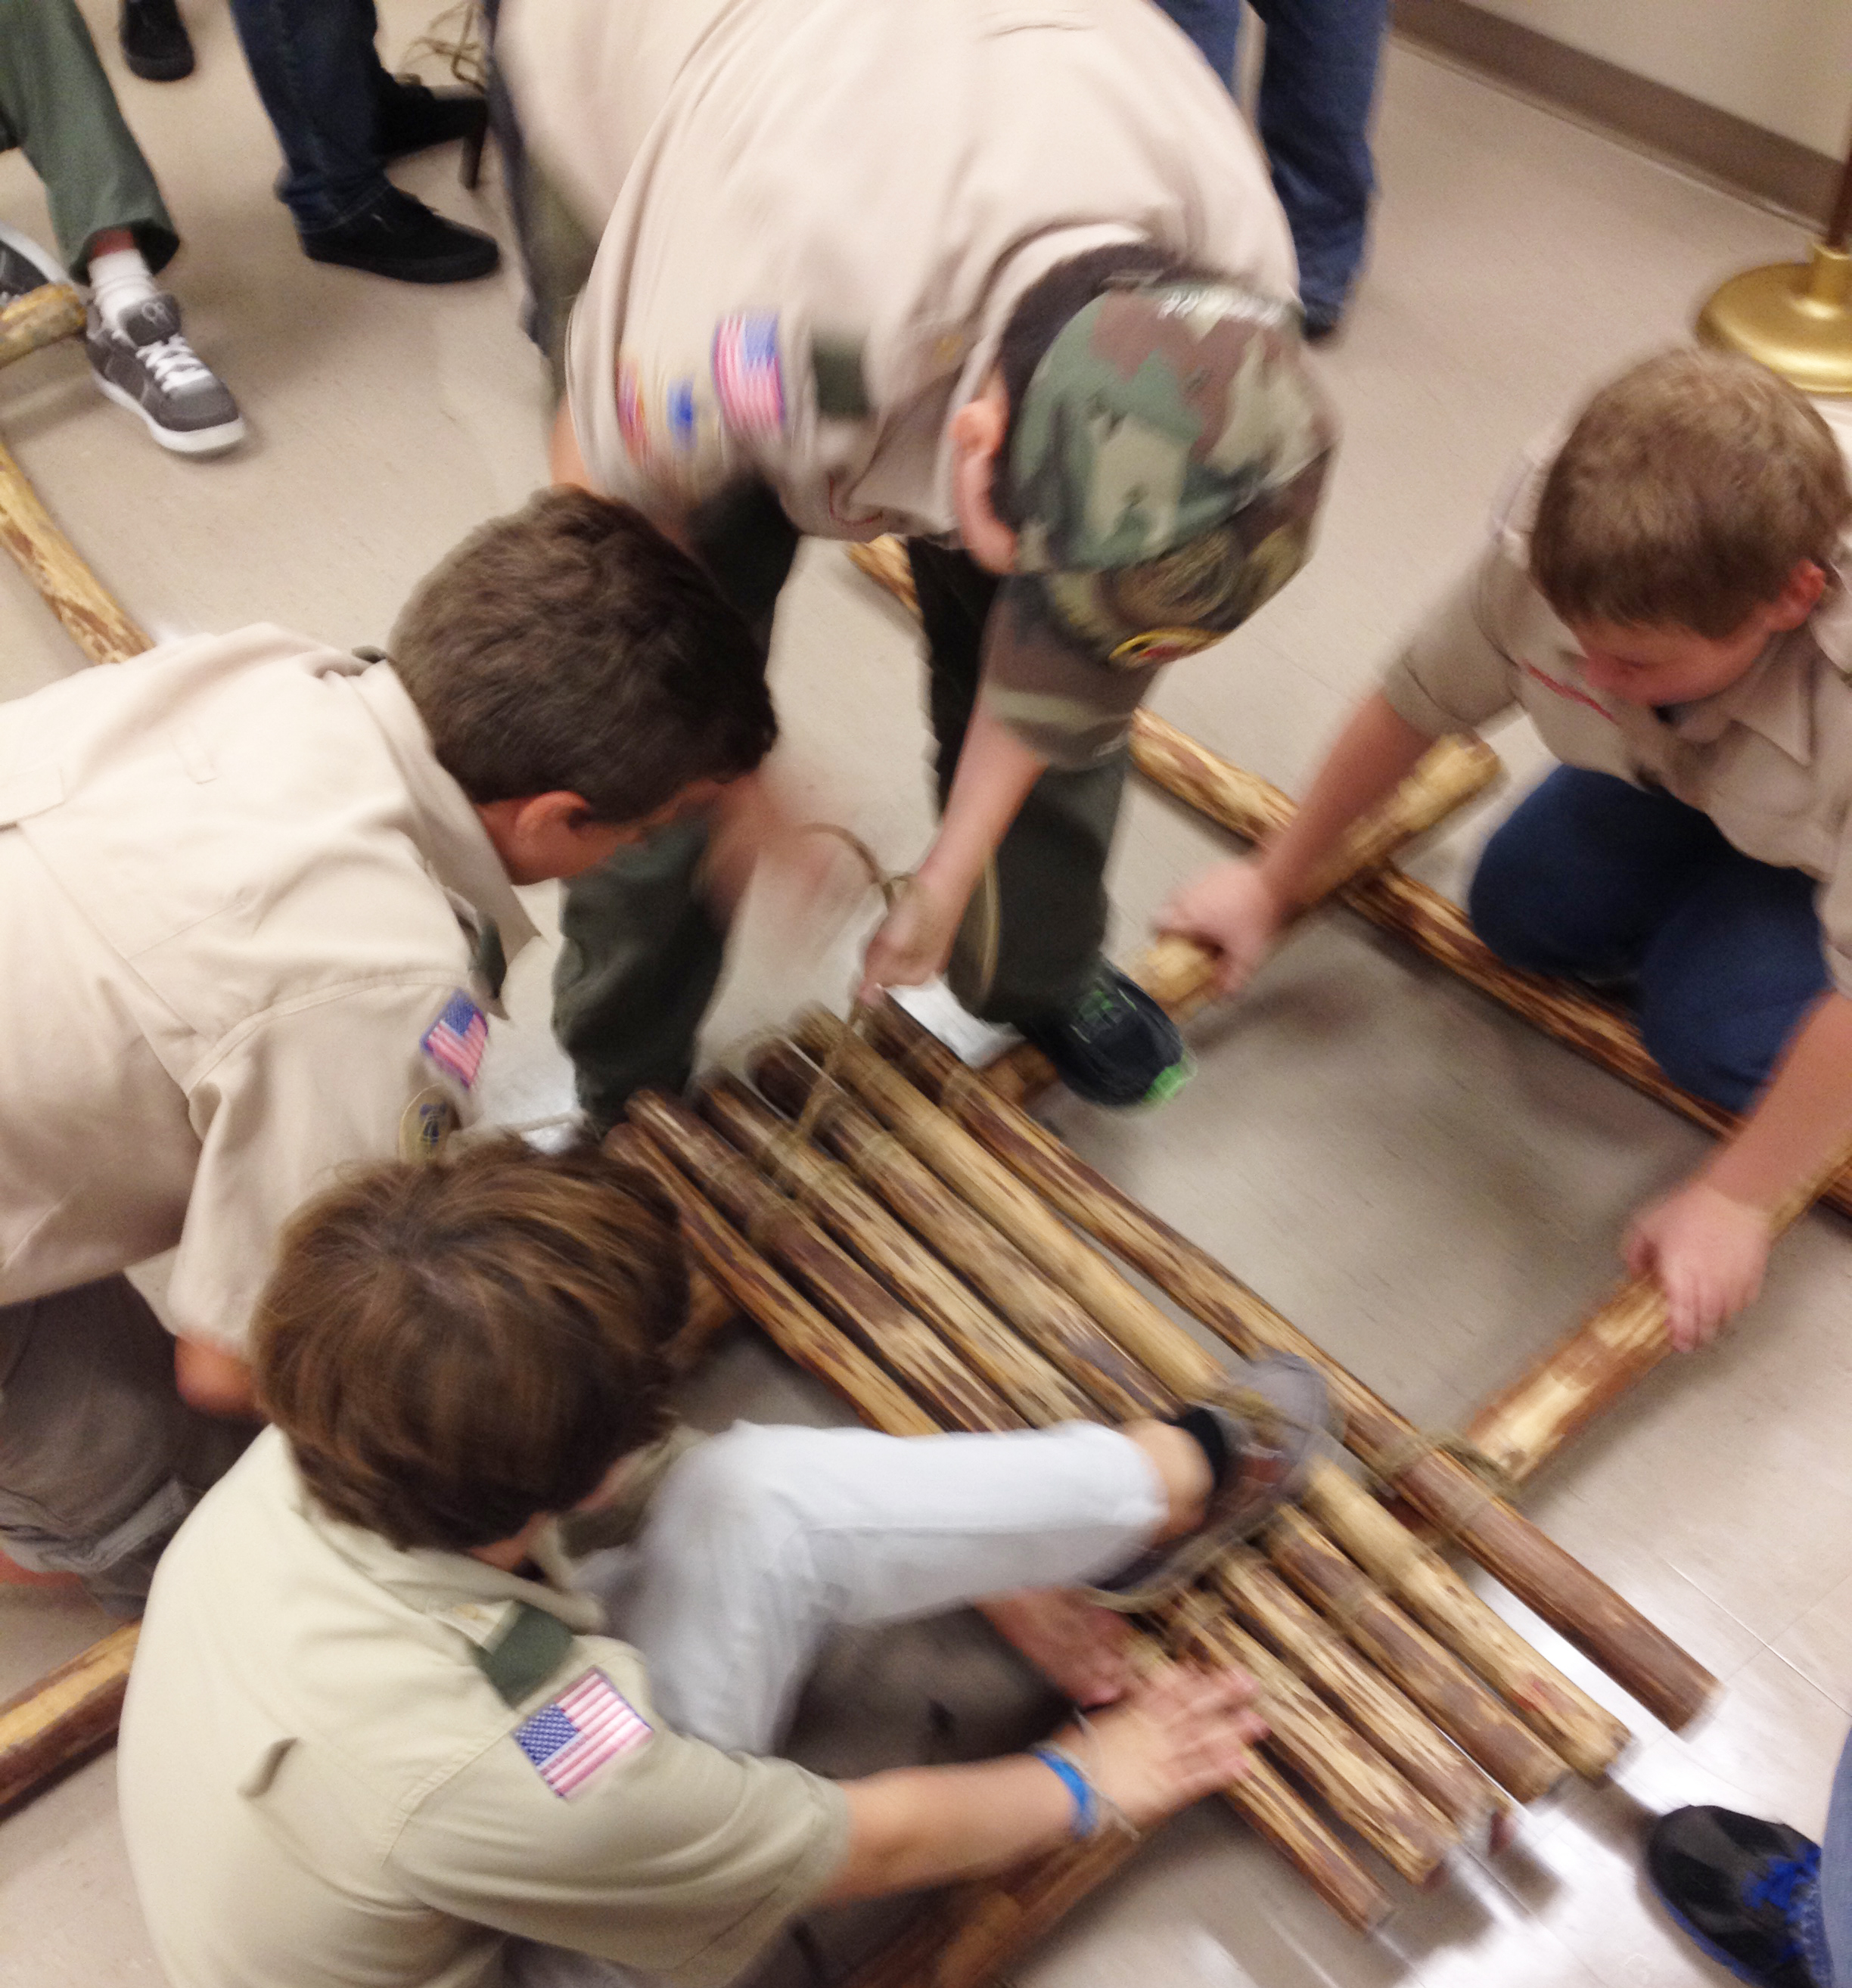
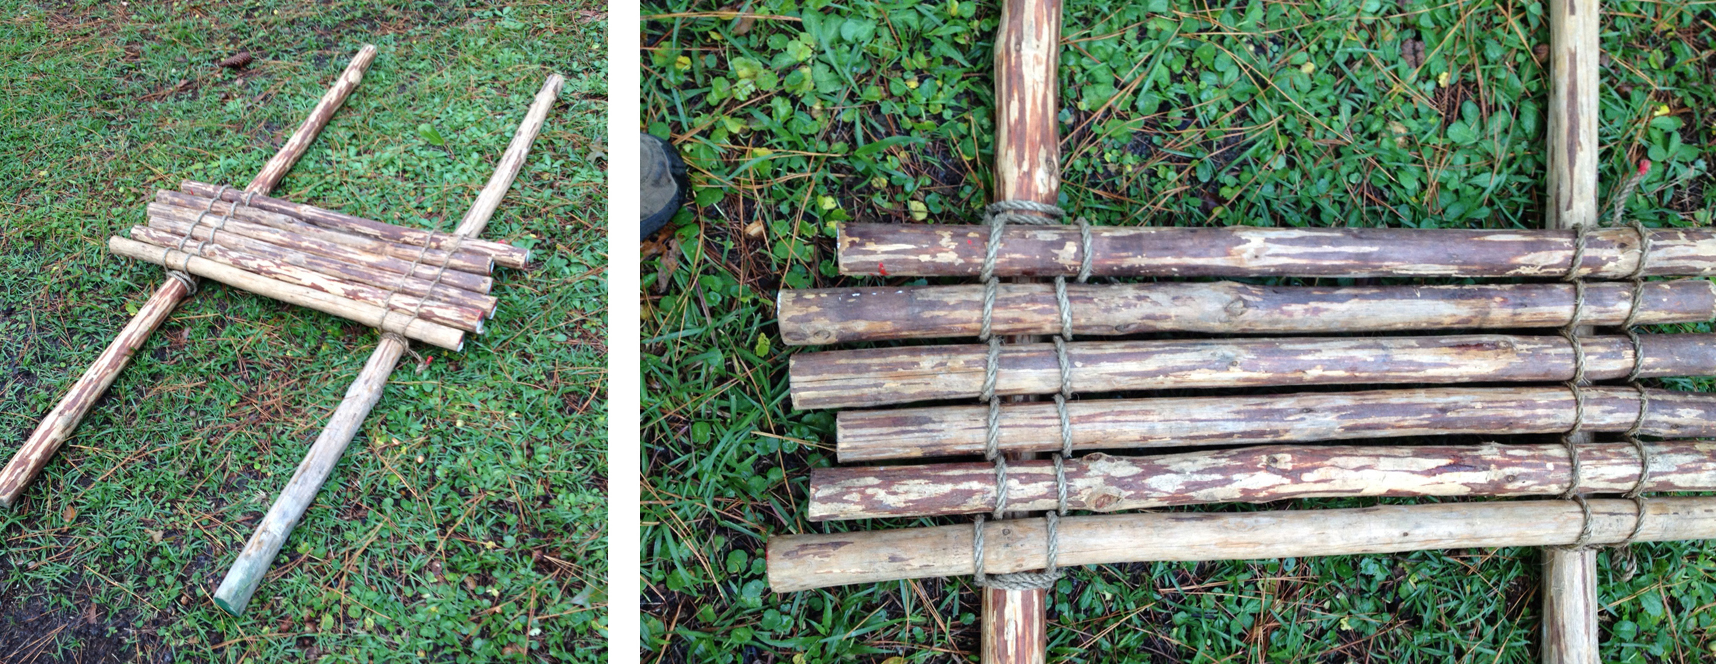
Prepare the A-Frames. Using two 12-foot spars and one 6-foot spar, with tight square lashings, lash together two identical A-frames making sure the tips of the legs cross the same distance from the top for each. Use a 20-foot rope where the tips of the legs intersect, and 15-foot ropes at the bottom. NOTE: Make sure the 6-foot connecting spars are lashed low enough to the bottom so later on there will be plenty of room to lash them to the pioneering stakes.

Add the oblique supporting legs. About a foot or so below the top lashing on the A-frames, lash on a third 12-foot spar to one leg of each A-frame, using 20-foot ropes. These spars will be angled down, extending out to support the A-frames in their vertical positions.

Connect the legs. Stand up the A-frames so they’re in a vertical position. Connect the 12-foot oblique supporting leg to the legs of each A-frame, using the remaining 6-foot spars and eight 15-foot ropes. Again, make sure they’re lashed low enough to the ground so later on there will be plenty of room to lash them to the pioneering stakes. (If you’ll be using the pulleys to lift up the 12-foot crossbar, loop one over the top of a leg, before standing up the A-frames.)

Position the two 3-legged subassemblies. Line up both support assemblies so they are facing one another on even ground and with the A-frames 10 feet apart.

Position the crossbar. Tie one end of each pulley rope to the ends of the crossbar, and have two Scouts carefully hoist the crossbar up to near the tops of the A-frames. They must carefully hold it in place. Position the ladder so that it’s even with one A-frame, and have a strong Scout climb about four to five feet up and lift the end into the crux of one A-frame. Repeat the process on the other side of the swing.

Lash on the crossbar. Making sure the rings are properly hanging down, and the crossbar is extending out approximately one foot from each side, one Scout will climb up and tightly lash the crossbar to one of the legs of each A-frame with a 20-foot rope.

Tie on the swings. One Scout will climb up and connect the swing ropes to the rings using a roundturn with two half hitches, making sure the swings hang evenly at the desired height.

Drive in and lash on the anchors. Four pioneering stakes are driven into the ground on each side—two spaced evenly and touching the bottom of each A-frame, and one against each connecting spar, hammered in near the oblique supporting leg. After these stakes are solidly in the ground, so they cannot jiggle, lash them to the connecting spars using 15-foot ropes.

Test the swing and make any adjustments as necessary.

Lashing Ropes and Spars

Addressing the basic and ongoing quandaries, HERE’S A VIDEO:

Some Questions and Answers LASHING RopeS:

  • What kind of rope should we use? For most projects, 1/4-inch manila. Refer to: Rope for Pionering and Camp Use
  • What length(s) should we cut the rope into? Depending on the diameter of the spars and what you’re building, 15 feet is the most common, 20 feet is often called for. For camp gadgets and many Scout meeting challenges, 6-1/2 and 10-foot lengths are good for working with Scout Staves.
  • Where can I get manila rope? 1/4-inch is commonly available at Lowes and Home Depot, but Get Pure Manila Rope and Don’t Be Fooled! For larger quantities, procure a box containing 1,200 feet from a reputable rope supplier.
  • Can I just tape the ends? Sure, but that’s not going to last long. Learn to tie a Sailmaker’s or West Country Whipping to assure the ends don’t unravel during use. Refer to: Whipping

Some Questions about Spars:

  • What kind of trees make good spars? Whatever’s growing in your area that will yield a straight spar with a minimum of taper will work. Pine is widely used because it grows so straight and when stripped of its bark and dried out, it makes spars that are not too heavy and suitable for “Scout-size” projects. Hardwoods can also be used and because of their strength, slightly smaller diameters can be selected to save on the weight. Refer to: Pioneering Kit
  • Where do we get them? In most parts of the country, there are large, forested areas where with the proper permission and clearance we can harvest the spars we need. Most natural and planted stands require thinning at certain stages of their development in order to sustain good tree growth throughout the life of the stand. Thinning is beneficial to the overall health of a stand of trees.* Refer to: Stumbling Block 3
  • What lengths and how thick? Depends on what you’re building. Most projects, that already have been happily built, come with a list of materials which detail the size of the spars you’ll need. 6, 8, 10, and 12-foot lengths are the most commonly used for “Scout-size” projects. Diameters vary from 2 to 4 inches at the butt end. Start with what you need to complete the project(s) at hand.

Forest Stewardship

Scouting is Both!

Laced throughout the Scouting adventure is the building of good character, training in the responsibilities of participating citizenship, and the development of leadership and personal fitness. Contributing to these positive outcomes are numerous experiences that are uniquely fun yielding a host of treasured memories that last a lifetime.

Scouting features a wide array of challenges, activities, and avenues of discovery. In such a multifaceted program there are opportunities to learn about subjects as diverse as on one hand: rocketry and robotics and on the other hand: wilderness survival and pioneering. Scouting is both the new and the old, the modern and the traditional, the innovative and the timeless!

Link to: Larger Image


Link to: Larger Image


Link to: Larger Image

Scouting is Both Star Trek Analogy
A Resurgence of Traditional Outdoor Skills
Scouting’s Traditional Outdoor Skills

Traditional Diagonal Lashing

VIEW VIDEO: How to Tie a Traditional Diagonal Lashing

Traditional Diagonal Lashing

When putting crossed braces on a structure to keep it from racking (as used when making a trestle), the most important lashing is the diagonal lashing, which gets its name from the fact that the wrapping turns cross the poles diagonally.

A diagonal lashing is used when there is a need to close a gap between two poles where they cross each other but do not touch.

The traditional diagonal lashing is tied as follows:

  1. Cinch the poles together by tying a timber hitch around them where they cross.
  2. Make three to four wrapping turns on the opposite diagonal to the timber hitch. Keep the wraps parallel to one another and pull them tight.
  3. Make three more tight wraps across the first three, again keeping them parallel.
  4. Take two to three frapping turns between the poles, tightly around both sets of wraps and complete the lashing with a clove hitch around one of the poles.

Four Basic Steps to Tying a Traditional Diagonal Lashing

Filipino Diagonal Lashing

The Den Chief

I know I’m a hopeless romantic, and I’m aware that I shouldn’t let what I think and feel be the empirical measure for the thoughts and feelings of others. But, I love to share, and the memories of my Den Chief, and much of Scouting, are embodied in Norman Rockwell’s paintings.

When I was a Cub Scout, I had fun. I did fun things with my den, I could earn badges and receive recognition, and I loved the uniform which made me feel important and gave me a sense of belonging. In and through my Cub Scout career, there was a sense that I was steadily approaching something wonderful. It was up ahead, and it promised new experiences…real life adventures! The glimpses I had in Boys Life Magazine, and actually seeing an older person in his green uniform, like my Den Chief, portended new heights of discovery—experiences about which I could only vaguely begin to imagine. I knew there would be unparalleled thrills and excitement, albeit from my vantage point, they were all shrouded in an aura of mystery and intrigue. What was gradually welling up in me was the realization—someday I would actually become a Boy Scout!

"The Den Chief"—My Idol!
“The Den Chief”—My Idol!

Cub Scouts and Boy Scouts—here’s the major difference: In Cub Scouts boys might use sticks and string to make a little model of a bridge, and in Boy Scouts, young men can learn how to use rope and spars and build a real one.

Pioneering and Team Building

They knew how to work together!


A Scoutmaster had the pleasure of witnessing one of the patrols in his troop out-perform 30 others at a council camporee. What’s significant was they were competing in an activity they had never tried before. Why were they so successful? Simple. They knew how to work well together. The interpatrol challenges at their troop meetings back home provided repeated opportunities to hone their teamwork skills—each was a team building challenge. Many required pioneering skills and were preparatory to building various pioneering structures, and the process gave rise to knowing how to pitch in and get the job done.

Pioneering requires good, cooperative teamwork. Without it, the project just won’t get built. As necessary as it is to have the required skill sets under their belts, the crew tackling the construction of any larger pioneering structure will also need to put into action all the qualities embodied in the execution of solid teamwork.

Scout patrols are teams. In order to get things done, especially on an outing, they must communicate, cooperate, and pull together. A good team building event furnishes each patrol member with a way to contribute to the successful accomplishment of the task at hand. Besides being challenging and fun, effective Team Building Activities afford a patrol the opportunity to pool their resources and share leadership. Of course, amongst the team members, there’s always plenty of provision for providing helpful support, along with a good show of Scout spirit.

Pioneering and Interpatrol Activities

Lashing Skill Activities

Team Building Activities

Campcraft Activities, Patrol Challenges, and Troopwide Games

Scout Meeting Activities

Related to Scout Pioneering are a variety of campcraft challenges that can be incorporated into the troop meeting agenda. A relevant upside is, these activities require putting skills into action that were gained during instructional sessions. Appropriately, these skills come into play in a way that is challenging and fun.

Link to: Flagpole Race
A Fun Interpatrol Activity: Nothing Succeeds like Success!

Of course, campcraft encompasses more than just Pioneering, though Pioneering is often central to the rewarding experience inherent in Scouting’s outdoor program. The campcraft challenges in this post also include activities related to general knotting, woods tools, fire building, navigation, and some first aid Scout skills too.

Healthy competition between patrols can have a positive outcome when handled in the right spirit. Naturally, when patrol makeup is homogenous, there’s more of a level playing field. But, when patrols are organized by age, to compensate for the difference in skill levels, certain handicaps might be introduced. In this instance or when individual patrol attendance is disproportionate, dividing the troop into equal crews is also always a practical approach.

Scoring and points are arbitrary—no hard, fast rule. Keeping track of patrol points for these activities (and awarding points for various other criteria) can be adopted and contribute towards patrol spirit. But, the presentation of the activities themselves carry their own rewards translating into involvement, enthusiasm, and fun.


The USEFUL Scout Stave

A Bundle of Scout Staves

For those interested in starting a pioneering program in their unit, it’s often suggested that one of the first things to procure is a supply of Scout Staves. The BSA Supply Division’s Scout Hiking Staff is still the best deal on the market for Scout Staves. You can order them through your local Scout shop.

  1. They’re very practical for teaching lashings.
  2. They can be used for a variety of involving and fun interpatrol competitions and Scout meeting challenges
  3. They’re exceedingly useful on outings

A SCOUT STAFF, by Robert Baden-Powell:

“The Scout staff is a useful addition to the kit of the Scout. Personally, I have found it an invaluable assistant when traversing mountains or boulder-strewn country and especially in night work in forest or bush. Also, by carving upon it various signs representing his achievements, the staff gradually becomes a record as well as a treasured companion to the Scout.

“The Scout staff is a strong stick about as high as your nose, marked in feet and inches for measuring. The staff is useful for all sorts of things, such as making a stretcher, keeping back a crowd, jumping over a ditch, testing the depth of a river, keeping in touch with the rest of your Patrol in the dark. You can help another Scout over a high wall if you hold your staff horizontally between your hands and make a step for him; he can then give you a hand from above. Several staves can be used for building a light bridge, a hut or a flag staff. There are many other uses for the staff. In fact, you will soon find that if you don’t have your staff with you, you will always be wanting it. If you get the chance, cut your own staff. But remember to get permission first.”

1. Flagpole / 2. Camp Gadget: Dish Washing Rack / 3. Uprights for Improvised Shelter / 4. Lashing Instruction / 5. Uprights for Dining Fly / Interpatrol Competition: Flag Raising Race / 7. Camp Gadget: Shear Legs for Clothes Dryer / 8. Interpatrol Competition: Catch the Snapper / 9. Interpatrol Competition: New Market Ballistas / 10. Walking Stick / 11. Camp Gadget: Simple Table / 12. Camp Gadget: Clothes Drying Rack / 13. Camp Gadget: Tool Rack / 14. Round Lashing Activity / 15. Interpatrol Competition: Free-Standing Flagpole / 16. Interpatrol Competition: (Catch the Snapper)
1. Flagpole / 2. Camp Gadget: Dish Washing Rack / 3. Uprights for Improvised Shelter / 4. Lashing Instruction / 5. Uprights for Dining Fly / Patrol Challenge: Flagpole Race / 7. Camp Gadget: Shear Legs for Clothes Dryer / 8. Patrol Challenge: Catch the Snapper / 9. Patrol Challenge: Scout Stave Launcher / 10. Walking Stick / 11. Camp Gadget: Simple Table / 12. Camp Gadget: Clothes Drying Rack / 13. Camp Gadget: Tool Rack / 14. Round Lashing Activity / 15. Patrol Challenge: Free-Standing Flagpole / 16. Patrol Challenge: (Catch the Snapper)

Some Camp Gadgets made with Scout Staves.

Scroll Down to Comments for an Illustrative, Scout Stave Graphic

Pioneering Program Curriculum X: Double Floor Lashing

This is the tenth post in a series that will eventually comprise an activity-based, unit pioneering program curriculum.

SUPPORTING VIDEO: How to Tie a Double Floor Lashing

Double Floor Lashing

Floor Spars and Platform Supports

X. This lashing is useful when building any kind of raised surface for a: platform, deck, raft, table, bench, chair, or Chippewa kitchen.

OBJECTIVE
  • Each Scout will tie a complete floor lashing, attaching floor spars to a platform support.

MATERIALS (for every two Scouts)

  • six 3-foot x 2-inch floor spars
  • two 4 to 6-foot x 3-inch platform support spars
  • two 15-foot x 1/4-inch manila lashing ropes

PROCEDURE

A. Instructor will demonstrate the floor lashing and then, with the guidance of the instructor, Scouts will:

  1. Lay out the two support spars parallel to one another so they are about 30 inches apart.
  2. Place the floor spars over the support spars, in the middle and against one another, making sure  the ends extend out from the support spars 2 to 3 inches on either side.
  3. Up against the first floor spar, tie one end of the lashing rope to the platform support with a cove hitch, leaving enough “tail” at the end to twist around the long end of the rope before continuing.
  4. Close to the clove hitch, make a bight in the running end and on the inside of the platform support, pass it over the first floor spar. (A bight is formed by doubling back a length of the rope against itself to form a U.) 
  5. Grab this bight and pass it underneath the platform support.
  6. Loop the bight over the first floor spar on the outside of the platform support.
  7. Tighten both loops around the first floor spar by pulling the running end (extending between the first and second floor spars on top of the platform floor).
  8. Repeat this process for each floor spar until you reach the other end.
  9. Secure the running end of the rope to the other end of the platform support, with tight half hitches.

View Video

Steps 4, 5, 6

Steps 7 and 8
Steps 7 and 8

Simple Lift Seat
Simple Lift Seat

B. The above procedure can be implemented by two Scouts simultaneously lashing both ends of the floor spars to their respective platform supports. When a platform is completed in a manner where the floor spars are snug, one Scout can sit on the floor spars and four Scouts can carefully lift him up.


SCOUT MEETING CHALLENGE: Lift Seat

PIONEERING PROJECT: Chippewa Kitchen

PIONEERING CURRICULUM: MAIN PAGE

Favorite Scout Meeting Challenge: Lift Seat

In the ever-important pursuit to pair each knotting and lashing instructional session with a fun activity that puts the newly-acquired skill into action, here’s a simple one that can be used as an entertaining culmination in conjunction with learning the Double Floor Lashing. Besides being lots of fun, the simple structure can subsequently be used to add some levity when making an entrance or forming a procession during Scout gatherings. It’s along the same lines as carrying an individual on the shoulders to express admiration. But, it’s much more “glamorous” and a whole lot more regal! Here’s all you’ll need for each patrol:

  • two 6-foot x 3-inch spars as carrying poles
  • six 3-foot x 2-foot platform spars as the seat
  • two 20-foot lashing ropes

The Floor Lashing has to be Tight!

The procedure’s just as simple as the materials. The patrol lays the two 6-foot spars parallel to one another and lashes on the 3-foot platform poles with two floor lashings using the lashing ropes. That’s it. One thing is necessary, though—the Floor Lashing has to be pulled tight after binding each individual platform spar. No square lashings are used to connect the carrying poles, just the floor lashings. Of course, to make the lift seat more secure for repeated use, the carrying poles can be connected at each end with an additional 3-foot spar and two square lashings. And if you want to really get elaborate, lash together a framework over the platform using Scout Staves, and add a lattice work of braided nylon cord. While your at it, lash on one or more flags!

Th Most Simple Construction for a Lift Seat
The Most Simple Design for a Lift Seat

Camp Seesaw Video and Photo Montage

CAMP SEESAW INSRUCTIONS

With limited space for their exhibit at the 35th annual Aynor Harvest Ho-Down, Boy Scout Troop 818 erected this seesaw.

ScoutingNews.org

Boy Scout Troop 888 builds a seesaw as an attraction at a District Webeloree.

Lots of See-Sawing at a district event for Webelos Scouts

Pioneering Curriculum IX: Using a Diagonal Lashing and Making a Trestle

This is the ninth post in a series that will eventually comprise an activity-based, unit pioneering program curriculum.

SUPPORTING VIDEO: How to Tie a Diagonal Lashing

Link to: Larger Image
Trestles are often used to support bridge walkways.

IX A. The diagonal lashing gets its name because the wraps form a diagonal where they cross the spars. It’s primary use is to spring together two spars that are not touching when the ends are lashed in place on a structure (as in a trestle).

IX B. The trestle is a basic component of many pioneering projects. When we speak of a trestle, we’re referring to what has been dubbed an H-trestle. The way it’s designed yields a very strong supporting structure that is often used as a subassembly for something larger, and frequently serves to support the walkways of a bridge.

OBJECTIVES

  • Each Scout will tie a diagonal lashing to effectively spring together the X-brace of a trestle.
  • Working individually or in small groups, Scouts will properly construct a trestle.

MATERIALS

  • two 6-foot x 2 to 3-inch spars and 15-foot lashing rope for demonstration
  • six Scout Staves for every four Scouts (six will be needed for each trestle)
  • two 6-foot x 1/4-inch manila lashing ropes for every Scout (eight will be needed for the square lashings on each trestle)
  • one 10-foot x 1/4-inch manila lashing rope for every Scout (one will be needed for the diagonal lashing on each trestle)

PROCEDURE A

Basic Four Steps to Tying a Traditional Diagonal Lashing

Using the 6-foot spars and the 15-foot lashing rope, Instructor demonstrates a diagonal lashing, then using a 10-foot lashing rope and two Scout Staves, with the aid of an instructor and following the basic four steps, Scouts will tie a diagonal lashing.

  1. Cinch the poles together by tying a timber hitch around them where they cross.
  2. Make three wrapping turns on the opposite diagonal to the timber hitch.
  3. Keep the wraps parallel to one another and pull them tight. Make three more tight wraps across the first three, again keeping them parallel.
  4. Take two frapping turns between the poles, tightly around both sets of wraps and complete the lashing with a clove hitch around one of the poles.

PROCEDURE B

With eight 6-foot lashing ropes, one 10-foot lashing rope, and working individually or in a group of up to four individuals, Scouts will follow the following procedure and build a trestle:

Trestle Formed with Scout Staves


  1. Lay out two poles parallel to one another as the trestle legs.
  2. Place a pole over the legs at the top and bottom to serve as the ledgers, and then lash them to the legs with four tight Square Lashings using the 6-foot lashing ropes.
  3. Turn the legs and ledgers over and place one pole diagonally over two of the legs as one of the X-braces.
  4. Where it intersects, join this pole to the legs with two tight square lashings.
  5. Place the last pole diagonally OVER one leg and UNDER the other leg, as the other X-brace.
  6. Where it intersects, join this pole to the legs with two tight square lashings.
  7. Stand the structure up. There should be a gap between the the two X-braces where they cross in the middle.
  8. Using the 10-foot lashing rope, spring the X-braces together with a tight diagonal lashing.
  9. The completed trestle should be sturdy enough to be lifted and shaken without losing its shape or becoming loose. After building their trestles, Scouts are ready to have a Roman Chariot Race.

INTERPATROL COMPETITON: Roman Chariot Race

PIONEERING PROJECT: Single Trestle Bridge

PIONEERING PROJECT: Single Lock Bridge

PIONEERING CURRICULUM: MAIN PAGE

Camp See-Saw

Camp See-Saw as a Festival Exhibit

CAMP SEESAW VIDEO AND PHOTO MONTAGE

UNDERWATER See-Saw
UNDERWATER See-Saw

We were introduced to and adapted this project thanks to the great Pioneering Made Easy website. It was inspired by Fun With Ropes and Spars by John Thurman who, with his inimitable approach to providing pioneering challenges and robust Scouting activities, dubbed it the “Underwater See-Saw.” This version is a doable land approach that can be erected during a camping trip (where the materials are trailered in) or along side a Double A-frame Monkey Bridge as part of a simple, public demonstration of Scouting fun. Because of the size and weight of the materials required for its construction, it’s categorized under Involved Campsite Improvements, but when the smoke clears, what we’ve got here is a large campsite toy that’s relatively easy to build. Link to: Larger ViewWe’ll need:

  • 4     10′ x 4″ leg spars
  • 2     6′ x 3″ leg supports
  • 2     2′ to 3′ x 3″ roller supports
  • 3     2′ to 3′ x 2″ connectors
  • 1     6′ x 4-1/2″ roller spar
  • 1     10′ x 10″ x 2″ smooth plank
  • 12   15′ x 1/4″ lashing ropes
  • 4     20′ x 1/4″ lashing ropes for the roller supports
  • 1     35’ x 1/4″ lashing rope for the plank
  • 4     25′ x 3/8″ guylines
  • 2     old tires
  • 8    30″  pioneering stakes

Note: In building the see-saw, the premise is to space the A-frames, the roller supports and the two bottom connectors so that the 6′ roller spar can easily roll around, but can hardly move from side to side or up and down. Overall, this is a simple project though some precision will be required when positioning the plank at the right height so that riders don’t experience too much tilt. Like with any seesaw, care must be taken not to misuse the structure, but overall this camp seesaw is a tempting attraction and gets a lot of long-time play and attention. When built with care and guyed down securely, it can withstand the frequent use it invariably will get, even from heavier riders.

Tightly Lashing on a Roller Support

Build the A-frames. The first step is to prepare two matching A-frames using the leg spars and the 6’ leg support spars. You can use a Shear Lashing or a square lashing on top, and square lashings for the 6′ leg support spars. The main thing is to make sure that with both A-frames, the tops intersect the same distance from the tips and the legs spread apart an equal distance at the butt ends. 8″ up from the bottom and 8″ protruding from the legs is fine, and intersecting a foot from the tips works fine too.

Prepare to connect the A-frames. Stand the A-frames up so that the legs and support spars are parallel, about four and a half inches apart. Since the roller spar will eventually be rotating between the A-frames, the actual distance the A-frames are apart is determined by the diameter of the roller spar. Four Scouts should hold the A-frames upright and steady.

The Roller Bar has to take all the weight, in this case over 550 lbs.
The roller supports have to take all the weight, (in the above photo over 550 lbs. Click on the photo for larger image.)

Lash on the roller support spars. Measure about 30″ up from the butt ends of all four legs. (For smaller, shorter riders, a lower height is definitely advised.) The height of the roller support spars will determine the angle of the board. Too steep an angle could easily make riding precarious. Begin connecting the two A-frames by lashing on the roller supports with tight square lashings. Lash them to the outside of the legs at a distance just a fraction wider than the diameter of the roller spar. For neatness, space them so the ends extend an equal distance out from the A-frame legs. Because these roller supports will be bearing the weight of the heavy roller spar, the plank, and the Scouts playing on the see-saw, when lashing them on with a Japanese Mark II Square Lashing, start the lashing by tying a Constrictor Knot around the leg to minimize any slippage.

Lash on the lower connectors. With the A-frames held steadily upright, temporarily lay the 6′ roller spar on top of the supports. Using the diameter of the 6′ roller spar as a measure, continue to connect the two A-frames by lashing on two connectors at a distance just above the roller spar, with tight square lashings. Again, for neatness, space them so the ends extend an equal distance out from the A-frame legs. Remove the roller and set it aside.

Lash on the top connector. Lash the last connector to one of the legs at the top of each A-frame, just below where the legs cross, with tight square lashings. If there is difficulty reaching the point on the legs where this connector needs to be lashed, carefully lay both parallel A- frames on their sides and then lash the connector in place. Again, for neatness, space the connector so the ends extend an equal distance out from the A-frame legs.

A Seesaw with a Plank (12') That was a Little too Long!
A Seesaw with a Plank (12′) That was a Little too Long!

Make the Anchors. Build four 1-1 Anchors 45º out from each leg.

Attach the guylines. With a Roundturn with Two Half Hitches, or Rolling Hitches, tie on the 4 guylines, one each about two feet below the square lashings at the top of the A-frames. Connect each to its respective anchor.

Position the see-saw. Stand up and move the A-frames in the position you want the see-saw. Drive in each of the four pioneering stakes, fifteen feet away and 45 degrees out from where they’re tied to the legs of the A-frames. Connect a guyline to each using a Roundturn with Two Half Hitches or rope tackle.

Lash on the plank. Slide the roller spar on top of the roller supports. Lay the plank on top of the roller and using the 35′ lashing rope, lash the middle of the plank firmly in place with a square lashing.

Lay down the tires. On each side, at the point where the plank hits the ground, place a tire to cushion the impact and absorb the shock.

Some advisories and suggestions:

  • Seesaws can be hazardous. Make sure there’s no horseplay. Just seated cooperation.
  • When Riders take their places on the board, they should position themselves so their weight is balanced.
  • Riders should never kick off from the ground forcefully springing their side skyward which can easily unbalance the other rider.
  • Exiting the seesaw should only be done when both rider’s feet are on the ground.
  • Adding ropes for handholds can be done in various places along the board by drilling holes about two inches from each edge and threading a short length of 3/8″ to 1/2″ braided nylon or polyester and tying a couple of figure eight stopper knots or tying the ends together on the underside of the board with a Water Knot.
  • Making four indentation grooves in the plank where it will be square lashed to the roller bar will eliminate the plank slipping towards one or the other rider during use.

Single Pull 2-Ring Monkey Bridge Configuration

7:1 Rope Tackle Monkey Bridge Configuration
Single Pull 2-Ring Monkey Bridge Anchor Configuration

We’ve seen how block and tackles and even commercial-grade come-alongs have been employed to tighten hand and foot ropes during the construction of various monkey bridge projects, especially those spanning longer distances and using larger diameter ropes. On the other side of the coin, in the presentation of his Double A-Frame Monkey Bridge, Adolph Peschke says, “Whatever strain three or four Scouts can put on the foot rope by pulling it by hand will be enough.”

The simple rope tackle provides a 3:1 mechanical advantage and is frequently used to apply the desired tension to both hand ropes and foot rope—often on both sides of the bridge. Adjusting the strain on individual ropes during use of the bridge can result in a slight complication—the spanner ropes can lose their symmetry.

7to1RopeTackleBridgeEnd
On the side of the bridge where the tension will be adjusted, the hand and foot Ropes are attached to one large ring.

A method that will alleviate this issue, and also provide a greatly increased mechanical advantage, is to utilize a Single Pull 2-Ring Configuration. After attaching the hand ropes to their respective spars with Clove Hitches, (adjusting the strain on the sections of the hand ropes between the double A-frames to match the sag of the foot rope) this approach is executed as follows:

  • Use a roundturn with two half hitches to attach the hand and foot ropes to a rope grommet at one anchor point. At that side of the bridge, they will remain fixed.
  • Pulling the three ropes so each receives the same degree of strain, attach each to one large ring at the other side of the bridge, again using Roundturns with Two Half Hitches.
  • With a length of 1/4 or 3/8-inch manila (preferred), using a roundturn with two half hitches, connect one end to the same large ring.
  • The other ring is in the rope grommet which is attached to the anchor.
    The other ring is in the rope grommet which is attached to the anchor.

    Reeve the running end of this rope through the ring in a rope grommet which is situated about four feet away and already fixed at the anchor point on this side of the bridge.

  • Carry the running end back and reeve it through the large ring. (If you now pull on the running end, there’s a 2:1 mechanical advantage.)
  • To increase the strength of this connection enabling it to withstand all the strain exerted on the bridge during heavy operation, reeve the running end back through the ring in the rope grommet and then through the large ring two or more times.
  • Now when you adjust the tension of the hand and foot ropes with this pull rope, the mechanical advantage is greatly increased. Secure the entire configuration with two Half Hitches cinched up against one of the rings.

Some Notes: This arrangement can be configured any way you like, e.g. when using 3/8-inch manila, attach the pull rope to the large ring, reeve it through both rings twice, and then finally secure the configuration at the large ring. Or, instead of first tying the pull rope to the large ring (the ring that’s functioning as the moving block) initially tie it to the ring in the rope grommet (fixed block). Then proceed to reeve it through the other ring, back again, etc.

With each turn on the rings, make sure the rope doesn’t cross on top of itself as this would interfere with adjusting the strain.

This kind of rope tackle can exert too much force on the bridge components, so carefully monitor how tight everything is getting and don’t just give the rope a willy-nilly pull.

Large Camp Table

The Drawing
The Drawing

A design for this table had been on the drawing board for quite some time. Well, a day before the site was set up for a special Scout Campcraft program, it was decided to build one as a functional showpiece.

The Table WIth Flags a-Blowin'.
The Table WIth Flags a-Blowin’.

We sank four 6′ spars two feet into the ground for the main corners, and sank eight 4′ spars a foot into the ground for the rest of the upright supports. Between the corners we lashed two 10′ lateral spars, and for the two long benches and the sides of the table top, we used six-footers. The table top itself was comprised of 4′ platform spars, and the side seats, 3′ ladder rungs. Since the 10′ lateral spars were really too long, we compensated for the unexpected space between the 6′ bench spars and the ends of the ten-footers by dispensing with the back rests, and instead lashed on a flag at each corner.

The Large Camp Table for the Frontier Days Program
The Large Camp Table for the Frontier Days Program (Click on the image for a LARGER VIEW.)

What a piece of work! It stayed up for three weeks and repeatedly got plenty of heavy use on a daily basis. The Floor Lashings regularly needed adjusting, and served as a perfect location to pass on the Double Floor Lashing technique to program participants who applied it later to building rafts. The 4′ vertical uprights soon worked themselves to a slight wiggling state, but continued to furnish their necessary support. Also, during the three week period, due to the heavy adults who loved to seat themselves at this rather elaborate piece of camp furniture, occasionally various Square Lashings had to be tightened up as well. Nevertheless, with all the strain, rain, and wear, this version of the large camp table happily stayed intact.