When putting crossed braces on a structure to keep it from racking (as used when making a trestle), the most important lashing is the diagonal lashing, which gets its name from the fact that the wrapping turns cross the poles diagonally.
A diagonal lashing is used when there is a need to close a gap between two poles where they cross each other but do not touch.
The traditional diagonal lashing is tied as follows:
Cinch the poles together by tying a timber hitch around them where they cross.
Make three to four wrapping turns on the opposite diagonal to the timber hitch. Keep the wraps parallel to one another and pull them tight.
Make three more tight wraps across the first three, again keeping them parallel.
Take two to three frapping turns between the poles, tightly around both sets of wraps and complete the lashing with a clove hitch around one of the poles.
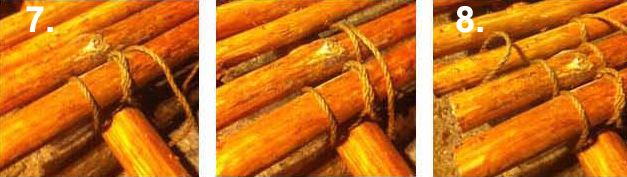
Four Basic Steps to Tying a Traditional Diagonal Lashing
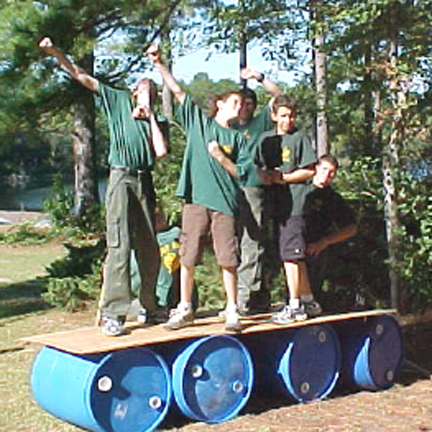
A Scoutmaster had the pleasure of witnessing one of the patrols in his troop out-perform 30 others at a council camporee. What’s significant was they were competing in an activity they had never tried before. Why were they so successful? Simple. They knew how to work well together. The interpatrol challenges at their troop meetings back home provided repeated opportunities to hone their teamwork skills—each was a team building challenge. Many required pioneering skills and were preparatory to building various pioneering structures, and the process gave rise to knowing how to pitch in and get the job done.
Pioneering requires good, cooperative teamwork. Without it, the project just won’t get built. As necessary as it is to have the required skill sets under their belts, the crew tackling the construction of any larger pioneering structure will also need to put into action all the qualities embodied in the execution of solid teamwork.
Scout patrols are teams. In order to get things done, especially on an outing, they must communicate, cooperate, and pull together. A good team building event furnishes each patrol member with a way to contribute to the successful accomplishment of the task at hand. Besides being challenging and fun, effective Team Building Activities afford a patrol the opportunity to pool their resources and share leadership. Of course, amongst the team members, there’s always plenty of provision for providing helpful support, along with a good show of Scout spirit.
For those interested in starting a pioneering program in their unit, it’s often suggested that one of the first things to procure is a supply of Scout Staves. The BSA Supply Division’s Scout Hiking Staff is still the best deal on the market for Scout Staves. You can order them through your local Scout shop.
They’re very practical for teaching lashings.
They can be used for a variety of involving and fun interpatrol competitions and Scout meeting challenges
They’re exceedingly useful on outings
A SCOUT STAFF, by Robert Baden-Powell:
“The Scout staff is a useful addition to the kit of the Scout. Personally, I have found it an invaluable assistant when traversing mountains or boulder-strewn country and especially in night work in forest or bush. Also, by carving upon it various signs representing his achievements, the staff gradually becomes a record as well as a treasured companion to the Scout.
“The Scout staff is a strong stick about as high as your nose, marked in feet and inches for measuring. The staff is useful for all sorts of things, such as making a stretcher, keeping back a crowd, jumping over a ditch, testing the depth of a river, keeping in touch with the rest of your Patrol in the dark. You can help another Scout over a high wall if you hold your staff horizontally between your hands and make a step for him; he can then give you a hand from above. Several staves can be used for building a light bridge, a hut or a flag staff. There are many other uses for the staff. In fact, you will soon find that if you don’t have your staff with you, you will always be wanting it. If you get the chance, cut your own staff. But remember to get permission first.”
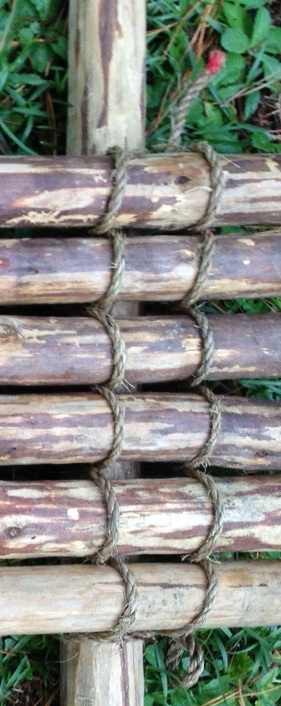
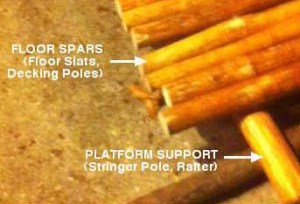
X. This lashing is useful when building any kind of raised surface for a: platform, deck, raft, table, bench, chair, or Chippewa kitchen.
OBJECTIVE
Each Scout will tie a complete floor lashing, attaching floor spars to a platform support.
MATERIALS (for every two Scouts)
six 3-foot x 2-inch floor spars
two 4 to 6-foot x 3-inch platform support spars
two 15-foot x 1/4-inch manila lashing ropes
PROCEDURE
A. Instructor will demonstrate the floor lashing and then, with the guidance of the instructor, Scouts will:
Lay out the two support spars parallel to one another so they are about 30 inches apart.
Place the floor spars over the support spars, in the middle and against one another, making sure the ends extend out from the support spars 2 to 3 inches on either side.
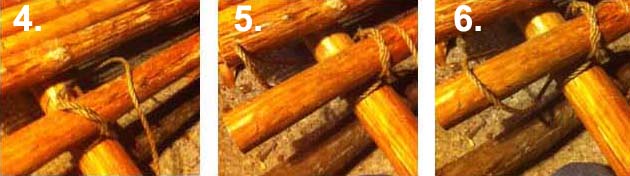
Up against the first floor spar, tie one end of the lashing rope to the platform support with a cove hitch, leaving enough “tail” at the end to twist around the long end of the rope before continuing.
Close to the clove hitch, make a bight in the running end and on the inside of the platform support, pass it over the first floor spar. (A bight is formed by doubling back a length of the rope against itself to form a U.)
Grab this bight and pass it underneath the platform support.
Loop the bight over the first floor spar on the outside of the platform support.
Tighten both loops around the first floor spar by pulling the running end (extending between the first and second floor spars on top of the platform floor).
Repeat this process for each floor spar until you reach the other end.
Secure the running end of the rope to the other end of the platform support, with tight half hitches.
B. The above procedure can be implemented by two Scouts simultaneously lashing both ends of the floor spars to their respective platform supports. When a platform is completed in a manner where the floor spars are snug, one Scout can sit on the floor spars and four Scouts can carefully lift him up.
Trestles are often used to support bridge walkways.
IX A. The diagonal lashing gets its name because the wraps form a diagonal where they cross the spars. It’s primary use is to spring together two spars that are not touching when the ends are lashed in place on a structure (as in a trestle).
IX B. The trestle is a basic component of many pioneering projects. When we speak of a trestle, we’re referring to what has been dubbed an H-trestle. The way it’s designed yields a very strong supporting structure that is often used as a subassembly for something larger, and frequently serves to support the walkways of a bridge.
OBJECTIVES
Each Scout will tie a diagonal lashing to effectively spring together the X-brace of a trestle.
Working individually or in small groups, Scouts will properly construct a trestle.
MATERIALS
two 6-foot x 2 to 3-inch spars and 15-foot lashing rope for demonstration
six Scout Staves for every four Scouts (six will be needed for each trestle)
two 6-foot x 1/4-inch manila lashing ropes for every Scout (eight will be needed for the square lashings on each trestle)
one 10-foot x 1/4-inch manila lashing rope for every Scout (one will be needed for the diagonal lashing on each trestle)
PROCEDURE A
Basic Four Steps to Tying a Traditional Diagonal Lashing
Using the 6-foot spars and the 15-foot lashing rope, Instructor demonstrates a diagonal lashing, then using a 10-foot lashing rope and two Scout Staves, with the aid of an instructor and following the basic four steps, Scouts will tie a diagonal lashing.
Cinch the poles together by tying a timber hitch around them where they cross.
Make three wrapping turns on the opposite diagonal to the timber hitch.
Keep the wraps parallel to one another and pull them tight. Make three more tight wraps across the first three, again keeping them parallel.
Take two frapping turns between the poles, tightly around both sets of wraps and complete the lashing with a clove hitch around one of the poles.
PROCEDURE B
With eight 6-foot lashing ropes, one 10-foot lashing rope, and working individually or in a group of up to four individuals, Scouts will follow the following procedure and build a trestle:
Trestle Formed with Scout Staves
Lay out two poles parallel to one another as the trestle legs.
Place a pole over the legs at the top and bottom to serve as the ledgers, and then lash them to the legs with four tight Square Lashings using the 6-foot lashing ropes.
Turn the legs and ledgers over and place one pole diagonally over two of the legs as one of the X-braces.
Where it intersects, join this pole to the legs with two tight square lashings.
Place the last pole diagonally OVER one leg and UNDER the other leg, as the other X-brace.
Where it intersects, join this pole to the legs with two tight square lashings.
Stand the structure up. There should be a gap between the the two X-braces where they cross in the middle.
Using the 10-foot lashing rope, spring the X-braces together with a tight diagonal lashing.
The completed trestle should be sturdy enough to be lifted and shaken without losing its shape or becoming loose. After building their trestles, Scouts are ready to have a Roman Chariot Race.
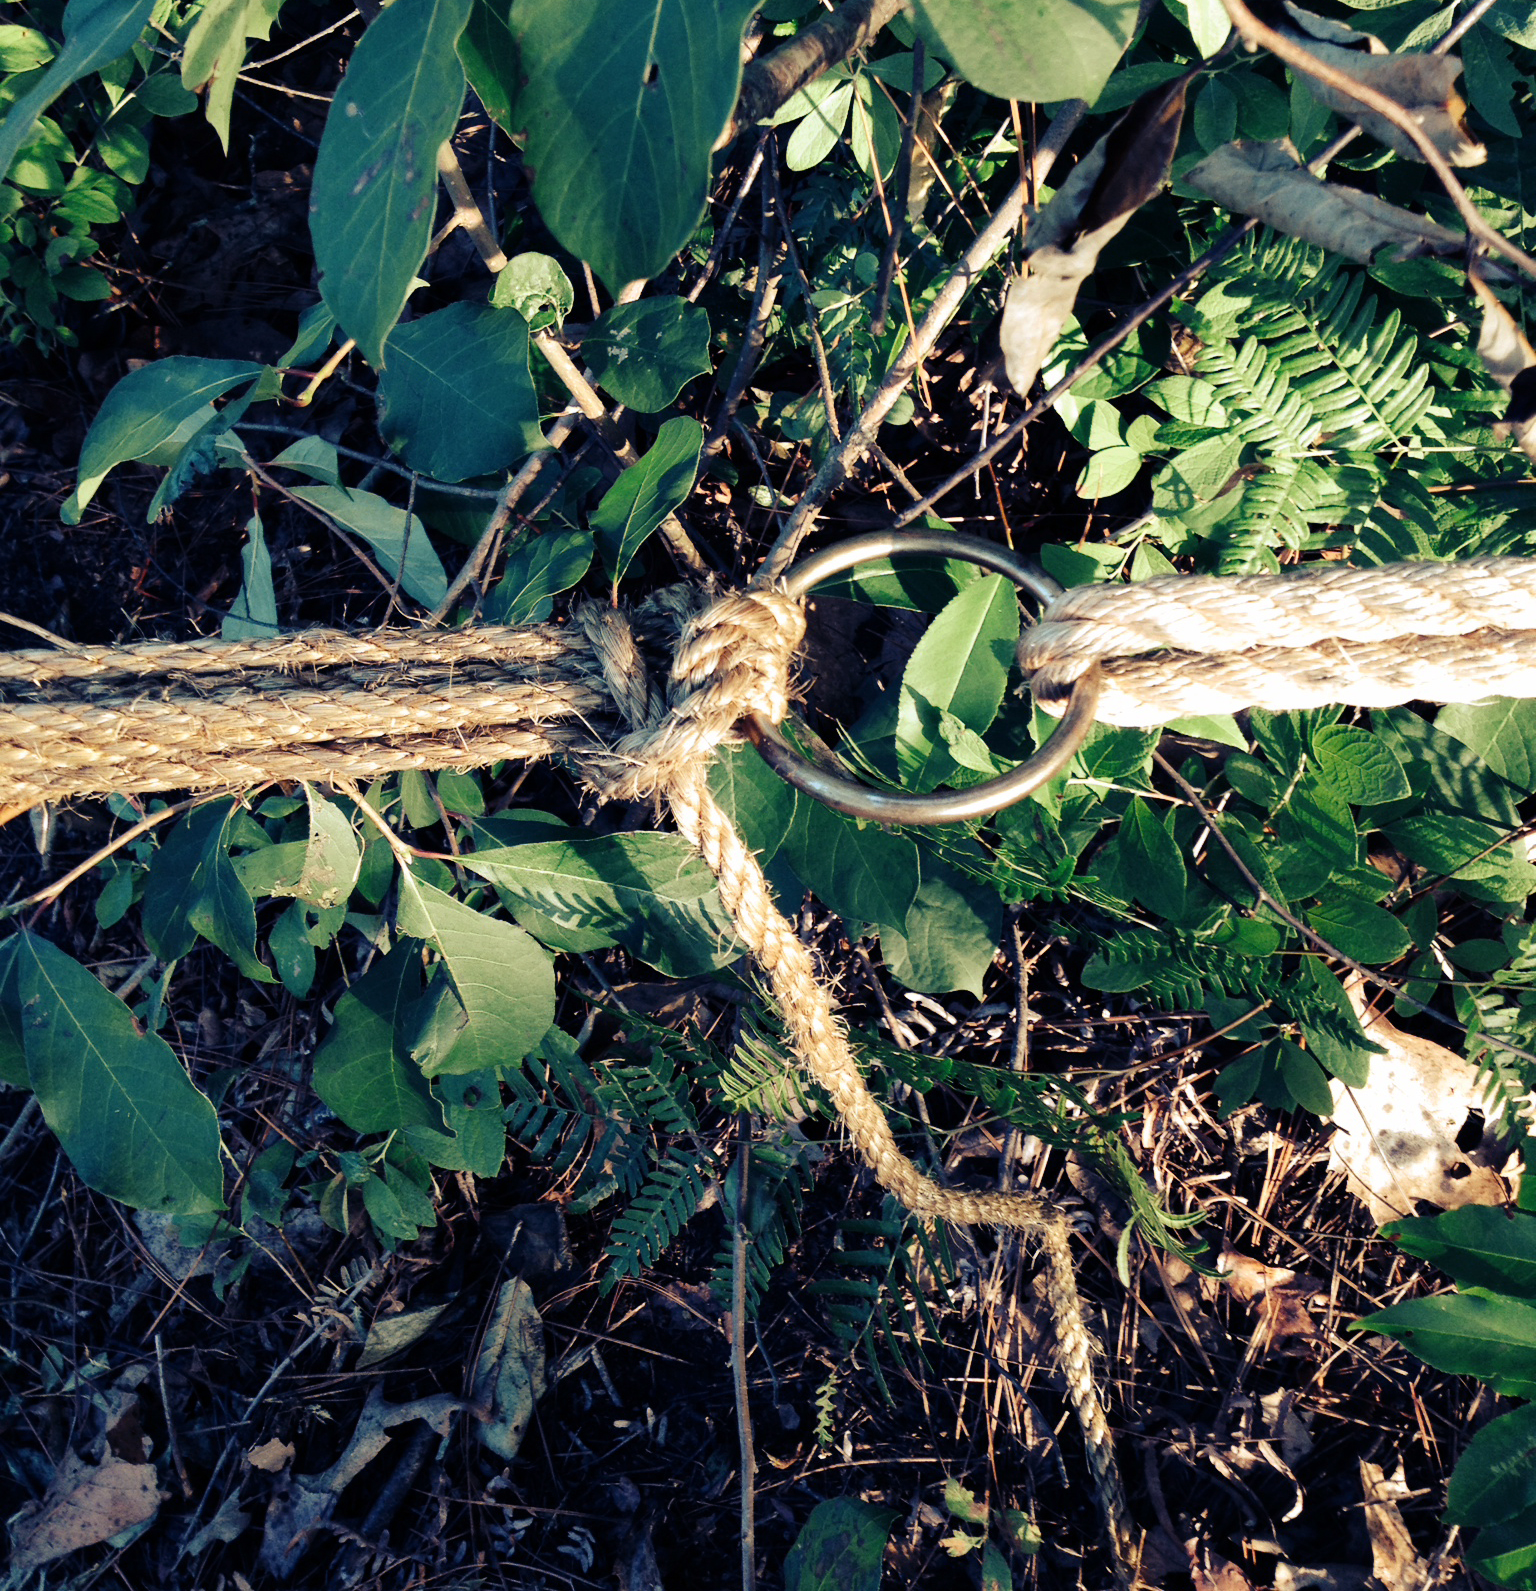
Single Pull 2-Ring Monkey Bridge Anchor Configuration
We’ve seen how block and tackles and even commercial-grade come-alongs have been employed to tighten hand and foot ropes during the construction of various monkey bridge projects, especially those spanning longer distances and using larger diameter ropes. On the other side of the coin, in the presentation of his Double A-Frame Monkey Bridge, Adolph Peschke says, “Whatever strain three or four Scouts can put on the foot rope by pulling it by hand will be enough.”
The simple rope tackle provides a 3:1 mechanical advantage and is frequently used to apply the desired tension to both hand ropes and foot rope—often on both sides of the bridge. Adjusting the strain on individual ropes during use of the bridge can result in a slight complication—the spanner ropes can lose their symmetry.
On the side of the bridge where the tension will be adjusted, the hand and foot Ropes are attached to one large ring.
A method that will alleviate this issue, and also provide a greatly increased mechanical advantage, is to utilize a Single Pull 2-Ring Configuration. After attaching the hand ropes to their respective spars with Clove Hitches, (adjusting the strain on the sections of the hand ropes between the double A-frames to match the sag of the foot rope) this approach is executed as follows:
Use a roundturn with two half hitches to attach the hand and foot ropes to a rope grommet at one anchor point. At that side of the bridge, they will remain fixed.
Pulling the three ropes so each receives the same degree of strain, attach each to one large ring at the other side of the bridge, again using Roundturns with Two Half Hitches.
With a length of 1/4 or 3/8-inch manila (preferred), using a roundturn with two half hitches, connect one end to the same large ring.
The other ring is in the rope grommet which is attached to the anchor.
Reeve the running end of this rope through the ring in a rope grommet which is situated about four feet away and already fixed at the anchor point on this side of the bridge.
Carry the running end back and reeve it through the large ring. (If you now pull on the running end, there’s a 2:1 mechanical advantage.)
To increase the strength of this connection enabling it to withstand all the strain exerted on the bridge during heavy operation, reeve the running end back through the ring in the rope grommet and then through the large ring two or more times.
Now when you adjust the tension of the hand and foot ropes with this pull rope, the mechanical advantage is greatly increased. Secure the entire configuration with two Half Hitches cinched up against one of the rings.
Some Notes: This arrangement can be configured any way you like, e.g. when using 3/8-inch manila, attach the pull rope to the large ring, reeve it through both rings twice, and then finally secure the configuration at the large ring. Or, instead of first tying the pull rope to the large ring (the ring that’s functioning as the moving block) initially tie it to the ring in the rope grommet (fixed block). Then proceed to reeve it through the other ring, back again, etc.
With each turn on the rings, make sure the rope doesn’t cross on top of itself as this would interfere with adjusting the strain.
This kind of rope tackle can exert too much force on the bridge components, so carefully monitor how tight everything is getting and don’t just give the rope a willy-nilly pull.
Building rafts stands out as one of the most fun-filled Scout Pioneering activities. It incorporates all the planning, preparation, and Scout engineering that contribute to the richness of the pioneering experience, but when the structure can actually float and carry the participants, the pronounced element of happy success inherent in the process is undeniable. Through the years, raft building has played a major role in pioneering activities, and thanks to the often hilarious exploits of John Thurman during his extended term as Camp Chief at Gilwell, riding on a raft one has designed and built is part of a rich Scout Pioneering heritage.
Three Raft Designs
Lashing on Some Decking with the Double Floor Lashing
Nothing provides the same kind of challenge and fun! Using the materials on hand to build it, and then embarking on a voyage across a lake is an adventure. Woodbadge training at Gilwell always used to include a day of Pioneering and the three main projects were towers, bridges and rafts. John Thurman never provided any clues regarding how to lash on the drums, though he did suggest that each one should receive a separate lashing. That way, if one drum was to come loose, losing it wouldn’t be the cause of an “unfortunate” chain reaction. Naturally, the bung holes should be positioned as high as possible and care should be taken that everything is lashed together tightly. As far as which comes first, constructing the framework in a complete assembly or in sub assemblies and then adding the drums, or lashing the drums into position and then constructing the rest of the framework, the former might be the better way to go. Laudable success has been experienced by adding the drums to a well-lashed framework that is spaced to accommodate the drums so they ride low and can withstand the strain brought on by simple tight wraps secured with two rope tackles. In this fashion, the drums can be placed on top of the tightly-lashed, well-spaced framework, and then when they are solidly in place, the raft can be flipped over to add all the accoutrements.
Neat Seats!
Creativity, and ingenuity come into play during the planning and preparation phases of raft building. During construction, team work and good lashing techniques are required. When it’s time to actually get it in the water and get it moving with everybody on board, there also needs to be an extra degree of cooperation.
Sink or swim, raft building and then, hopefully, raft riding is great fun. It’s just about impossible not to have a fantastic time!
A Swing Boat is a fairground ride in which pairs of riders pull ropes to swing back and forth. At the national jamboree, it’s one of the pioneering area’s favorite features. Click here for more information. This is a smaller, more boy-sized version, but still lots of fun and plenty big enough.
ALL LASHINGS MUST BE VERY TIGHT! (This is an appropriate occasion to start the Japanese Mark II Square Lashing with a clove hitch in the middle of the rope around the upright, under the crossing spar, before proceeding with the wraps.)
After completed, the A-frames are stood up and held in place while other construction continues.
Build the A-frames. Using 20-foot ropes, lash two identical A-frames. The tops of the shear lashings needs to be approximately 3 feet below the tips of the 12-foot legs. (In lieu of shear lashings you might want to join the legs at the top with looser square lashings applied with the legs held at 90º after which the legs can be brought into the desired position to add the ledgers, but in doing so, make sure there won’t be too much strain applied to the top rope and the spars.) The 10-foot ledgers need to be approximately 1.5 feet above the butts of the legs. Lash on an additional 6-foot cross spar for extra support on each A-frame.
Join the A-frames together. Stand up the A-frames and holding them in place, use the remaining 12-foot spars to join them together. Lash these on as low as possible so they don’t interfere with the action of the swing.
The following steps can be carried out using an 8 to 10-foot folding step ladder or by laying the structure on its side. Either way, strong crew members will be needed to hold the spars in place.
Add the Center Spar. With a TIGHT square lashing, lash the stout 10-foot center spar to the inside of one leg of each A-frame, about 1 foot from each end where the tops intersect. This will provide a good, inward lean to the A-frames. (If you are using rope grommets with steel rings, attach them to the center spar with a prusik, about 6 inches from the legs of each A-frame.)
Tightening a Square Lashing on One of the Parallel Top Support Spars
Lash on the top support spars. Join the tops of the A frames by tightly lashing a 10-foot spar on the legs of each A-frame, about 6 inches from the tips. (It’s a good idea to start these lashings with a constrictor knot to minimize slippage during use.)
Attach the pull rope spar and pull ropes. At right angles, lash a 10-foot spar across the center for the pull ropes. About 6 inches from the ends, tightly tie a 15-foot pull rope to each end using a roundturn with two half hitches.
Attach the swing. Attach a swing rope to each end of the prepared plank with a scaffold hitch. Using a roundturn with two half hitches, tie the ends of each swing rope securely to their corresponding ring -or- directly to the center spar about 6 inches from the legs of each A-frame.
Add the guylines. Using a roundturn with two half hitches or rolling hitch, attach a 36-foot x 3/8-inch guyline to the top of each leg. (If, the structure has been on its side, it’s time to stand it completely up.)
Anchoring the Ledgers with Pioneering Stakes
Prepare the anchors. Drive in pioneering stakes for four 1-1 anchors extending 20 feet out from the legs at 45º. Attach the corresponding guyline to each using a rope tackle. Also, drive in a stake about 6 inches in at each of the four corners so they will intersect with the A-frame ledgers. Lash each stake to the corresponding ledger with a square lashing.
Make adjustments. Level out the plank to the desired height and adjust the swing ropes so the swing hangs evenly.
Materials
6 12-foot x 4-inch spars
6 10-foot x 4-inch spars
2 6-foot x 3-inch spars
18 20-foot x 1/4-inch lashing ropes
2 36-foot x 1/2-inch swing ropes
4 36-foot x 3/8-inch guylines
12 pioneering stakes
4 tent stakes and lengths of rope or binder twine for 1-1 anchors
1 2-inch x 8-foot board (sanded and notched about 6 inches from the ends)
Santee Lodge 116, Order of the Arrow hosted this year’s Dixie Fellowship at Camp Coker. With the input of the Dixie Design Team comprised of Pioneering Crews from Chicora, Iswa and Attakwa Chapters, Arrowmen erected a 24 foot six flag, banner gateway flying the American flag, the Order of the Arrow flag, the World Scout Crest flag, and the state flags of NC, SC, and GA. These six flags surrounded a 10’ banner welcoming everyone to the Dixie Fellowship! The OA Pioneering Crews also built a 12’ Swing Boat and 10’ Atomic Pile for intermittent fun during the Fellowship.
Building and Hoisting the Gateway / Flags Flying / Gateway During the Day and Illuminated at Night / A Group Shot of Some Arrowmen from Tomo Chi Chi Lodge Under the Banner
The Swing Boat was situated near the Trading Post.
The Atomic Pile challenged Scouts behind the Trading Post.
Arrowmen Setup and Man Various Pioneering an Team Building Stations
Because they impressed the staff and participants at the previous year’s event, the Scouter heading up the program for the following Council-wide Scout Expo invited the Order of the Arrow to set up several pioneering-related exhibits. Naturally, on the list was a request for a monkey bridge, but additionally the pioneering team was asked to come up with some team building stations and a Scout skills challenge.
Each of these four lashings can be used to join two spars together to make an extension. With each there are no frapping turns. The manner in which these lashings need to be applied results in the spars being in a position where they are already tightly touching. Taking frapping turns between the parallel spars would only weaken the connection.
The objective is to combine the spars together to make a longer length that is as rigid as possible. So, connecting two spars in this fashion definitely requires a good overlap between them. Obviously, it also requires two lashings, each tied tightly well near the ends of each spar where they overlap.
Round Lashing. The first and most commonly used lashing for extending the length of a spar can be referred to as the traditional round lashing. The usual way this lashing is tied is with a clove hitch around both spars followed by eight to ten tight wraps that are flush together, and then ending with another clove hitch around both spars.
In his book Pioneering Principles, John Thurman refers to this round lashing as a “Sheer Lashing Mark II” (sheer spelled with two e’s). Same lashing and it’s interesting that he’s fond of starting the lashing with a timber hitch around both spars for added rigidity, and then finishing with a clove hitch after taking at least eight tight turns. When the poles are smooth, the traditional round lashing can be made more secure by adding additional half hitches to the clove hitches.
West Country Round Lashing. As Adolph Peschke says, this method of joining two spars with a series of tight half knots and ending with a square knot is very strong and effective. When extending the length of two heavier spars or when constructing a very long pole, the West Country Shear Lashing is an excellent choice. Follow this link to Lashing INFORMATION and scroll down for further information and a West Country Shear Lashing diagram.
Note: This lashing should rightfully be called a West Country Round Lashing, in that (like all round lashings) it has no frapping turns and is used to form a rigid connection between two parallel poles. By contrast, shear lashings are used to form a flexible joint needed when constructing shear legs.
Strop Lashing. When a quick job is desired with light spars, a simple strop lashing will often suffice. Find the middle of the length of binder twine or lashing rope and tightly wrap both ends simultaneously in opposite directions around the poles finishing with a square knot. Follow this link to Lashing INFORMATION and scroll all the way to the bottom for further information.
Half Hitch Round Lashing
Half Hitch Round Lashing. A fourth form of round lashing is made by tying a series of interlocking half hitches around both spars. Like the West Country “Round” Lashing, which tightens and secures each of the wraps with a half knot while working both ends of the rope simultaneously, this method accomplishes the same thing by applying a tight half hitch to each wrap. The final lashing features what resembles a two-strand French Braid twisted diagonally around both spars!
An Opportunity Identified: Last spring, on April 12-14, a Scout Expo was held on the extensive grounds of the Myrtle Beach Speedway in Myrtle Beach, SC. for the purpose of increasing public awareness and celebrating Scouting throughout the eleven counties of the Pee Dee Area Council. Units were invited to camp overnight on Friday and Saturday, and from 10:00 to 5:00 p.m. on April 13, the Expo’s festivities were open to the general public. To promote Scouting, all units were invited to set up a fun, and/or informational display.
A Challenge Accepted: To contribute to the overall impact of the event and to increase awareness of the Order of the Arrow, the Chicora Chapter of Santee Lodge 116 received permission to set up their own exhibit. They wanted to communicate and share with everyone in attendance that members of the Order of the Arrow were capable of providing an outstanding activity—one that provided real interactive fun, and one that promoted camping by demonstrating advanced Scout skills.
Addressing the Opportunity and the Challenge: To take advantage of this opportunity, the chapter decided to challenge itself to assemble a Scout Pioneering exhibit—one that would engage and impress Expo attendees. It would be a special rope bridge. But, instead of the typical single or double A-frame versions, an elaborate design was developed featuring two 5’ climbing towers.
What They Did:
They formed a Pioneering crew made up of chapter members who readily volunteered to participate.
They fine-tuned the project design and gathered together all the materials needed.
They provided themselves with the pioneering skills required to build a safe structure.
They formalized a plan of action for actual project construction, with assembly procedures and building assignments.
They made meal plans and camping arrangements for all crew members.
They organized a schedule for manning the bridge to assure it was used safely and properly during the seven hours of Expo festivities.
They carried out all their plans
Who was involved: Twelve members of the chapter rendered cheerful service in building the project on Friday, maintaining and supervising its safe operation on Saturday, and disassembling the structure on Sunday.
The Costs: The only money involved was the cost of Friday evening’s dinner for the Pioneering crew, and the price of registration for those brothers who were not already camping with their troop.
The Success: The success of Scout Pioneering can be measured in two ways. One, did those building the project complete it safely and effectively? Two, did the completed project accomplish whatever it was designed to do? Their efforts were successful on both counts. The chapter brothers cheerfully worked hard and worked together building a project that was stable and strong. When the work was done, they proudly shared the fruits of their labor with numerous, appreciative Scouts and Expo guests.
The Result: For seven hours, their display enjoyed a continual stream of eager Cub Scouts, Webelos Scouts, Boy Scouts, and Expo visitors. The Council-wide Scout Expo was well-attended. Though there was not an exact count, it is easy to say that throughout the day, hundreds of people crossed the bridge, supervised and safe-guarded by the helpful Order of the Arrow attendants. The Expo organizers were very happy with the participants’ response to the OA exhibit, and the Pioneering crew regularly received high praise from Expo attendees.
The Benefit: The Chicora Chapter’s original intention in setting up a Scout Pioneering exhibit at the Expo was to benefit both Scouting and the Order of the Arrow, by contributing to the overall impact of the event, and by providing those attending with positive exposure to our Brotherhood of Cheerful Service. Because their display was so cool, and because its presentation was so impressive, the conclusion is that in both these lights, they hit the ball out of the park! In line with an honor organization that promotes camping, they wanted to have Scouts associate the Order of the Arrow with advanced Scouting skills that are functional and fun. For many, it was the first time they ever got to try a rope bridge. For everybody, it was the first time they ever saw a monkey bridge with a double platform! The exhibit was well-manned and the cheerful Arrowmen looked great with their sashes symbolizing the service they provided to their fellow Scouts and Expo visitors.
The Future: As an outgrowth of the favorable impression made at the Scout Expo, opportunities to serve their district and council are on the rise. In October the chapter was asked to build a traditional Double A-Frame Monkey Bridge at a District Webeloree. Then in November, they received a request to assist in an afternoon team-building session during a multi-district Boy Scout Camporee, by presenting Pioneering activities as patrol challenges. More and more arrowmen are becoming aware of the fun and positive impact this kind of service provides, and an increase in participation by other chapters throughout Santee Lodge is foreseen.
Plans to Grow: The more the Pioneering skills are developed through learning and application, the greater will be the capacity for sharing these skills through the construction of interactive Pioneering displays, while exampling cheerful service! Those who appreciate the fun in using only poles and rope to build a useful structure, who enjoy working together as a team utilizing specialized skills to get the job done, and who have experienced the sense of accomplishment that goes along with completing a Pioneering project that illustrates “old-school” Scouting know-how, need no coaxing when invited to do it again and again! The chapter just found out that a local pack has requested they build a simple Single A-Frame Bridge with twin walkways for their outdoor Webelos crossover ceremony this February. But, they’re most excited by the largest venture coming up in April! Santee Lodge is hosting this year’s Dixie Fellowship at Camp Coker. With the input of the Chicora Chapter Pioneering Crew and with the help of many other, eager lodge brothers, Pioneering crews will be erecting an enormous gateway flying the American flag, the Order of the Arrow flag, the World Scout Crest flag, and the state flags of NC, SC, and GA. These six flags will surround a 10’ banner welcoming everyone to the Dixie Fellowship! The OA Pioneering Crews will also build a 12’ Swing Boat and 10’ Atomic Pile for intermittent fun during the Fellowship. With over 1,000 OA brothers in attendance, sharing the satisfaction inherent in serving Scouting and promoting the Order of the Arrow through well-presented displays of Scout Pioneering will be a blast! (See: Pioneering at the 2014 Dixie Fellowship.)
Sustaining the Idea: The idea is fostered that if provided the wherewithal, in every OA lodge there are many Scouts who would enjoy building fun and useful Pioneering structures that are really cool. There are also those closely involved with Scout Pioneering who would be very happy to make it a priority to help equip and train fellow arrowmen, so they can implement their own program and serve their councils in like fashion. Building Pioneering projects provides outdoor fun that quite simply stands the test of time. The Native Americans did it in a big way, and so did the folks who settled our country. Especially today, even with a modern emphasis on the high-tech, the fascination with old school Scouting skills always persists. This is evidenced by the joyful responses well-built Pioneering projects consistently receive. The Order of the Arrow is steeped in rich Scouting traditions, and hence provides wonderfully fertile grounds for a welcome resurgence of the timeless Scouting skills that are embodied in Scout Pioneering—a golden opportunity to both promote Scout camping while exampling cheerful service during Scouting events!
Furthering the Mission and Purpose of the Order of the Arrow: For 100 years, the Order of the Arrow has inspired numerous Scouts, both young and old, by linking a love for the outdoors and camping with the cheerful rendering of service to our fellow man. When, in preparation for an organized Scouting event, arrowmen dedicate their time and skills to the building of an impressive, interactive pioneering structure, they are setting the stage for something very special. In addition to enhancing the event’s impact, their accomplishment carries with it a dual purpose. One: a properly presented and well-built Pioneering project in itself promotes a love for the outdoors and camping. Two: unselfishly giving their time to share the fun inherent in their work, by answering questions about their project in a friendly manner and providing safe guidance in its use, is the kind of action that inspires, motivates, and indeed exemplifies the cheerful service that embraces the watchwords of our order.
VII. The rope tackle is a major player when there’s a need to add guylines to stabilize a pioneering structure, or to increase the torque on a monkey bridge’s hand and foot ropes. Whenever there’s a need for tightening and securing a load-bearing line, this combination of knot-tying prowess and basic engineering principles is both practical and effective. Applying a rope tackle will be called for on numerous occasions and has been found to have a wide range of uses.
YOU’LL USE IT AGAIN AND AGAIN
OBJECTIVES
Scouts will tie a butterfly knot to create a fixed loop in the standing part of a line.
Scouts will form a working rope tackle and use it to lift a weight.
Scouts will secure the load they lift, using the hauling end of the line to tie two Half Hitches around the length of ropes extending from the butterfly knot, and cinching the hitches up tight against the knot’s fixed loop.
MATERIALS
Length of manila rope 1/2 to 3/4 of an inch in diameter with one end threaded around a ground-level anchor, for purposes of demonstration
Horizontal hitching rack(s) secured 5 feet off the ground with one 4-foot nylon cord hanging down for each Scout
One 2-1/2 pound barbell weight (or facsimile) for each Scout
PROCEDURE A
The instructor(s) methodically demonstrates how to tie a butterfly knot in the large diameter rope.
With an attendant holding on to the free end of the large diameter rope, the instructor(s) proceeds to use it to form a rope tackle.
Each Scout stations himself behind a cord on the horizontal hitching rack. Using the large diameter rope, the instructor(s) slowly goes through each step to tie a butterfly knot, as each Scout attempts to duplicate the steps with their cord.
After the Scouts have grasped how to tie a butterfly knot, they tie one again, about 2 inches from the horizontal pole of the hitching rack.
CLICK ON THE IMAGE FOR A PHOTO ILLUSTRATION. (Small image will appear on the new page. Click on it for the large view.)
With their fixed loop in place, each Scout passes their cord’s running end through the weight, then through the fixed loop forming a rope tackle.
Pulling on their cord’s running end, which now becomes the hauling line, each Scout uses their rope tackle to raise their weight.
Each Scout can compare the resistance they feel by (1) pulling the hauling line down and away from the rack, and (2) pulling it up towards the rack.
PROCEDURE B
With the rope tackle tied in the large diameter rope, the instructor(s) demonstrate how to tie it off by forming a half hitch with the hauling line around the length of ropes extending from the butterfly knot, and cinching it up tight against the knot’s fixed loop. He also adds a second half hitch, working it up against the first.
With the instructor’s help as needed, holding the position of their lifted weight, each Scout ties off their rope tackle with two half hitches.
This is the eighth post in a series that will eventually comprise an activity-based, unit pioneering program curriculum.
VIII. For a wide range of pioneering structures, proper anchoring is crucial for both stability and safety. When nature doesn’t furnish natural anchors as in trees or boulders in just the right location, it becomes necessary to build your own. Of the two most prevalent approaches to building a very strong anchor, the 3-2-1 Anchor is the most simple. Also, depending on the amount of strain the lines must withstand, this form of anchoring can be constructed in a variety of configurations.
OBJECTIVE
By following the proper procedure, Scouts will work together and demonstrate they can correctly build a 3-2-1 Anchor.
MATERIALS
six pioneering stakes 30-inch x 2 to 2-1/2 inches
two wooden tent stakes
two 1/4-inch manila lashing ropes for the tourniquets (an 8 to 10-foot and a 12-1/2 to 15-foot will do)
30 to 50-foot x 3/8-inch manila rope
one heavy wooden mallet
PROCEDURE A
With the supervision of the instructor:
Strong Anchor for Pioneering Projects
Scouts take turns driving three pioneering stakes 18 inches into the ground in a row at a 20° angle using a large wooden mallet.
Scouts take turns driving two pioneering stakes also 18 inches into the ground, at a 20° angle next to each other, spaced 2 feet away from the three-stake set.
In the same way, Scouts take turns driving one more pioneering stake into the ground spaced a foot away from the two-stake set.
As an attentive group, Scouts join the ends of the longer 1/4-inch manila rope with a sheet bend and form a double loop around the three-stake set and two-stake set. Using a tent stake, they twist the loop tight in a tourniquet. The loop is positioned at the top of the three-stake set to the bottom of the two-stake set. Once it is tight they push or tap the tent stake into the ground to keep it from unwinding.
With the shorter 1/4-inch manila rope, Scouts repeat the tourniquet process between the two-stake set and the single stake.
PROCEDURE B
As an attentive group, Scouts tie a butterfly knot about 15 feet from one end of the 30 to 50-foot rope.
Scouts pass the end of the rope that’s 15 feet away from the butterfly knot around the bottom of the three-stake set. (No rope grommet will be necessary for this activity.)
Scouts proceed to form a rope tackle by passing the same end through the fixed loop of the butterfly knot.
PROCEDURE C
One Scout grabs a hold of the hauling end of the rope tackle, and two Scouts grab hold of the other end. On signal, to test the effectiveness of the rope tackle (and indeed the 3-2-1 Anchor!), a short tug of war ensues between the one Scout against the two Scouts.