The following text is by Adolph E. Peschke as presented in the 1998 printing of the 1993 edition of the Pioneering Merit Badge Pamphlet: “When you have to tie the ends of two large ropes (1/2”-diameter or larger) together, there is no better knot to use than the carrick bend. While many other knots reduce the strength of the rope considerably, a carrick bend reduces its strength only slightly. You’ll find that once a carrick bend is put under a big strain, it’s not all that hard to untie. The knot will tighten under the strain of the ropes, but won’t slip and works well with wet or slippery ropes.
The Carrick Bend Pulled Tight (collapsed)
The carrick bend looks very symmetrical when it’s first tied and is still loose, like two interlocking loops . But, as soon as it’s pulled tight, it looks quite different and is often hard to identify.”
Pioneering Uses
To tie large diameter (1/2-inch diameter or larger) ropes together, especially if there will be heavy strain on the rope.
To tie two ropes of any size together when the rope is wet or slippery and when you need a knot that will untie easily.
Tying a True Carrick Bend
To tie a true carrick bend, where the ends of the rope emerge diagonally from opposite sides, start by making an underhand loop at the end of one rope (red and white rope) and bring the end of the other rope (blue and white rope) under the loop as in the left photo. Then, weave the end of the other rope (blue and white rope) over and under at every crossing, as in the middle and right photos.
The carrick bend’s main function is to join the ends of large diameter lines that are stiff and not at all easy to form into other common bends. In these instances, the knot can be left in its elongated form and the ends are seized to their standing part. This way, after maximum strain is applied, the carrick bend can be easily untied.
There was a volunteer who procured ten 50 feet x 1/4-inch packages of what was presented as 100% manila rope. He wanted to prepare the rope to be used for Scout pioneering projects and set about diligently pre-stretching each 50′ length, cutting each into various lengths for lashing, painstakingly applying a sailmaker’s whipping to each end, burning off excess hairs because the ropes were very hairy, and then color-coding the ends with a little paint.
Hairy and Stiff
Because the rope was so hairy, uneven, and rather stiff, the volunteer was concerned that the quality of this manila was pretty poor. But, he persevered in his labors because this is what he had to work with. During the process of coiling and storing the lashing ropes, he became more and more concerned that this manila must be very old or something, because it was so dry and a whole lot less flexible than the lashing ropes he had provided Scouts for their projects in the past. Wondering if there was something he could treat the rope with to perhaps make it a little more flexible and soft, he set out to get some information from a rope expert. In the process, he contacted a real rope man from Louisiana who’s company distributed rope to bona fide suppliers. After this man learned that the rope was from China, it became very clear, the rope was not manila at all. Instead, it was sisal that had been color-treated to resemble manila. Pure manila rope comes from the Philippines. The man said the rope in question should NEVER have been sold as manila, but instead as “natural fiber” rope!
So, please watch out! Buyer beware! Sisal is not anywhere near as good for projects as manila. There’s a big difference between the two:
Manila rope is from the stems of the abaca plant which grows in the Philippines. (The capital of the Philippines is Manila, and hence the rope’s name.) The stems of the abaca plant have long fibers that make them very well-suited for making rope. As Adolph Peschke mentions in the older Pioneering Merit Badge Pamphlet:
“Pure manila rope is by far the best all-around rope. It is easy to handle, has good strength-to-size ratio, and does not have an objectionable stretch factor. It handles well in three important pioneering areas: knot tying, lashing, and in using a block and tackle.
“Manila rope can be spliced easily and withstands repeated wetting and drying cycles, making it suitable for boat and marine use, as well as many camping and pioneering applications. Manila rope should provide the bulk of the rope needed for your troop’s pioneering kit. (Its cost is mid-range.) Properly cared for it will give good service for quite a few years.”
Sisal rope,on the other hand, is from a cactus plant that grows in very dry areas and whose fibers are shorter and more splintery. Big difference! Here’s what Adolph Peschke says about sisal:
“Sisal rope has much the same appearance as manila rope, but it is quite inferior in strength and does not handle well when used for lashing or knot tying. When sisal rope that is tied into a knot or lashing gets wet and then dries, it becomes useless because of the kinks that remain.
Made in China!
“Even though it costs less. it is not cost effective because it breaks down quickly during use and when it gets wet. It might offer limited use in cases where expendable, but overall the cost is high when compared to other types of rope that can be used again and again.”
Please don’t be fooled. As for the poor volunteer who went through all the time and effort to prepare new lashing ropes and ended up with forty of lower quality, you gotta love him. And, after 80 applications, at least he’s now an expert at tying the sailmaker’s whipping.
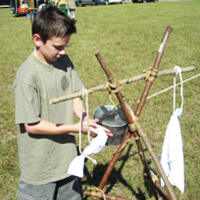
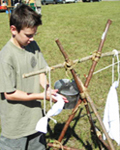
Lashing together a Trestle from Bamboo Spars (note the friction tape)
The following text is by Adolph E. Peschke as presented in the 1998 printing of the 1993 edition of the Pioneering Merit Badge Pamphlet:
A trestle is the basic component for building a bridge in a pioneering project. It is used to support the walkways.
The most basic form of a trestle is an H-frame. It consists of two legs, two ledgers, and two cross braces (see figure 125). When building a bridge, the top ledger is also called a transom. This is the part that supports the walkways.
To make an H-frame trestle, the two ledgers are lashed near the top and bottom of the legs and the cross braces are added, lashing them to the legs.
Figure 125
All of the lashing on the H-frame trestle is done with two types of lashings: a square lashing and a diagonal lashing. The ledgers are lashed to the legs with square lashings. Although it might not look like it, the cross braces are also lashed to the legs with square lashings, not a diagonal lashing. A diagonal lashing is used to lash the two cross braces together where they cross in the center.
When setting out to build an H-frame trestle, choose the two spars for legs first. These spars can be most any length, depending on the type and height of the structure you’re building.
To build a basic H-frame, lay the two legs on the ground with the two butt ends of the spars at the same end and even with each other. Then add the ledgers.
Ledgers. The ledgers are spars that are typically 2 to 2-1/2 inches in diameter. They are lashed to the legs with square lashings. Any of the three square lashings (shown in this pamphlet) can be used. The position of the ledgers on the legs will depend on the structure you’re building. There are a couple of general rules to keep in mind.
This Trestle is One of Several Subassemblies in a Larger Project
First, always keep the legs parallel and the butt ends of the legs even with each other as you’re lashing on the ledgers.* If you don’t, the trestle will stand crooked when you stand it up. As you add the ledgers, they should not stick out too far beyond the legs. You must leave enough room at the ends to tie the lashing, Any more will get in the way.
When using a Traditional Square Lashing or a Modified Square Lashing to tie the ledgers to the legs, be sure the starting clove hitch is placed on the leg so it’s beneath the ledger. When the clove hitch is below the ledger it will support it when the trestle is stood upright. As you tie the lashings, make sure they ar all very tight.
If you use a Japanese Mark II Square Lashing, you can start this lashing with a clove hitch in the middle of the rope to help support the ledger.
Cross braces. Next, the cross braces are added. The cross braces are spars that are usually 2 inches in diameter. They are lashed to the legs in a particular sequence.
First, flip the trestle over and work on the opposite side from the ledgers (see figure 125). Lash one cross brace to the back side of both legs. As mentioned before, use a square lashing (not a diagonal lashing) to attach the ends of the cross braces to the legs.
The second cross brace is added so that the bottom end is on the same side as both ends of the first cross brace. The other end is placed on the front side, the side with the ledgers (see figure 125). This is done so that the cross braces are standing slightly apart. There will be a gap where they cross at the center.
Trestle built with 5′ Scout Staves
Diagonal Lashing. After the ends of the ledgers and the cross braces are lashed to the legs, stand the trestle up on end. Adjust the trestle so that the legs are parallel. Also check to see that the top ledger is parallel to the ground. If it is not, lower the trestle, untie the lashing, and adjust it.
When the legs are parallel and the top ledger is parallel to the ground, you’re ready to tie the diagonal lashing to the cross braces while the trestle is standing upright. This lashing is very important to the strength of the trestle.
The diagonal lashing creates triangles that are important to stiffen the arrangement of the spars and to keep the trestle from racking. Look around at steel towers, bridges, or buildings being erected and you will see the triangle used in many places for the same reasons as we use it to build a trestle.
When the cross braces are lashed to the legs, there is a slight gap between them where they crossed at the center. A diagonal lashing is used here because it starts out with a timber hitch. The timber hitch pulls the cross braces tightly together. This adds strength to the whole trestle. You have to keep a strain on the lashing rope as you complete the diagonal lashing with three wraps in each direction around the X. Then make two frapping turns between the cross braces to pull the wraps tight. Finally finish by tying another clove hitch on one cross brace.
Once the possibility of racking has been taken care of with the diagonal lashing, the trestle’s vertical legs provide support for a large downward load. Since this is a downward force, also known as a shearing force, the legs don’t have to be very big. In fact, the overall shape of the trestle is an engineered structure that is able to support quite a bit of weight with rather small-diameter spars for legs.
* An exception is building a Single Lock Bridge when the top of one trestle has to fit between the legs of the other.
The following text is by Adolph E. Peschke as presented in the 1998 printing of the 1993 edition of the Pioneering Merit Badge Pamphlet:
Once you learn to tie and use the constrictor, you will wonder where it has been hiding in all those knot books and why it isn’t in wider use today.
In the days when black powder was used for blasting in mining operations, this was the knot that was tied around the top of the bag containing the black powder to hold the fuse in securely; hence, it’s other common name, the Bag Knot. *
The constructor is based on the clove hitch, except that it has an extra half-knot that provides an extra hold when the knot is pulled tight. Like the clove hHitch, the constrictor can be tied using the end of the rope (see figures 19 and 20) or by forming a twisted loop and slipping it over a spar (see figures 21, 22, and 23).
Pioneering Uses
To use interchangeably with a clove hitch, except once the constrictor is pulled tight, it is quite hard to untie.
To start a lashing. When it’s tied to a vertical spar, the crossing spar can rest on it while the lashing is being made.
To make a good temporary whipping at the cut end of a rope, or to start the West country whipping.
To start a splice, use it to stop off the unlaid strands of the rope so they won’t unravel further as you’re working the splice.
The Constrictor Knot
* The constrictor is also referred to as a Miller’s Knot in that it was used to tie the tops of bags of flour.
The following text and some of the drawings are by Adolph E. Peschke as presented in the 1998 printing of the 1993 edition of the Pioneering Merit Badge Pamphlet:
We could imagine the first lashing made by man was wrapping a few strips of bark around a stone to hold it to a tree branch to make an ax to hunt and build with. Even today with all our modern ways to hold things together, it is still fascinating to lash sticks or spars together to make a camp gadget or useful structure.
There are still areas in the world where lashing spars (or bamboo poles) is the basic means of building structures. In Scouting, we use the same methods but have replaced strips of bark and vines with natural and synthetic fiber ropes.
The best choice of rope to use for lashing the type of pioneering projects (shown in this pamphlet) is pure manila rope. Therefore, all references to rope used for lashing in this section refer to manila rope.
Yet, sometimes we are faced with a problem—we have to use what is available and economical to get the job done. When making camp gadgets for temporary use, you could use lesser quality, less expensive rope or even binder twine for small projects.
SQUARE LASHINGS ***
The basic type of lashing for most projects is some form of a square lashing. This lashing is used to join two spars together, usually at a right angle, but not always. For example, square lashings are used when building a trestle to join the ledger and header to the legs at right angles. But it is also used to hold the ends of the X bracing to the legs at an angle. (Refer to “Making a Trestle.”)
In this section, three different square lashings are shown: (1) the Traditional Square Lashing, (2) the Modified Square Lashing, and (3) the Japanese Mark II. All three types of square lashings accomplish the same thing by making three wraps and two frapping turns around the spars being held together.
The only difference between these three different square lashings is the type of knot that is used to start and complete the lashing. You may learn that one of these knots is easier to tie, if so, you can stick with the one you are most comfortable with.
In addition to square lashings, you will most likely need to know how to make a diagonal and shear lashings. Some methods of making these types are also shown later in this section.
LASHING TERMS
No matter what kind of lashing you’re making, there are two basic terms you should be familiar with: wraps and fraps. The basic difference between the two terms is that a wrap is made around the spars, while a frap is made around the rope itself.
Wrap. A wrap is a turn made around the two spars to hold the spars tightly together. Usually, three wraps are made to form a Square Lashing. Some other lashings require more wraps.
Frap. A frap is a turn made between the spars. It goes around the wraps to pull the wraps tighter. Usually two frapping turns are made on a lashing.
Good lashings are not made in a hurry. Each wrap must be made with a strain on the rope. Frapping turns should be pulled up as tightly as possible before the final knot is tied.
ROPE LENGTH
When you set out to make a lashing, the size and length of the rope you need are among the first questions you have to answer. To determine the length of rope needed for a lashing, add the diameters (in inches) of the two spars at the point the lashing is being made. If one spar is 2-1/2 inches in diameter and the other is 3-1/2 inches in diameter, the total equals 6 inches. Multiply by 3 feet to get the length of the rope needed for lashing.
If you use a rope that is too short to make three wraps and two fraps for a lashing, you should add (Splice or join with a Square Knot) a length of rope to complete the lashing with three full wraps and two fraps. For safety, don’t leave the lashing short.
If you find you have extra rope, make more wraps or fraps to use up the rope to avoid cutting the rope or leaving long loose ends hanging out.
ROPE DIAMETER
In most cases, 1/4-inch diameter manila rope should take care of lashing two spars together as long as the combined diameter of both spars is 6″ or less. When the combined diameter is over 6 inches, use 3/8-inch diameter rope.
PIONEERING KIT
If your troop or camp puts together a pioneering kit, it should contain lashing ropes that are cut to standard lengths: 10, 15, 20, 30 and 50 feet.
Both ends of these lashing ropes should be properly whipped. It also helps to color-code the ends of all ropes with a bit of paint to denote each length. When storing ropes, make sure they are dry and properly coiled. Never “hank” ropes for storage. That is, don’t wrap them around your hand and elbow to form a coil. Tie each coil with a short piece of cord and store the coiled rope on pegs or in a ventilated storage box.*
In Scout Pioneering in the United States we most often see the square lashing started with a clove hitch. The clove hitch is tied on the vertical spar, just below where you want to join the crossing horizontal spar (see 1).
Using a clove hitch to start this lashing allows for two things. First, you can rest the crossing spar on the clove hitch to help support it as you begin the lashing while building your structure. Second, the clove hitch helps keep the structure from racking (twisting out of shape), causing the lashing to loosen as it is moved or hoisted into position.
After the clove hitch is tied, wrap the excess short end of the rope around the standing part of the rope (see 2). Hold the crossing spar up to the vertical spar and make three wraps around the spars using the long end (see 3, 4, and 5). Pull each wrap tight to hold the spars together. Make two frapping turns around the wraps (between the spars) to pull the wraps tight (see 6 and 7) and finish with another clove hitch on the horizontal spar (see 8 and 9).
One other point to make about the square lashing is that you shouldn’t be fooled by or limited by its name. Although two spars can be lashed together at 90° using a square lashing, it can also be used to lash two spars together at any angle. For example, a square lashing is used to lash the ends of two light spars to the uprights of a trestle to form the X bracing. A diagonal lashing is used at the center of the X to hold the crossed spars together.
MODIFIED SQUARE LASHING
The Modified Square Lashing was developed because of the difficulty usually experienced when tying a clove hitch to complete the traditional square lashing. The clove hitch that starts the lashing is easy enough to make, but tying a clove hitch at the end of the lashing is a different matter.
As shown in figure 104, the modified square lashing starts with a clove hitch. When tying the clove hitch, let the running end of the clove hitch extend about 12″. Also do not twist the short end around the standing part of the rope as in the traditional square lashing.
After tying the starting clove hitch, proceed as usual using the long end of the rope to make three wraps (see figure 105). Then make two frapping turns (see figure 106).
To complete the lashing, bring up the short end of the rope that extends from the clove hitch and tie a square knot (see figure 107). Bring the short end up in the opposite direction of the frapping turns.
As in the Traditional Square Lashing, there is some disadvantage in having to make the complete lashing using the one end of the rope.
Japanese Mark II Square Lashing Photographed Procedure
DIAGONAL LASHING ***
When putting crossed braces on a structure to keep it from racking (as used when making a trestle), the most important lashing is the diagonal lashing where the spars cross. (Refer to the “Making a Trestle” section.)
When the cross spars are properly assembled on the trestle, they will be standing apart where they cross. That is, there will be a few inches of space between the spars where they cross at the center of the X. To pull them tightly together, a timber hitch is used to start the lashing (figure 1). As the timber hitch is pulled tight, the spars are sprung together. Next, three wraps are made in each direction across the X (figures 2 thru 5). After the wraps, make two frapping turns between the spars, pulling the wrapping turns tightly together and taking up any slack (figures 6 and 7). Finally, tie a clove hitch on one spar to complete the lashing (figures 8 thru 10). When this lashing is added to the cross braces, it helps keep the trestle from racking. Filipino Diagonal Lashing.
Diagonal Lashing Diagram
WEST COUNTRY ROUND LASHING
The pattern you make with the rope for this lashing is the same as the one to make the whipping. The only difference is that this lashing is tied around two spars to hold them together.
To make this lashing, tie a series of half-knots (overhand knots) around the two spars (see figure 115). Tie one half-knot in front and the next half-knot in back (see figure 116). Make sure each half-knot is pulled up as tight as possible. After tying six to ten half-knots, finish off the lashing with a square knot (see figure 117). By using six to ten half-knots in this lashing, it makes it very strong and effective, but can be a little difficult to untie.
The West Country Round Lashing is used to tie two spars together to extend the overall length of the spars. When this is done, you should make two sets of lashings, not just one lashing. Make one lashing at each end of the overlapping spars.
West Country Shear Lashing Diagram
TWO-SPAR SHEAR LASHING (Shear Lashing)
The main application for the Two-Spar Shear Lashing is when spar legs are to be spread apart to form an A-frame.
The Two-Spar Shear Lashing starts with a clove hitch on one spar (see figure 118). After making the clove hitch, wrap the excess part of the short running end around the standing part of the rope (see figure 119).
Two-Spar Shear Lashing Diagram (this drawing has been modified for the purpose of clarity)Completed Shear Lashing Before the Spars have been SpreadShear Lashing After Spreading the Shear Legs
Unlike square lashings, the shear lashing requires eight or ten wraps around the spars before making the frapping turns between the spars to pull the wraps tight (see figure 120). This lashing then ends with a clove hitch on the other spar (see figure 121).
If you’re making an A-frame, start the spars side by side and tie a clove hitch on one spar, about 1 foot from the top end of the spars depending on the project. Then you can take ten wrapping turns around the spars, making the wraps somewhat loose. The legs can then be spread to the required distance. This should put strain on the wraps.
With the legs apart, you can make the frapping turns around the wraps to pull them tight. Finally, complete the lashing by tying a clove hitch on the opposite spar.
In some pioneering situations all that’s needed is a few wraps with a rope, a light cord, or binder twine to hold two small spars or sticks together. Wrap the rope or cord around the spars a few times and finish with a Square Knot. This is called a strop lashing.
A strop lashing can be drawn down tight, or it can be made as a loose wrap so that it allows movement or acts as a hinge.
The strop lashing can have several simple applications at camp. For example, if you don’t want to dig a hole for the staff of your patrol flag, drive a tall stake in the ground. Then use a light cord or binder twine to make two strop lashings about 1 foot apart to hold the staff to the stake (see figure 122).
If your patrol just completed a signal tower and you want to show who did it, lash your patrol flag to the top of one of the legs with a strop lashing.
When you’re adding walkways to a bridge, they need to be joined to the trestle to form a single unit. The way to do that is to lash the two walkways to the transom at the center of the bridge with two or three strop lashings (see figure 123).
The ends of the walkways also need to be held to stakes. Use a strop lashing to hold the ends of the walkway to the stakes (see figure 124).
* An approach that is seen as a practical way to preserve and organize your lashing ropes is to coil ropes of the same length into manageable groupings, i.e. a large coil containing more than a single rope, and then tying up the grouping at one end with a 3-foot light cord.
** Round lashings are more frequently used to very effectively extend Scout staves or smaller diameter spars.
*** In a square lashing, the wraps and fraps form a square. In a diagonal lashing the wrapping turns cross the poles diagonally. Both lashings can be used to join two poles together that cross each other from 45º to 90º. It’s the square lashing that is used most because there is more contact between the rope and the poles, and hence it is stronger. A diagonal lashing is used when there is a need to close a gap between two spars or when they spring apart, in other words, when we want to bind poles together where they cross each other but do not touch. This most commonly occurs when the ends of the spars are already lashed in place in a structure, as in forming the X-brace of an H-Trestle.
This is a simple and quick way to tie a tripod lashing. The wraps are not woven in and out between the spars. The running end is simply wrapped around all three, snugly but not too tight. In Rope Works Plus, Gerald Findley refers to this lashing as a Tripod Lashing with Plain Turns. Here’s a page right out of the 1967 printing of the BSA Fieldbook:
Tripod Lashing
Notice how the outside legs cross under the middle leg. In that way, the strength of the tripod is not entirely dependent on the strength of the lashing rope, but also on the support given by the wood of the outside legs.
Racking Turns
Note: This lashing works very well for most Scout Pioneering applications, but for a heavy tripod, or a large one that will be supporting a lot of weight for a longer period of time, using racking turns (Figure of Eight Tripod Lashing) provides more contact between the rope and the spars.
The following text is by Adolph E. Peschke as presented in the 1998 printing of the 1993 edition of the Pioneering Merit Badge Pamphlet:
This is one of the basic knots that is very reliable for a number of uses in pioneering work. It is easy to tie and untie and does not reduce the strength of the rope due to sharp turns when under a hard pull.
You start by making a roundturn. This provides extra surface around the spar when chafing or slipping might be a problem. Once you’ve made the roundturn, the rope has a grip on whatever it’s around (see 1). The strain on the rope can then be adjusted before finishing off with two half hitches (see 2 and 3).
The knot is well suited for both ends of a guyline. When it is used in a place where you will not have easy access, as at the top of a tower, secure the running end, (after the two half hitches are tied) with a piece of light cord.
It can be tied in the middle of a long rope by making a long bight with enough rope to make two half hitches after the roundturn.
1, 2, and 3 (below) illustrate the half hitches tied loosely. In actual use both half hitches are pulled up tight.
Tying a Roundturn with Two Half Hitches
To make the knot, start by making a roundturn over a spar.
Next, make a half hitch around the standing part of the rope. Then make another half hitch.
When both half hitches are made, pull them tight, and secure the ends with a small cord.
PIONEERING USES
At both ends of large hand and foot ropes for a monkey bridge. Be sure to secure the running ends with a light cord.
When wear is a factor when tied to an iron ring.
For guylines because it does not jam, and is easy to untie when adjustments are needed.
The following text is by Adolph E. Peschke as presented in the 1998 printing of the 1993 edition of the Pioneering Merit Badge Pamphlet:
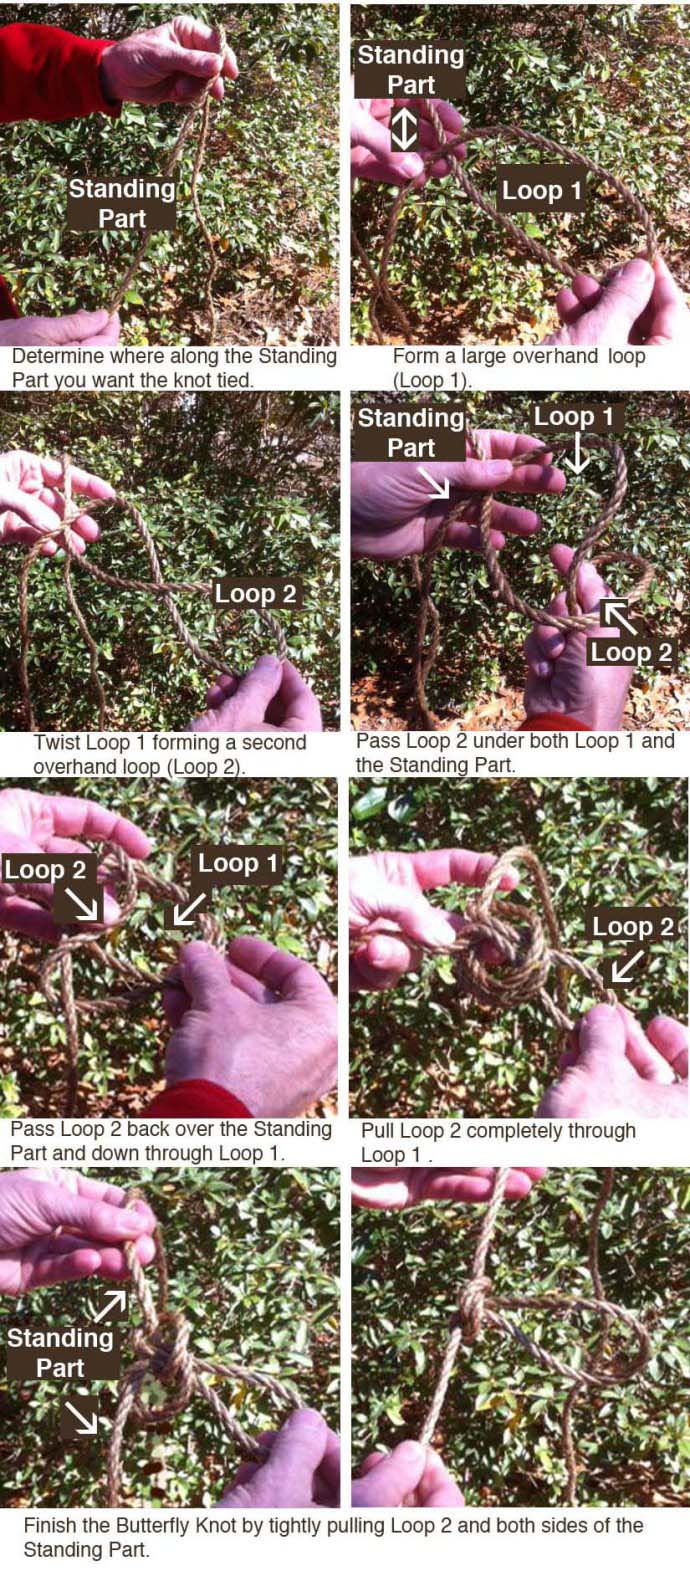
A butterfly knot is a fixed loop tied in the middle of a rope. There are a number of other knots that do the same thing, but the butterfly knot tends to work better because it doesn’t jam when strained and it’s easy to untie.
Since it’s tied in a symmetrical fashion, strain can be put on it from any direction. Even though this knot is usually tied in the middle of the rope, you can also tie it at the end of the line if you need a fixed loop that is easily untied.
The butterfly knot is a favored knot for mountain/rock climbers, used for hand or foot loops or used to hook their carabiners into. It has many uses in pioneering work.
Butterfly Knot Instruction at a Camporee
Pioneering Uses
When using a rope to pull a heavy object (such as a log), tie a series of butterfly knots to form loops for each person’s hand or shoulder.
When climbing a rope, you can tie a series of butterfly knots to form loops for your hands and feet.
To provide a fixed loop to use with a toggle.
When making a rope tackle, the loop in the butterfly knot serves as the pulley. (See Rope Tackle.)
To tie up horses or anchor canoes on shore, tie a series of in a picket line for each horse or canoe.
YOU’LL USE IT AGAIN AND AGAIN!
The butterfly knot, also named the Alpine Butterfly and the Lineman’s Loop, has been referred to as the “Queen of Knots” by Pioneering legend, John Sweet.
The following text is by Adolph E. Peschke as presented in the 1998 printing of the 1993 edition of the Pioneering Merit Badge Pamphlet:
Pioneering is the knowledge and skill of using simple materials to build structures that are used in a wide range of Scouting activities. These skills are sometimes referred to as “backwoods engineering.”
Down through the ages, people have used ropes, spars, and simple hardware to build bridges, towers, and even their own shelters. In the early development of our country, pioneering methods were used in mining and transportation, to clear the wilderness, and to build roads and bridges. So it is understandable that the term “backwoods engineering” was applied.
The same skills can be used by Scouts to build pioneering projects ranging in complexity from a simple camp gadget to a signal tower.
Whatever the project, the same applied principles of physics, geometry, and math are used to build pioneering projects and structures. But, keep in mind that all the information (in this pamphlet*) is eventually used for a practical, hands-on application—that is, to build something.
Pioneering is a good foundation for many Scouting activities. You must learn, and then use, such disciplines as planning ahead and teamwork. You can also put to use the basic skills learned in rank advancement, such as knot tying.
But most of all, pioneering provides a practical way to experience the joy of accomplishment when you’ve built something that is needed for yourself or others; it can be something that makes living in camp easier and more comfortable. Pioneering can be both fun and challenging when you use your skill and knowledge to choose the right materials (ropes and spars) and build a usable structure.
The basics of pioneering, such as tying knots, making lashings, using rope tackle, constructing anchors, and basic rope knowledge can be done at home. The projects and structures (shown in this pamphlet**) can usually be constructed with materials available at summer camp or at council camping events.
The following text is by Adolph E. Peschke as presented in the 1998 printing of the 1993 edition of the Pioneering Merit Badge Pamphlet:
Building pioneering projects often requires some type of strong point for attaching a guyline for a tower or derrick. An anchor point might also be needed to anchor one or both ends of a monkey bridge.
Sometimes nature will provide a tree or rock in just the right location or you might be able to shift the location of the project to take advantage of a natural anchor.
STAKES
Pioneering Stakes
When nature does not provide a solution, anchors can be constructed using stout pioneering stakes.
Note: Under no conditions should tent pegs be used for pioneering stakes. They’re not long enough or strong enough to make a safe anchor.
Pioneering stakes should be made of hardwood, such as oak or hickory. The most common size of stake (for the projects shown in this pamphlet) is 2-1/2 inches in diameter and about 24 to 30 inches long (see figure 84). After cutting the stake to this size, cut a point on one end. Then bevel the top edge to prevent it from mushrooming or splitting when the stake is driven into the ground.
MALLET
Wooden Mallets
When driving stakes into the ground, it’s best to use a wooden mallet. Using a metal sledge hammer or an ax head will damage the stake.
To make a wooden mallet, cut a 4-inch diameter piece of hardwood, such as hickory, elm, or sycamore, about 11 inches long (see figure 85). It should weigh about four pounds. Drill a 1-1/8-inch diameter hole to mount the handle. The handle can be made from a 24-inch length of hardwood (similar to making a stake). Use a knife or ax to round the end of the handle to fit the hole in the mallet head. Secure the handle in place with a wedge placed crosswise to the length of the head.
Buried Spar & Guyline Placement
SOIL CONDITIONS
When driving the stake into the ground, drive it at about a 20° angle. Soil conditions can vary and will dictate how large and long a stake you need. If there will be a heavy strain on the anchor, you might need additional stakes as in the 3-2-1 configuration (shown in figure 89). After the stake is driven into the ground, keep your eye on it as strain is applied to see how it’s holding.
If ground conditions are unsuitable for even the largest stake you have, use a 4-inch diameter spar that’s buried 35 inches in the ground at a 30° angle and anchored in place with a stake (see figure 86).
GUYLINE
Always attach the guyline around the stake as close to the ground as you can get it. If the guyline is placed or slips higher on the stake, there will probably be enough leverage to pull the stake loose (See figure 87).
ANGLES FOR GUYLINES
Both the 3-2-1 anchor and the log-and-stake anchor should be positioned so that the guyline is at a 15° angle, or a maximum of 25°. To determine this, measure the height at the point where the guyline is attached. Double this distance to determine the minimum distance required between the base and the anchor. For example, if the guyline is attached 10′ up the pole, the anchor should be a minimum of 20′ from the base (see figure 88). If your line is long enough, it won’t hurt to place the anchor a few feet further out.
Angles for Guylines and Guyline Length
3-2-1 ANCHOR
Strong Anchor for Pioneering Projects
As the name implies, the 3-2-1 anchor is made by driving stakes in a series: three stakes, then two stakes, and then one stake to form the anchor (see figure 89). All six stakes are 30 inches long and are driven 18 inches into the ground at a 20° angle.
First drive in the set of three stakes. Next drive in the set of two stakes about 24 inches away from the first set. Then tie a rope from the top of the three-stake set to the bottom of the two stake set using at least two loops of 1/4-inch manila rope, or six to eight loops of binder twine. Then use a small stick to twist the rope tight in a tourniquet. After the rope is twisted tight, push the end of the stick in the ground to keep it from unwinding.
Finally, drive a single stake in the ground about 12 inches from the two-stake set. Once again, use a twisted rope or binder twine as a tourniquet to hold the two-stake set tightly in place.
Depending on the strain, you can use other configurations, such as 2-1-1, or even 1-1-1 for a light strain. When using any stake anchor, be sure that it is in direct alignment with the strain being applied.
LOG-AND-STAKE ANCHOR
Log-and-Stake Anchor
The log-and-stake anchor is easy to make and can hold a considerable amount of pull. You can tie the line directly to the log, or you can use a ring-and-rope grommet as shown in figure 90.
To make the log-and-stake anchor, place a log 4 to 6 inches in diameter perpendicular to the pull of the line. Then drive in four large stakes in front of the log. Next, slip the rope grommet through the ring and then slip the ends of the grommet around the log (see figure 90).
Drive a second row of stakes 24 inches behind the front stakes. Then anchor the front stakes to the rear stakes with a tourniquet made of binder twine or rope.
STROPS
It is good practice to use a device called a strop to avoid damage to your long lines. It also makes it easier to tie off your long lines and to make adjustments.
A strop can be made by using a 10-foot length of 1/2-inch diameter manila or polypropylene rope. To make a strop, splice a thimble and ring into one end of the rope (see figure 91), or use a screw pin shackle with a thimble.
The strop can then be wrapped around a rock or tree to attach the line (see figure 92). It can also be used around a spar that is anchored between two trees (see figure 93).
Strops
Note: Be sure to use a piece of canvas or burlap to protect your rope from sharp edges of a rock or to protect the bark of the tree from rope burns.
GROMMETS
A grommet is often used in conjunction with an anchor. A large grommet can be made by splicing together the ends of a 10-foot length of 1/2-inch manila or polypropylene rope. If you don’t have a spliced grommet in your pioneering kit, tie the ends of the rope with a square knot or a carrick bend. Be sure to secure the ends of the rope.
The completed grommet is useful when attaching a long line to an anchor of stakes. It provides a strong and more convenient way to attach a guyline or other long line.
The grommet you use must be made of a larger-diameter rope than the guyline to avoid creating a weak link in the chain between the structure and the anchor.
From certain perspectives, the following pioneering kit presented in the informative older Pioneering Merit Badge Pamphlet is undoubtedly very extensive for a single unit, and better suited for a kit stored in a large shed or storage facility earmarked for multi-unit use in a District or Council.
—> For a unit interested in putting together their own pioneering kit, a good place to start is to gather the materials necessary to undertake the specific project or projects the unit wishes to build. More supplies can be added to the unit’s kit to meet additional demands for materials, as required by the desire and wherewithal to tackle new and different projects.
The following text is by Adolph E. Peschke as presented in the 1998 printing of the 1993 edition of the Pioneering Merit Badge Pamphlet:
The easiest way to make sure that you have all the necessary ropes, spars, and equipment ready to build a pioneering project is to put together a pioneering kit. It saves a lot of time if the pioneering kit is organized and ready to go so you don’t have to spend time gathering all your equipment every time you want to build a pioneering project.
The pioneering kit described here consists of enough spars and ropes to build the projects shown in this pamphlet. It is designed to be used by a troop at summer camp to build “boy-size” structures: that is, projects that can be built by Scouts of Scouts BSA age. This kit is also ideal to provide the equipment necessary for teaching pioneering skills to new Scouts.
The sizes and quantities of ropes and spars described here should be a good starting point for your pioneering kit. You can always add more equipment as the number of Scouts participating increases, or if some Scouts become more skilled in building a wider range of projects.
SPARS
Knowing that this pamphlet might be used by Scouts all over the world presents some problems concerning availability of suitable species of trees to use for spars. Generally, pine makes the best spars because pine trees are straight. Also, when pine is stripped of its bark and dried out, it makes spars that are not too heavy, therefore suitable for “Scout-size” projects.
If pine is not available, cut spars from the straightest trees you can find. It might be to your advantage to make spars from hardwood species of trees. Given the strength of hardwoods, you might be able to use slightly smaller diameters as a weight-saving measure. Don’t overlook softwood spars for light, smaller projects.
Some lumberyards and farm supply stores carry round, treated fence posts that can be used for short lengths. Barn poles might also be available for a few of the longer lengths. Remember that barn poles are quoted at the top diameter, not the butt end. The supply yard might let you select and match what you need.
On all spars, you should remove the bark and cut the ends square. It is recommended that you cut all the spars to exact, even lengths, regardless of their butt diameter, as shown in the chart below.
Large Pioneering Kit: SPARS for Multi-Unit UseColor-Code for Spars
There are several combinations of lengths and diameters of spars suggested for this pioneering kit. This is because various projects might require the same length spar, but in different diameters depending on where it is to be used in the structure.
Both ends of the spars in your pioneering kit should be color-coded with a band of paint to denote length. Here are the colors that can be used to easily show the lengths of the spars without having to measure them each time.
ROPES
The best all-around rope to use for pioneering projects is pure manila, three-strand, twisted. (Refer to the “Rope” section.)
All ropes in your pioneering kit should be whipped on both ends. In the case of plastic rope, whether it’s twisted or braided, it must be first melted back and then whipped.
Large Pioneering Kit: ROPES for Multi-Unit UseRope Color-Code
Ropes cut to the standard lengths shown above should have the ends color-coded with a dab of paint to denote the length. Here is a recommended color-coding system for all rope, regardless of diameter of the rope:
You might also have a need for ropes of specific diameters and lengths that are used for projects that are built often. These should be identified with a tag and coiled separately. These ropes, along with slings, grommets, strops, and anchor ropes should be stored in a separate box.
OTHER EQUIPMENT
In addition to spars and ropes, your pioneering kit should contain some basic equipment needed for building projects. This equipment includes
2 round-point long-handle shovels
4 wooden mallets
50 pioneering stakes
4 binder twine boxes
1 bow saw
1 hand ax
10 wooden cleats and nails
8 welded steel rings, 3/8″ x 3″
8 screw pin shackles, 3/8″
10 quick links, 5/16″
You might also find that putting this equipment on a trailer that can be pulled by a truck will help get your pioneering kit to your project site. The trailer will also help you move your pioneering kit to a dry shelter when not in use.
James Keller, Director of the Pioneering area at the 2013 National Jamboree, related a story about the Japanese Mark II Square Lashing. He described how back in 1993, Adolph Peschke had mandated that his staff should just use the Japanese Mark II Square Lashing for the national jamboree’s pioneering projects. Some of the Pioneering staff back then had not as of yet become familiar with the lashing, and at first, some were a little hesitant to adopt it. But, after becoming acquainted, their overwhelming consensus was, why had they wasted so much time over the years using the “traditional” approach starting and ending with a clove hitch?
Scouts Lashing on the Transoms of a Single A-Frame Bridges at the 2013 Jamboree
The following text is by Adolph E. Peschke as presented in the 1998 printing of the 1993 edition of the Pioneering Merit Badge Pamphlet:
The Japanese Mark II Square Lashing has found its way into Scouting in the United States through Wood Badge training in England, and because of the work of John Thurman, camp chief of Gilwell. He observed it on one of his many world trips related to Wood Badge training.
This lashing is a straightforward approach to the task of lashing two spars together. Begin by placing the spars in the desired position. Now fold your lashing rope in half.
The midpoint of the rope is placed around the vertical spar and just under the crossing spar (see figure 108). Now work both ends of the rope at the same time to make three wraps around the spars (see figure 109).
After completing the three wraps, bring the two ends up between the spars in opposite directions to make the frapping turns around the wraps (see figure 110). Pull the frapping turns tight, and complete the lashing by tying the two ends with a Square Knot (see figure 111). It’s that simple.
Tying the Japanese Mark II Square Lashing
The advantage of this lashing is that you’re working both ends of the rope at the same time. This makes it much quicker to tie since each hand has less rope to pull through. This lashing has the same holding effect as both the traditional and modified Square Lashings.
If more support is needed for the crossing spar, a Clove Hitch can be tied at the midpoint of the rope. Tie the Clove Hitch to the vertical spar just below the crossing spar. You can rest the crossing spar on the Clove Hitch as the lashing is being made. Then use both ends to complete the lashing as described above.
Photographed Procedure (First click on the above image, then for a a full-page view, start second wrap, click on smaller image that appears.)
The following text is by Adolph E. Peschke as presented in the 1998 printing of the 1993 edition of the Pioneering Merit Badge Pamphlet in the Lashing Section describing the traditional diagonal lashing…
When putting crossed braces on a structure to keep it from racking (as used when making a trestle), the most important lashing is the diagonal lashing where the spars cross.
When the cross spars are properly assembled on the trestle, they will be standing apart where they cross. That is, there will be a few inches of space between the spars where they cross at the center of the X. To pull them tightly together, a timber hitch is used to start the lashing. As the timber hitch is pulled tight, the spars are sprung together.
and in the Basic Knots Section describing the timber hitch:
The timber hitch is a knot that can be tied quickly. As strain is put on the rope, the knot gets tighter, yet it remains easy to untie.
To tie a timber hitch, first wrap the running end around the timber log or spar. Then loop the running end around the standing part of the rope, continuing to wrap the running end around itself a few more times. This will form a hitch that will tighten on the timber as the rope is pulled. After the timber is dragged or hoisted into position, the timber hitch is easy to untie.
TImber Hitch DrawingKillick Hitch
A note about this final half hitch: when using the timber hitch to lift or pull an object, that added half hitch combined with the timber hitch forms what has been referred to as a Killick Hitch. John Sweet in Scout Pioneering suggests this combination when making a lobstick to throw a line over a branch. The Killick Hitch is also known as a Kelleg Hitch. The timber hitch is most always exampled as the first step in tying the combination.
The following text is by Adolph E. Peschke as presented in the 1998 printing of the 1993 edition of the Pioneering Merit Badge Pamphlet:
Before you begin learning new knots, you need to know some of the basic terms used in knot tying. You should become familiar with these terms and use them as you learn how to tie the various knots.
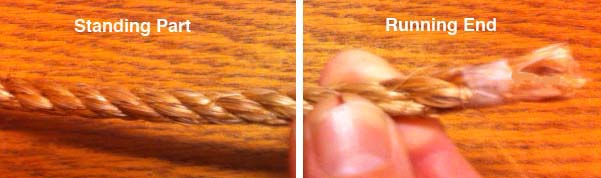
Running end and standing part. These are two of the most common terms used in knot tying. The running end is the end of the rope that is used to tie the knot. This end is sometimes referred to as the working end. The rest of the rope is the standing part.
Standing Part and Running End
Overhand loop. An overhand loop is formed when a loop is made so that the running end of the rope is on top of the standing part. It can be formed anywhere along the standing part of the rope in the same fashion.
Underhand loop. And underhand loop is formed when the running end of the rope is placed under the standing part of the rope.
Overhand and Underhand Loops
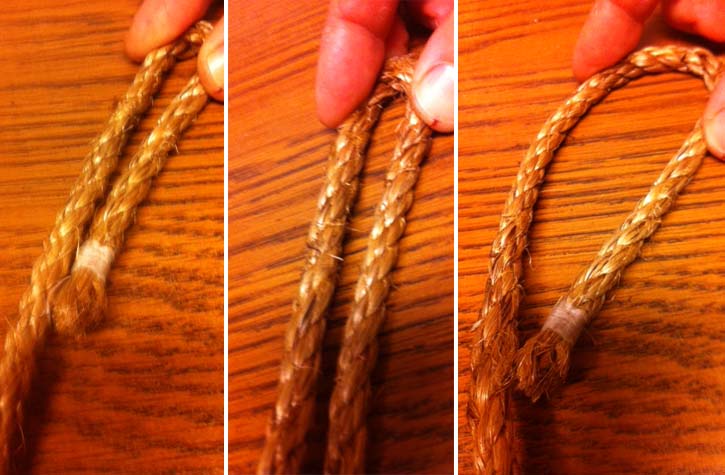
Bight. A bight is formed by doubling back a length of the rope against itself to form a U.
This can be done with the running end (as shown on the left), or anywhere along the standing part (as shown in the middle). Bights can vary from a few inches to a few feet in length. A bight doesn’t have to have a sharp bend. It can be “open” (as shown on the right). In this case, the running end of the rope is alongside the standing part of the rope, but is not crossed over (which would form and overhand or underhand loop).
A Bight
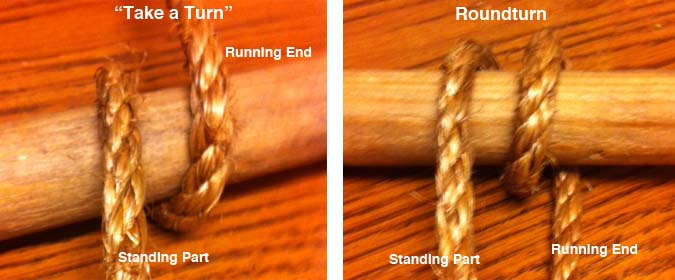
Take a turn. The term take a turn means to wrap a rope around a spar or stake so it continues off in the same direction. The friction this creates will give you a grip on the stake or spar that will help you hold the strain on the line. It also gives better control in taking up or letting out a line.
Roundturn. To make a roundturn, wrap the rope completely around a spar and bring the running end back along the standing part of the rope. A roundturn gives you even more grip in holding the strain on a line, and is the basis for tying several knots, as when making a Roundturn with Two Half Hitches.
Bend – A bend is a knot used to join two lengths of rope.
Bight – A bight has two meanings in knotting. It can mean either any central part of a rope (between the standing end and the working end) or an arc in a rope that is at least as wide as a semicircle. In either case, a bight is a length of rope that does not cross itself. Knots that can be tied without use of the working end are called knots on the bight.
Binding Knot – Binding knots are knots that either constrict a single object or hold two objects snugly together. Whippings, seizings and lashings serve a similar purpose to binding knots, but contain too many wraps to be properly called a knot. In binding knots, the ends of rope are either joined together or tucked under the turns of the knot.
Capsizing – A knot that has capsized has deformed into a different structure. Although capsizing is sometimes the result of incorrect tying or misuse, it can also be done purposefully in certain cases to strengthen the knot
Decorative Knot – A decorative knot is any aesthetically pleasing knot. Although it is not necessarily the case, most decorative knots also have practical applications or were derived from other well-known knots. Decorative knotting is one of the oldest and most widely distributed folk art.
Dressing – Knot dressing is the process of arranging a knot in such a way as to improve its performance. Crossing or uncrossing the rope in a specific way, depending on the knot, can increase the knot’s strength as well as reduce its jamming potential.
Elbow – An elbow refers to any two nearby crossings of a rope. An elbow is created when an additional twist is made in a loop. An example is when tying a Butterfly Knot.
Flake – A flake refers to any number of turns in a coiled rope. Likewise, to flake a rope means to coil it.
Frap – Fraps are a set of loops coiled perpendicularly around the wraps of a lashing as a means of tightening.
Friction Hitch – A friction hitch is a knot that attaches one rope to another in a way that allows the knot’s position to easily be adjusted. Sometimes friction hitches are called slide-and-grip knots. They are often used in climbing applications. Good examples of a friction hitch are the Rolling Hitch and Prusik.
Hitch – A hitch is a knot that attaches a rope to some object, often a ring, rail, spar, or post.
Jamming – A jamming knot is any knot that becomes very difficult to untie after use. Knots that are resistant to jamming are called non-jamming knots.
Lashing – A lashing is an arrangement of rope used to secure two or more items together in a rigid manner.
Loop – A loop is one of the fundamental structures used to tie knots. It is a full circle formed by passing the working end of a rope over itself.
Loop Knot – A loop knot is the type of knot that forms a fixed loop. It is created either when the end of a rope is fastened to its own standing part or when a loop in the bight of a rope is knotted. Unlike a hitch, a loop knot creates a fixed loop in a rope that maintains its structure regardless of whether or not it is fastened to an object. In other words, a loop knot can be removed from an object without losing its shape.
Noose – A noose can refer to any sliding loop in which the loop tightens when pulled.Open Loop – An open loop is a curve in a rope that resembles a semicircle in which the legs are not touching or crossed. The legs of an open loop are brought together narrower than they are in a bight.Seizing – A seizing is a knot that binds two pieces of rope together side by side, normally in order to create a loop. The structure of seizings is similar to that of lashings.
Setting – Setting a knot is the process of tightening it. Improper setting can cause certain knots to underperform.
Slipped Knot – A slipped knot is any knot that unties when an end is pulled. Thus, tying the slipped form of a knot makes it easier to untie, especially when the knot is prone to jamming.
Splice – Splicing rope is a method of joining two ropes done by untwisting and then re-weaving the rope’s strands.
Standing End – The standing end (or standing part) of a rope is the part not active in knot tying. It is the part opposite of the working end.
Stopper Knot – A stopper knot is the type of knot tied to prevent a rope slipping through a grommet or as a temporary whipping.
Whipping – A whipping is a binding knot tied around the end of a rope to prevent the rope from unraveling.
Working End – The working end (or working part) of a rope is the part active in knot tying. It is the part opposite of the standing end. (Working End is another name for Running End.)


")