Knot-Tying Terminology


The following text is by Adolph E. Peschke as presented in the 1998 printing of the 1993 edition of the Pioneering Merit Badge Pamphlet:

Before you begin learning new knots, you need to know some of the basic terms used in knot tying. You should become familiar with these terms and use them as you learn how to tie the various knots.

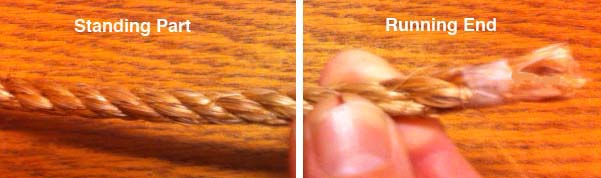
Running end and standing part. These are two of the most common terms used in knot tying. The running end is the end of the rope that is used to tie the knot. This end is sometimes referred to as the working end. The rest of the rope is the standing part.

Standing Part and Running End

Overhand loop. An overhand loop is formed when a loop is made so that the running end of the rope is on top of the standing part. It can be formed anywhere along the standing part of the rope in the same fashion.

Underhand loop. And underhand loop is formed when the running end of the rope is placed under the standing part of the rope.

Link to: Larger Image
Overhand and Underhand Loops

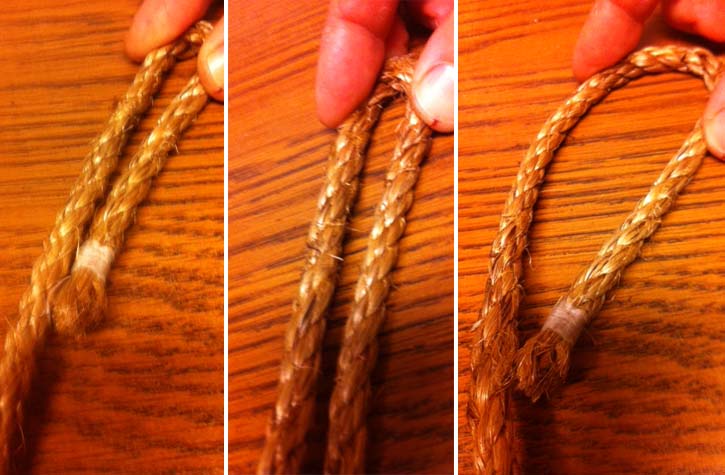
Bight. A bight is formed by doubling back a length of the rope against itself to form a U.

This can be done with the running end (as shown on the left), or anywhere along the standing part (as shown in the middle). Bights can vary from a few inches to a few feet in length. A bight doesn’t have to have a sharp bend. It can be “open” (as shown on the right). In this case, the running end of the rope is alongside the standing part of the rope, but is not crossed over (which would form and overhand or underhand loop).

Link to: Larger View
A Bight
Take a turn. The term take a turn means to wrap a rope around a spar or stake so it continues off in the same direction. The friction this creates will give you a grip on the stake or spar that will help you hold the strain on the line. It also gives better control in taking up or letting out a line.
Roundturn. To make a roundturn, wrap the rope completely around a spar and bring the running end back along the standing part of the rope. A roundturn gives you even more grip in holding the strain on a line, and is the basis for tying several knots, as when making a Roundturn with Two Half Hitches.
"Take a Turn and Roundturn
“Take a Turn and Roundturn

What follows is a glossary of knot-tying terms, much of which has been excerpted from Wikipedia’s List of Knot Terminology:

Bend – A bend is a knot used to join two lengths of rope.

Bight – A bight has two meanings in knotting. It can mean either any central part of a rope (between the standing end and the working end) or an arc in a rope that is at least as wide as a semicircle. In either case, a bight is a length of rope that does not cross itself. Knots that can be tied without use of the working end are called knots on the bight.

Binding Knot – Binding knots are knots that either constrict a single object or hold two objects snugly together. Whippings, seizings and lashings serve a similar purpose to binding knots, but contain too many wraps to be properly called a knot. In binding knots, the ends of rope are either joined together or tucked under the turns of the knot.

Capsizing – A knot that has capsized has deformed into a different structure. Although capsizing is sometimes the result of incorrect tying or misuse, it can also be done purposefully in certain cases to strengthen the knot

Decorative Knot – A decorative knot is any aesthetically pleasing knot. Although it is not necessarily the case, most decorative knots also have practical applications or were derived from other well-known knots. Decorative knotting is one of the oldest and most widely distributed folk art.

Dressing – Knot dressing is the process of arranging a knot in such a way as to improve its performance. Crossing or uncrossing the rope in a specific way, depending on the knot, can increase the knot’s strength as well as reduce its jamming potential.

Elbow – An elbow refers to any two nearby crossings of a rope. An elbow is created when an additional twist is made in a loop. An example is when tying a Butterfly Knot.

Flake – A flake refers to any number of turns in a coiled rope. Likewise, to flake a rope means to coil it.

Frap – Fraps are a set of loops coiled perpendicularly around the wraps of a lashing as a means of tightening.

Friction Hitch – A friction hitch is a knot that attaches one rope to another in a way that allows the knot’s position to easily be adjusted. Sometimes friction hitches are called slide-and-grip knots. They are often used in climbing applications. Good examples of a friction hitch are the Rolling Hitch and Prusik.

Hitch – A hitch is a knot that attaches a rope to some object, often a ring, rail, spar, or post.

Jamming – A jamming knot is any knot that becomes very difficult to untie after use. Knots that are resistant to jamming are called non-jamming knots.

Lashing – A lashing is an arrangement of rope used to secure two or more items together in a rigid manner.

Loop – A loop is one of the fundamental structures used to tie knots. It is a full circle formed by passing the working end of a rope over itself.

Loop Knot – A loop knot is the type of knot that forms a fixed loop. It is created either when the end of a rope is fastened to its own standing part or when a loop in the bight of a rope is knotted. Unlike a hitch, a loop knot creates a fixed loop in a rope that maintains its structure regardless of whether or not it is fastened to an object. In other words, a loop knot can be removed from an object without losing its shape.

Noose – A noose can refer to any sliding loop in which the loop tightens when pulled.Open Loop – An open loop is a curve in a rope that resembles a semicircle in which the legs are not touching or crossed. The legs of an open loop are brought together narrower than they are in a bight.Seizing – A seizing is a knot that binds two pieces of rope together side by side, normally in order to create a loop. The structure of seizings is similar to that of lashings.

Setting – Setting a knot is the process of tightening it. Improper setting can cause certain knots to underperform.

Slipped Knot – A slipped knot is any knot that unties when an end is pulled. Thus, tying the slipped form of a knot makes it easier to untie, especially when the knot is prone to jamming.

SpliceSplicing rope is a method of joining two ropes done by untwisting and then re-weaving the rope’s strands.

Standing End – The standing end (or standing part) of a rope is the part not active in knot tying.  It is the part opposite of the working end.

Stopper Knot – A stopper knot is the type of knot tied to prevent a rope slipping through a grommet or as a temporary whipping.

Whipping – A whipping is a binding knot tied around the end of a rope to prevent the rope from unraveling.

Working End – The working end (or working part) of a rope is the part active in knot tying.  It is the part opposite of the standing end. (Working End is another name for Running End.)

Rope for Pioneering and Camp Use

New ropes need to be stretched, before they are fit for use. One Scout only can do it! After the first stretch, the slack should be taken up and the process repeated once only.
From: “Scout Pioneering” Construction and Care of Rope by John Sweet

The following text is by Adolph E. Peschke as presented in the 1998 printing of the 1993 edition of the Pioneering Merit Badge Pamphlet:

KEY FACTORS TO CONSIDER

There are several important factors to consider when selecting the kind and size of rope to use in pioneering and camping activities. Three of the most important factors to consider are the strength in both the working load and breaking point of the rope, the stretch factor of the rope, and how easily the rope handles.

Some other considerations are the rope’s resistance to mildew, its ability to stand up to repeated wetting and drying, and whether or not it retains kinks from knots after having been under a hard strain, making it difficult to use a second time.

Cost is always an important factor to consider when equipping a pioneering kit. Factors that affect cost are quality, grade, packaged cut length, and source of supply. Scout units can usually buy rope from wholesale suppliers if it’s purchased in standard package lengths. Manila rope in 1/4″ diameter comes in a standard 1200′ coil, while larger diameters come in 600′ coils. Most other types of rope come in 600′ spools as a standard package. Shorter lengths are available from retail suppliers.

ADDITIONAL FACTORS

  • Since all rope types and sizes come in different grades of quality, which can relate to the strength, it is best to refer to the manufacturer’s specifications that appear on the package. It is a good idea to keep the package for future reference.
  • Braided rope is about 10 percent stronger than twisted rope of the same diameter and type.
  • Even the best knots can reduce rope strength 20 percent.
  • Overhand knots reduce strength 50 percent.
  • Polypropylene ropes lose strength when exposed to sunlight for extended periods of time.
  • Nylon rope is 20 percent elastic and stretches to add 20 percent to its original length.
  • The working load strength of most types of rope is up to 20 percent of its breaking strength. If available, go to the manufacturer’s specifications to determine the safe working load.
  • Good care and storage will prolong useful life.
  • Frequent inspections and discarding questionable rope is essential to ensure safe working equipment.

TYPES OF ROPE

Manila. Pure manila rope is by far the best all-around rope. It is easy to handle, has good strength-to-size ratio, and does not have an objectionable stretch factor. It handles well in three important pioneering areas: knot tying, lashing, and in using a block and tackle.

Manila rope can be spliced easily and withstands repeated wetting and drying cycles, making it suitable for boat and marine use, as well as many camping and pioneering applications. Manila rope should provide the bulk of the rope needed for your troop’s pioneering kit. (Its cost is mid-range.) Properly cared for it will give good service for quite a few years.

Polypropylene. Rope made of this man-made plastic fiber should be considered for pioneering activities because it is lightweight and its strength-to-size ratio is good. Size for size it is twice as strong as manila rope, but has a little higher stretch factor. Its strength makes it suitable for anchor strops and for any application involving heavy strain.

Polypropylene does stretch under a hard pull, but should not pose a problem if taken into consideration beforehand. A hard pull will result in kinking with some knots. Polypropylene resists mildew and will float, making it a good rope for waterfront activities and in wet conditions.

It is easy to splice in a twisted three-strand form. Because it is somewhat slippery, four tucks should be made instead of the usual three tucks. Cut ends should be both melted back and whipped with a good flax cord.

A disadvantage of polypropylene is that long exposure to sunlight has a weakening effect on the fibers. But, all things considered it is is worth including in your pioneering supplies.

Nylon. Nylon is commonly available in both braided nylon and twisted forms. Both forms come in a loose braid or twist and in a hard solid braid or twist. The loose braid or twist is not as strong and its fibers can easily get caught on bark, which can be bothersome. The hard twist or braid costs more, but is well worth its price.

Nylon rope is strong for its size, It is two an a half times stronger than the same size manila rope but loses some of its strength when wet. The three-strand twisted form of nylon can be spliced, but, as with polypropylene rope, it’s best to make four tucks instead of the usual three tucks and the cut ends should be both melted back and whipped to prevent raveling.

The most prevalent disadvantage of nylon rope is that it has a 20 percent stretch factor. But in cases where the stretch factor can be taken up with adjustment to the strain on the line, its strength can be an advantage. Nylon rope also has a tendency to slip when a hard pull is put on some knots. Because of these two factors, it is almost useless as a lashing rope.

All things considered, there is a place for both twisted and braided nylon rope in the solid, not loose, form.

Polyester. This man-made fiber rope is usually seen in the braided form. It handles well, is strong, and its stretch factor is less than nylon. It costs more than manila or nylon, but some sizes and lengths could be used in pioneering activities on a selected basis. A 6′ length of 1/4″-diameter polyester rope makes an excellent rope for practicing knot tying and pioneering games.

Polyethylene. This is the cheapest of man-made fiber ropes. It is most often seen in braided form and has a distinctive shine. Don’t let the low cost lure you into buying any quantity of polyethylene for pioneering or camp use. It is not suited for either knot tying or lashing because it holds kinks after being under a strain. (Since it floats it does have some very limited use at he waterfront for ski ropes or other waterfront activities).

Sisal. Sisal rope has much the same appearance as manila rope, but it is quite inferior in strength and does not handle well when used for lashing or knot tying. When sisal rope that is tied into a knot or lashing gets wet and then dries, it becomes useless because of the kinks that remain.

Even though it costs less. it is not cost effective because it breaks down quickly during use and when it gets wet. It might offer limited use in cases where expendable, but overall the cost is high when compared to other types of rope that can be used again and again.

Cotton. Cotton rope in both twisted and braided forms is outclassed in strength by other types and today there is little use for it in pioneering and camping.

Binder twine. Binder twine is made from loosely twisted jute fibers that are treated with oil during manufacturing. Its principle use today is for tying up bales of hay as the baling machine compresses the hay.

Binder twine is readily available in varying quantities at hardware and farm supply stores. Its low cost makes it a throwaway item after use. But don’t be too quick to toss it in the trash—a balled up handful of discarded twine makes a very good fire starter in camp.

Here are some uses for binder twine:

  • When pioneering projects or camp gadgets call for the use of saplings less than 2″ in diameter, binder twine can be used for lashing. (Do not use binder twine as a replacement for 1/4″ rope in general pioneering use or lashings.)
  • Use binder twine to make a simple strop lashing with six or eight wraps and a square knot.
  • Use binder twine to hold the cross spars of a light bridge walkway in place.
  • Two strands of binder twine quickly twisted together will equal a light cord. Use binder twine for the back stays of anchor stakes.
  • Use binder twine to outline the ax yard for safety.
  • Use binder twine for the construction of pioneering camp gadgets.

Get Pure Manila Rope and Don’t Be Fooled!

Rope-Toss-Log-Lift Challenge

Racing over to the log!

If the site where you hold your meetings can feature a “permanent” crossbar about 10 feet high, then your Scouts can frequently practice and enjoy this activity whenever the opportunity is presented. Otherwise, erecting the crossbar is itself a mini-pioneering challenge, and if you have the grounds, can be regularly put up by a patrol  prior to or during as many meetings as desired.

Also referred to as the Rope-Throw-Log-Lift Game and the Heaving Bar, this is an activity requiring a series of rope-handling and knot-tying skills. Because the skills that are called into play aren’t normally combined in such a sequence, and because there’s an element of fast-paced, fun competition, those Scouts knowing how to tie the featured knots most often get a kick out of giving it a go. The activity can be a competition to complete the task in the fastest time between individual Scouts or played with a team of three Scouts, each assigned a specific task.

Here’s how Adolph Peschke describes this activity in the 1993 edition of the Pioneering Merit Badge Pamphlet:

Long log! (Isn't that supposed to be a timber hitch?)
Long log! (Good Half Hitch, but is that a Timber Hitch?)

This game is intended to develop the knot tying skills of an individual Scout or of a team of three Scouts. It is important to know that the knots used (clove hitch, timber hitch, sheep shank) are each tied in a typical application for each knot. Additionally, you will develop the skills of coiling and throwing a rope.

To prepare for this challenge, you should practice tying the individual knots and coiling and throwing a rope. The challenge starts for a single Scout with the rope coiled ready to throw. The rope is thrown over the cross spar. If the throw misses the mark, the Scout recoils the rope and throws again. If the throw is good, he uses the end of the rope he is holding to tie a clove hitch on the stake next to where he’s standing.

Next he moves to the end of the rope that was thrown over the cross spar and uses it to tie a timber hitch  around a short length of log (about 4 inches in diameter and 4 feet long). Then he ties a half hitch around one end of the log (forming a Killick Hitch).

To complete the challenge, he moves to the part of the rope between the stake and the upright structure, and ties a sheep shank to shorten the rope enough to suspend the log above the ground.

This is how it should look!

When the challenge is played with a team of three Scouts, the first Scout throws the rope over the cross spar and ties the clove hitch on the stake. the second Scout moves to the log and ties the timber hitch with the additional half hitch. The third Scout ties a sheep shank to shorten the rope and hold the log off the ground. The challenge comes when the game is played while being timed with a stopwatch. As a patrol, the times of the individual Scouts can be added up for a total patrol score.

Three Scouts at once!

The following materials will be needed so that three Scouts or three teams of Scouts can play simultaneously:

  • three 50-foot x 1/4 or 3/8-inch throwing ropes
  • two 8 to 10-foot x 2 to 3-inch legs
  • one 10-foot x 2 to 3-inch crossbar
  • two 15-foot x 1/4-inch lashing ropes
  • seven stakes
  • three 4-foot x 4-inch logs
  • four 20-foot guylines

To set up the upright structure, lash the cross bar to the legs with tight square lashings. About 3/4 of the way up each crossbar, attach two guylines with a roundturn with two half hitches. Stand up the structure where it will be positioned, and hammer the stakes about 12 feet out from the legs at 45° angles. So that good tension can be applied to each leg, you can attach the guylines to the stakes with a simple rope tackle.

On the throwing side, space out three stakes between the legs and hammer them in to the ground about 25 feet from the structure. On the other side space out the three logs.

SCOUT MEETING CHALLENGES MAIN PAGE

Rope-Toss-Log-Lift Challenge at the Jamboree

Self-Standing Garbage Bag Holder

Simple Self Standing Trash Bag Holder

Self Standing Garbage Bag Holder

Getting that garbage bag off the ground has all kinds of advantages, but sometimes, you can’t hammer sticks into the ground to make the easy three stake holder. There might be any number of reasons. The ground’s got too many rocks. The ground is rock. You’re in a parking lot or on the sidewalk during a fundraiser. You’re indoors.

In these cases, to hold up a trash bag (when there is no trash can), you can simply lash three Scout Staves or similar poles into a tripod and lash on some short cross pieces to keep it stable. All that’s required is seven lashing ropes, one for a tripod lashing and six for square lashings. For the poles you need three 4 to 5-foot sticks for the tripod legs, and three short sticks for the tripod leg supports.

Note: The tripod lashing is tied below the middle of the longer sticks. The length that the sticks extend on top of the lashing will be determined by the size of the bag your holding. Also, to secure the bag on the holder, and too shorten or lengthen the amount the bag hangs, you can fold the top of the bag as much or as little as you like over the three upper leg extensions.


Single Lock Bridge

CLICK HERE FOR COLOR PHOTOS, COMMENTARY, AND SOME FURTHER GUIDELINES ON BUILDING A SINGLE LOCK BRIDGE.

Single Lock Bridge Photo Scanned from 1967 Field Book

Link to: Older Pamphlet InfoThe following text is by Adolph E. Peschke as presented in the 1998 printing of the 1993 edition of the Pioneering Merit Badge Pamphlet:

The single lock bridge shown here is a well-established and basic design. The list of spars shown for this project should build a bridge to span a creek or ravine approximately 4 feet deep and 18 feet from bank to bank.

Trestles. The bridge consists of two trestles and two walkways. Begin by building the two trestles as subassemblies. Adjust the length of the spars for the trestle so that when they are placed in the creek, as shown in Drawing 2, the tops of the ledgers will be about 1 foot above the level of the banks of the creek. This will give a comfortable slant to the walkways.

Drawing 1: Trestle Schematic

When constructing the two trestles, build only one trestle first. Then as the second trestle is being built, make sure that the legs are narrower at the top and fit between the legs of the first trestle (see Drawing 1).

Walkways. Next, the two walkways are constructed as subassemblies. Each walkway consists of two lateral spars. six cross spars, and two longer cross spars. One of these two longer cross spars is used as an underspar at the end of the walkway that is attached to the transom. The other longer cross spar is used to attach to the stakes. (Refer to Bridge Walkways.)

Interlocking Trestles
Drawing 2: Interlocking Trestles

Assembly. After building the trestles and walkways, take them to the assembly site (the creek or ravine). Place the trestles in the center of the creek so that the tops of the trestles are interlocked (see Drawing 2). Then lift a 3-inch diameter transom spar to fit on top of the interlocked trestle legs.  Now, heel in the bases of the legs in holes 4 to 6 inches deep. As you’re heeling in the legs, level the transom spar so that the walkways don’t slant when they’re added.

Next, the two walkways are put into position (see Drawing 3). Lash the underspars on the walkways to the transom spar with Strop Lashings at three points. Finally, the cross spars at the ends of the walkways are lashed to the stakes.

By lashing the walkways to the transom spar and lashing the ends of the walkways to the stakes, you make a complete walkway unit that will prevent movement and provide a sturdy bridge deck.

Drawing 3: Fully Assembled Single Lock Bridge

List of Materials for a Single Lock Bridge

  • four 3-inch x 6-foot trestle legs
  • four 2-1/2-inch  x 4-foot trestle ledgers
  • one 3-inch x 4-foot trestle transom
  • four 2-inch x 6-foot cross braces
  • four 3-inch x 10-foot walkway lateral spars
  • twelve 2-inch x 3-foot walkway cross spars
  • four 2-inch x 3-1/2-foot walkway cross spars
  • two 2-inch x 10-inch x 10-foot walkway planks
  • four stakes

CLICK HERE FOR COLOR PHOTOS, COMMENTARY, AND SOME FURTHER GUIDELINES ON BUILDING A SINGLE LOCK BRIDGE.

Single Trestle Bridge

SingleLockVertical
Summer Camp: Pioneering Merit Badge Class

CLICK HERE FOR COLOR PHOTOS AND COMMENTARY.

This simple crossing bridge uses only a single trestle and two walkways. The legs of the trestle are extended up above the walkway to provide a way to attach a handrail. The length of the spars listed for the walkways and trestle will be enough to build a bridge that will span a creek or ravine that’s up to 4 feet deep and 18 inches wide.

This project can be broken into three subassemblies: the trestle, the two walkways, and the four light spars for handrails.

Trestle. Begin by building the trestle. The legs for the trestle should be spars that are about 3 inches in  diameter and 8 to 10 feet long. When choosing these spars, take into account the depth of the creek you’re crossing.

The distance from the base of the legs to the top ledger (transom) on the trestle should be about 1 foot higher than the level of the banks of the creek. This will allow the walkways to slant up. Then allow an additional 4 feet in height on the legs from the top ledger up to the top of the legs for attaching the handrail.

The top ledger of the trestle should be about 3″ in diameter since it also acts as the transom and carries all the weight of the walkways and the person using it. The bottom ledger can be smaller: a 2 inch diameter spar will work here.

Drawing 1: Trestle Heeled in with one walkway positioned.

The trestle is assembled with Square Lashings to hold the ledgers and the ends of the cross braces to the legs. The center of the cross braces is lashed together with a Diagonal Lashing.

Walkways. The two walkways are assembled as separate sub assemblies. (Refer to Bridge Walkways.) Be sure to make the cross spar at the end of the walkway long enough to attach to both the stakes and the handrails without getting in the passageway.

Assembly. To assemble the bridge, set the trestle in the center of the creek. Heel in the bottoms of the trestle legs by setting them in holes approximately 4 to 6 inches deep (see Drawing 1). This will prevent the trestle from shifting, and is also a way to level the transom spar as the trestle is set in place so that the walkways are level.

Next, put the walkways in position from both sides and lash the walkways’ underspars to the transom (top ledger) of the trestle. Then drive stakes at the other end of the walkways. Lash the ends of the cross spars on the walkways to the stakes.

Handrails. Finally, handrails are provided to help those crossing the bridge and also add strength to the structure of the bridge. When the handrails are added, they form triangles with the walkway and the trestle leg. These triangles produce a strong structure that prevents the bridge from racking. Lash the handrails to the top of the trestle legs and to the stakes with simple Strop Lashings (see Drawing 2).

single_trestle_bridge
Drawing 2: view of assembled bridge with handrails.

List of Materials for a Single Trestle Bridge

  • 2    3-inch x 8 or 10-foot trestle legs
  • 1    3-inch x 4 -foot trestle top ledger (transom)
  • 1    2-inch x 4-foot trestle bottom ledger
  • 2    2-inch x 6-foot cross braces
  • 4    3-inch x 10-foot walkway lateral spars
  • 12  2-inch x 3-foot walkway cross spars
  • 4    2-inch x 3-1/2-foot walkway cross spars
  • 2    2-inch x 10″ x 10-foot walkway planks
  • 4    2-1/2-inch x 12-foot handrails
  • 4    stakes
Related articles

The Older Pioneering Merit Badge Pamphlet

Link to: Older Pamphlet Info
The Older Edition by Pioneering Legend, Adolph Peschke

Those of us who have experience providing a program of Scout Pioneering, and who are familiar with the edition of the Pioneering Merit Badge Pamphlet written by the legendary Adolph Peschke, will have no difficulty relating to why there are repeated references and allusions to the 1993, 1998 edition in this website, with its attention to detail, and  when it comes to providing explanations that are helpful and comprehensive.

In the interest of accuracy, the recent 2006 edition has undergone many necessary revisions.  There’s a website corresponding to the newest edition, and the post: What Pioneering Merit Badge SHOULD Be! is written from the author’s personal perspective.

In the interest of providing more and more Scouts with worthwhile pioneering experiences, and as an aid to those Scouters who are serious in making these experiences available to our youth, this website features specific text and drawings from Adolph Peschke’s  edition.

What follows are links to posts containing the text and many of the drawings from the 1993, 1998 pamphlet:

INTRODUCTION TO PIONEERING

SAFE PIONEERING

ROPE-TOSS-LOG-LIFT CHALLENGE

ROPE FOR PIONEERING AND CAMP USE

KNOT-TYING TERMINOLOGY

TIMBER HITCH

ROUNDTURN WITH TWO HALF HITCHES

ROLLING HITCH

BUTTERFLY KNOT

CARRICK BEND

CONSTRICTOR KNOT

WATER KNOT

PIPE HITCH

PRUSIK

SPLICING ROPE

WHIPPING

ANCHORING PIONEERING PROJECTS

ROPE TACKLE

LASHING

JAPANESE MARK II SQUARE LASHING

MAKING A TRESTLE

BRIDGE WALKWAYS

PIONEERING PROJECTS

SINGLE TRESTLE BRIDGE

SINGLE LOCK BRIDGE

SINGLE A-FRAME BRIDGE

14′ DOUBLE LADDER SIGNAL TOWER

DOUBLE A-FRAME MONKEY BRIDGE

PIONEERING KIT

Note: This website’s purpose is to share the joys and benefits of Pioneering and is not intended to serve as a direct aid in earning the Pioneering Merit Badge. But, for those interested, here is a link to the current requirements for the badge.


Pioneering Projects

Author: Adolph PeschkeThe following text is by Adolph E. Peschke as presented in the 1998 printing of the 1993 edition of the Pioneering Merit Badge Pamphlet:

PIONEERING PROJECTS

The craft of building with ropes and spars continues in remote areas throughout the world today. Scouts can apply the skills of knot tying and lashing to build pioneering structures that are needed to make living in camp a little more comfortable. Whether you build a simple gadget, or a bridge to provide a shortcut to the swimming pool, pioneering can be rewarding and fun.

The pioneering projects shown here, along with the suggested sizes and lengths of spars, are intended for building “boy-size” structures; that is, projects that can be built by boys of Boy Scout age.

You don’t have to build a huge tower to learn the skills and enjoy the fun of pioneering. These projects are designed so that you can build them in a few hours with a minimum of equipment and supplies. Yet, you will still learn how the basic pioneering skills of knot tying and lashing must work together with the design of a structure to produce a sound, safe pioneering project.

Building these projects will be much easier if you put together a pioneering kit first. The success of any project is directly related to the planning and preparation you put into the project from the beginning.

Here are some things to take into consideration before you build a pioneering project:

  • Decide on the type of project you want to build. Take into consideration the equipment, the number of people needed, and the time required to build it.
  • Check the site where the project is going to be built. Collect all the information that you will need when building the project. For example, are there any natural anchors for guylines? How wide and deep is the creek where a bridge is to be built?
  • Make a rough sketch of the project or work from an approved plan drawing. Along with the sketch, have a list of equipment that includes all the equipment you’ll need. You don’t want to start a project and later learn you need something you don’t have.
  • Select the necessary spars you’ll need for the project, making sure that you have enough spars with the proper butt diameter and length to build a safe project.
  • Determine the size and lengths of all the ropes needed for lashings, guylines, etc.
  • Before you start building, determine if the project can be divided into subassemblies for ease of lashing and erecting. Assign crew members and a crew leader to each of the sub assemblies, based on skill level and experience.
  • Go over the plans with all the crew members. Assign only one person to give signals when raising all or part of the structure.
  • As you’re building the project, frequently check the progress to make sure it is being done with safety in mind.

A word about the appearance of the project: Part of the skill in building with ropes and spars is to select the spars that are best suited to the structure. In some situations, the supply of spars might be limited.

It is not necessary for your project to be picture perfect, but rather that it is structurally sound. If one or two spars are a bit longer than required, that’s fine as long as the lashings are in the proper location for strength and the diameter of the spars will carry the load applied.

Try to avoid cutting off the ends of spars and ropes just to fit a certain project, especially if you’re working with spars from a pioneering kit. The next crew might want to build a different project and could use the spars and ropes at the original lengths.

The spars used for a pioneering project should have the bark removed for two reasons. Bark beetles and other boring insects can seriously decrease a spar’s strength, and inspection is easier with the bark removed. Also, if the project racks, the bark under the lashing can be loosened, which in turn makes the lashing loose and adds to the possibility of making the whole project wobbly and unsafe. (And, bark under a lashing can be rubbed off in the process of setting up a project.)

Note: Any pioneering structure that is to be a permanent camp improvement should not be left with only lashings. It needs to be bolted together for safety and maintenance.

Pioneering Legend: Adolph Peschke

Soon after the 1993 edition of the Pioneering Merit Badge Pamphlet was published, I ventured to contact its author with some questions. Happily, I was able to reach him at his home, and was treated to enthusiastic explanations regarding the projects our troop wanted to build. Mr. Peschke was always very generous with his time and had so much information to share, it always felt I was being given dollar answers for my little 10¢ questions.

Pioneering Legend, Adolph Peschke

The following text has been extracted from the Acknowledgments page of the Pioneering Merit Badge Pamphlet he authored: “Mr. Peschke has more than sixty years’ tenure in the St. Louis Area Council, and is a Wood Badge course director for more than 20 course staff experiences. He has designed thirty original “boy-size” pioneering projects. As a design engineer for five national Scout jamborees, he was responsible for the theme development, site layout, and staff training for the Action Center’s pioneering areas. He also developed the pioneering kit with its color-coded system to identify rope and spar lengths for building pioneering projects, and he has contributed to the BSA Fieldbook, Program Helps, and Boys’ Life and Scouting Magazines.”

Adolph Peschke, a most worthy recipient of the Boy Scouts of America’s Silver Antelope Award, passed away on November 23, 2012. He was 98. I had just spoken with him about two weeks before, during which time he was, as always, enthusiastic and emphatically informative. He will be missed, but his legacy will live on. Thank you Adolph! You have served, and continue to serve, as a most-helpful resource of valuable insight and information.

Adolph Peschke’s Pioneering Guidelines

Adolph Peschke’s Introduction to Pioneering

Pioneering With Laminated Spars by Adolph E. Peschke: How to Build a Pioneering Starter Kit with Laminated Spars for a Scout Troop to Build “Boy-Sized” Projects.

Adolph Peschke in Wikipedia

Double A-Frame Monkey Bridge

—> EXPLANATIONS, DETAILED INSTRUCTIONS, AND ILLUSTRATIONS!

—> EXPLANATIONS, DETAILED INSTRUCTIONS, AND ILLUSTRATIONS!

On November 14, at the Chicora District Webeloree, (gathering of 4th and 5th Grade Webelos Scouts), a crew from Troop 888 put up the troop’s eighth Double A-Frame Monkey Bridge. The event was geared mainly towards those Scouts who hadn’t yet had a hands-on experience assembling a bridge. Scouts gathered at 8:30, and the bridge was ready for a test walk by 10:00 a.m. Lending a hand were: Ian Baker, Dominick Bezmen, Geoff Britzke, Will Hall, Jason Hardee, Daniel Mesich, Sam Snodgrass, and Greg Spatholt. The following steps went into building the bridge: Scouts lash together two 8ʼ spars and one 6ʼ spar to form four A-Frames, Two A-Frames are joined together to form each side of the bridge. The Double A-Frames are held up in the proper positions and at the right distance. Two Hand Ropes and one Foot Rope are tied on and anchored at either end. Spanner Ropes are added to the Hand Ropes and Foot Ropes. The Monkey Bridge is tested and adjustments are made as necessary. Scouts supervise Webelos interested in crossing the bridge. The bridge was able to support a 270 pound adult! Lashing and knot-tying savvy are important in any large pioneering project, but teamwork is the key. A 14’ Double Ladder Tower is scheduled for Feb.

—> EXPLANATIONS, DETAILED INSTRUCTIONS, AND ILLUSTRATIONS!

FOur and a half years ago we studied the plans for a Double A-frame Monkey Bridge in the Pioneering Merit Badge Pamphlet. Four and a half years later, we're still using the same pine spars cut from behind the house and putting up bridges on selected camping trips and Scouting events. The lashings and methods we learned are constantly being passed on to new Scouts. The techniques are the same but with some slight improvements. Like a sheer lashing is tied to the tops of the A-frames instead of a square lashing. And after this last bridge, we're now frapping the strop lashings on the bottom when lashing the two A-frames together. This makes them real tight. After four and a half years, the bridges are still as much fun as ever, and with moe advanced teamwork and sharper skills, they're going up a whole lot faster too. Our SPL goes through the ticky process of lashing two A-frames together where the 8 foot spars cross. The A-frames are steadied as the hand rope is attached with a clove hitch on each side. The bridge is tested before the final tightening of the hand and foot ropes. The bridge went up in about an hour and took ten minutes to take down.

—> EXPLANATIONS, DETAILED INSTRUCTIONS, AND ILLUSTRATIONS!

Double A-frame monkey bridge (Our first Built with Laminated Spars) Square Lashing an A-frame corner, joining together the bottoms of two A-frames with round lashings, adjusting the clove hitch on a spanner rope as Scouts wait their turn to cross the bridge, crossing the fully assembled monkey bridge on a camping trip.

—> EXPLANATIONS, DETAILED INSTRUCTIONS, AND ILLUSTRATIONS!

Double Tripod Chippewa Kitchen


—> CLICK HERE FOR INSTRUCTIONS, FURTHER INFORMATION AND ILLUSTRATIONS!

After assembling the tripods and lashing on the braces, Scouts lash on the cooking platform on a Double Tripod Chippewa Kitchen

Scouts cut a couple of burlap bags before adding a layer of mineral soil to make the cooking surface.

—> CLICK HERE FOR INSTRUCTIONS, FURTHER INFORMATION AND ILLUSTRATIONS!

 Lit charcoal chimneys are placed on the cooking surface and monitored.

Pouring out the Charcoal. When the coals are ready, they're spread over the cooking surface of the Chippewa Kitchen.

—> CLICK HERE FOR INSTRUCTIONS, FURTHER INFORMATION AND ILLUSTRATIONS!

Foil food packets are cooked over the coals on a Chippewa Kitchen

14′ Double Ladder Signal Tower

This signal tower went up on a camping trip in March of 2000 in a large grassy field. The operation took a little over two hours. PHASE 1: Before we started, a well-muscled sledge hammer crew, made up of Jason Hardee, Theodore Fontana, Cory Keibler, Kurt Lester, and Will Hall, took turns pounding in 24 three-foot pioneering stakes to make up the four “1-1-1” anchors needed to tie the tower down. PHASE 2: A crew assembled the 2 fourteen foot ladders. (All Scout campers tied at least one of the fifty square lashings required to put together the completed project.) PHASE 3: Another crew held the ladders in position while they were lashed together. Thanks to Jason for his diagonal lashings, and Theodore and Hiram for their help in lashing down the floor spars making up the platform. PHASE 4: The tower is hoisted with Scouts manning each corner guyline and the rope used to make sure the tower isn’t pulled too far before it’s secured. Thanks to Michael O’Neil who was in charge of tightening the guylines using the rope tackles at each of the anchors
This signal tower went up on a camping trip in March of 2000 in a large grassy field. The operation took a little over two hours. PHASE 1: Before we started, a well-muscled sledge hammer crew, made up of Jason Hardee, Theodore Fontana, Cory Keibler, Kurt Lester, and Will Hall, took turns pounding in 24 three-foot pioneering stakes to make up the four “3-2-1” anchors we thought we needed to tie the tower down. (For years, we overlooked the fact all we really needed were 1-1 anchors.) PHASE 2: A crew assembled the 2 fourteen foot ladders. (All Scout campers tied at least one of the fifty Square Lashings required to put together the completed project.) PHASE 3: Another crew held the ladders in position while they were lashed together. Thanks to Jason for his Diagonal Lashings, and Theodore and Hiram for their help in lashing down the floor spars making up the platform. PHASE 4: The tower is hoisted with Scouts manning each corner guyline and the rope used to make sure the tower isn’t pulled too far before it’s secured. Thanks to Michael O’Neil who was in charge of tightening the guylines using the rope tackles at each of the anchors

The National Camp Accreditation Program (NCAP)   Program Specific Standard PS-212 states: “Scout camp structures such as monkey bridges, obstacle courses, and pioneering towers are expected to meet safety standards in equipment and supervision comparable to COPE but are not subject to COPE standards, do not require COPE inspection, and do not require an on-site COPE Level II instructor.
“VERIFICATION: If a project has participants elevated more than 6 feet above the ground, evidence of council enterprise risk management approval. This approval may be part of the general program design review in Standard PD-112.” 

—> RECENT TOWER CONSTRUCTION <—

14′ Boy Scout Tower Gateway (Four Flag Tower)

Jamboree Pioneering Area: Towers

The following text is by Adolph E. Peschke as presented in the 1998 printing of the 1993 edition of the Pioneering Merit Badge Pamphlet:

This project solves the old problem of wanting to build a signal tower when there aren’t enough big spars to do the job. The double ladder tower requires four 14-foot spars and several smaller spars, but not nearly the amount needed for a four-leg signal tower. It also cuts down the number of lashings required.

This tower is not free standing. It requires the use of guylines to hold it steady. Review the sections on anchors and rope tackle if this is your first encounter with guylines.

Assemble the ladders. This project begins with building two ladders: a climbing ladder and a supporting ladder. Lay out two pairs of spars on the ground for the legs of the ladders. Be sure the butt ends are even at the bottom so that the tower will stand up straight. Before you begin any lashing, mark the positions where the spars that will hold the top platform are to be lashed onto the legs. This is about 4 feet from the top ends of the legs.

To make the climbing ladder, lash ten rungs on one pair of legs at about 1-foot intervals. The top rung should be lashed on where you marked the position of the platform, 4 feet from the top. Also the top handrail is lashed on to complete the climbing ladder.

To make the supporting ladder, lash three spars on the other set of legs to serve as the bottom, center, and top spreaders. The top spreader should be lashed at the point you marked for the platform, 4 feet from the top. Then lash on the top handrail, as on the climbing ladder.

Lash the ladders together. Now you have to join the two ladders to form the tower. Turn the two ladders up on their sides so they’re parallel to each other and approximately 6 feet apart. Check to see that the bottoms are even. Now lash on the base spreader to join the bottoms of the two ladders.

Lash on the platform supporting spar just above the top rung and top spreader on the ladders. Before proceeding, check the measurements from the bottoms of the legs to the platform supporting spar to make sure they’re equal on both legs so that the platform will be level.

Continue by lashing on the top long handrail. The lash on the two side X-braces diagonally between the legs using square lashings to lash the ends to the legs, and a diagonal lashing where they cross.

Figure 137
Figure 137

Lash the other side. To make the lashings on the other side, you have to get the whole crew together to roll the tower over 180° so that it’s laying on the X braces and the other sides of the ladders are up where they will be easier to get to.

Then proceed as before. Lash on the base spreader spar and the platform supporting spar. Again, measure to make sure there’s equal distance from both ends of the platform support spar to the bottoms of both legs. Continue to lash on the top long handrail and finish with the X-braces.

Lash on two more platform X-braces under the platform. These braces go diagonally across the legs just under the platform to help the tower resist racking (see figure 137). Use square lashings to lash them to the legs and a diagonal lashing where they cross.

14' Double Ladder Signal Tower Schematic
14′ Double Ladder Signal Tower Schematic

Before standing the tower upright, lash on the spars to form the platform floor.

Anchors and Guylines. When all the lashings are done, move the tower to where it will be hoisted. Before actually hoisting the tower, lay out the position of the four legs on the ground.  Then determine where the four anchors for the guylines will be placed to steady the legs of the tower. (Refer to the Anchors section to determine the position of the anchors.)

If the tower is positioned to make use of a natural anchor (such as a tree), prepare anchor strops to attach the guylines. For any guylines that won’t be using natural anchors, build anchors using pioneering stakes. At a minimum, you’ll need to build well constructed 1-1 anchors at all four corners.

Attach the four guylines to the legs just above the platform. The guylines should be 3/8-inch diameter manila or polypropylene rope. They’re attached to the legs of the tower using a roundturn with two half hitches and securing the running end of the rope.

Note: For safety reasons, never use a taut-line hitch on guylines, or for that matter, in any pioneering work. This hitch is used when adjustments in the tension are called for. It can slip.

During the Carwash Fundraiser in May of 1997, we raised our third 14 foot Double Ladder Signal Tower. After the tower is lashed together, requiring 50 square lashings, before it can be hoisted, it has to be carried and positioned in the exact location. Once in position, the crew divides into :lifters
Hoisting the 14′ Double Ladder Signal Tower

Hoisting the tower. Hoisting the tower up into a vertical position is done with separate ropes. Do not use the guylines. Tie two lines on the side of the tower being lifted and one line on the opposite side to prevent over pulling and toppling the tower.

You’ll need a whole crew to do the hoisting. First there should be a safety officer who observes for all safety considerations and signs of trouble during the hoisting. There should also be a signal caller who tells the crew members when and how fast to pull on the hoisting ropes and when to stop pulling. Two or more Scouts should be on each of the two ropes. And one or two Scouts should be on the rope on the other side to prevent over pulling the tower.

When everyone is in position, the signal caller should direct the Scouts on the hoisting ropes to hoist the tower into position. As soon as it’s up, temporarily tie the guylines to the anchors using a roundturn with two half hitches.

Heeling in the legs. When the tower is upright, heel in the butt ends of the tower legs in holes about 4 to 6 inches deep. This is done to steady the tower and can also help in leveling the tower to make sure that the platform is level and the tower itself is vertical.

Four 1-1 Anchors
Four 1-1 Anchors

Tighten the guylines. To hold the tower steady, gradually apply strain to each of the four guylines at the same time. One of the easiest ways to adjust the strain is to tie a rope tackle on the anchor ends of the guylines.

As soon as the tower is in position and the legs are heeled in, go to each of the anchors and untie the roundturns with two half hitches and replace it with a rope tackle.

Do this by tying a butterfly knot in each guyline about 6 to 8 feet from the anchor. Then wrap the running end of the guyline around the forward stake of the anchor and back through the loop in the butterfly knot. When rope tackles are tied to all four anchors, gradually tighten the lines. Apply enough strain to each of the guylines to hold the tower firm and in a vertical position. Then tie off the rope tackles and secure the running ends with half hitches.

Test the structure. Before the tower can be put into general use, make a test climb while the safety officer and the whole crew observe all the lashings and anchors to ensure they are all secure.

Note: Some people are not comfortable climbing up to a high place. They should not be encouraged to climb if they are not sure of themselves. Do not pressure anyone to climb the tower if they don’t want to.

1997 EXPO TOWER
1997 SCOUT EXPO TOWER

MATERIALS:

  • four 4-inch x 14-foot tower legs
  • ten 2-inch x 3-foot climbing ladder rungs
  • three 2-inch x 3-foot support ladder spreaders
  • two 2-1/2-inch x 6-foot base spreaders
  • two 2-1/2-inch x 6-foot platform supporting spars
  • two 2-inch x 3-foot platform handrails
  • two 2-inch x 6-foot platform long handrails
  • four 2-1/2-inch x 10-foot X braces
  • two 2-1/2-inch x 8-foot X braces
  • eighteen 2-inch x 3-1/2-foot platform support slats
  • eight pioneering stakes
  • binder twine
  • four 3/8-inch x 50-foot manila guylines
  • thirty-one 1/4-inch x 15-foot manila lashing ropes (for 28 square Lashings and 3 diagonal lashings)
  • twenty-two  1/4-inch x 20-foot manila lashing ropes (for 22 square lashings)

In accordance with current regulations, a fine adaptation consists of replacing the ladder rungs with support side spreaders, and dispensing with the platform floor slats. Lashing one or more long flag poles to the top of the legs and flying banners or flags never fails to elicit a rousing array of cheers, as the Scouts hoist their tower into an upright position!  Click here for project description and materials.